Kevin

Kevin has been involved in the custom automotive scene since he bought his first mini-truck in high school and began modifying it. He also has interest in sustainability, DIY projects, and various forms of fabrication. Seeing improved technology of batteries, he has made a concentrated effort over the last few years to transition away from fossil fuels. From lawn care to automotive.

Ryobi Electric Zero Turn Mower – The Review Home Depot and Ryobi Don’t Want You to See

ryobi zero turn mower review

This is an update on my initial review of the Ryobi Zero Turn mower after less than one year of use and subsequent return. Both potential buyers and current owners should be aware of what may very well be imminent battery failure and actions they may need to take. I was genuinely excited when I took ownership of this mower, but less than a year later that quickly faded. Substantial battery degradation has happened to many other owners as well. I tried leaving reviews on both Ryobi and Home Depot’s websites, but they moderate them and chose not to publish mine, so here goes. During this process, I came to realize how terrible Ryobi customer service is. I’ll document these experiences and having to reach to both the Attorney General’s office and Better Business Bureau. Read on… The Battery The battery is the root of the problem. After only 3 months of ownership I already noticed I wasn’t able to mow our 1.86 acres on a single charge. Everything I’ve later researched on lead acid batteries shows that they are not designed to handle anywhere near as many “cycles” as Lithium-ion batteries. The lead acid battery used on this mower seems to be its achilles heal. Approximately 10 months into ownership, I was now charging 3-4 times just to mow our entire property. Knowing the 1-year warranty on the battery was coming up, I called Ryobi. They told me to take it to an authorized repair center that was about 45 minutes away. I called the repair center, and verified when I could drop it off. Dropping the Mower Off at the Ryobi Authorized Repair Center Upon dropping off the mower in May, I was informed it would take 3-4 weeks before they could even look at it. While certainly inconvenient, I realize this is likely peak season for them. In about a 3 weeks, I received a call from the service center who confirmed one of the four battery cores was bad. Worse yet, I was informed the batteries were backordered and weren’t expected for 8 weeks. Battery Backorder I called the service center after 8 weeks had passed for an update (July 2021). This update was not good. I was now told the batteries would not be available until October 22nd. This would now be over 5 months without the mower. That doesn’t include time for the vendor to ship the batteries, arrive at the service center. The service center would also need time to install the batteries. Home Depot and Extended Warranty Customer Service After hearing they didn’t expect batteries until October, I reached out to Home Depot (both a local store and their toll free number. Their customer service is pretty much useless if you haven’t experienced it yourself. They have a 90-day window on mowers so I knew I was outside of that. They advised I reach out to Asurion, who was their previous extended warranty company. I believe they now use All State. Asurion said they could not doing anything since it was still under the factory warranty and advised I reach out to Home Depot. The customer service bounce around was beginning. I’ll leave it at this, but this continued with Ryobi customer support also giving me a runaround and saying there was nothing else they could do. Consumer Warranty Protection Act Realizing I was getting no where with the Ryobi / Home Depot / Asurion 3-ring circus, I started researching other alternatives. For anyone else experiencing similar situations with warranty work not being completed in a timely manner, research the Consumer Warranty Protection Act. When the manufacturer doesn’t meet the Consumer Warrant Act, your next step is likely the Attorney General… Filing a Complaint Against Ryobi with the Attorney General This is what finally got me past some of the unknowledgeable customer service reps that kept giving me the run-around to contact one of the other companies. Ryobi seemingly trains their phone reps to say “I don’t know” or “you should try calling Home Depot” and “there’s nothing else I can do”. Reaching out to the Attorney General’s office (if in the United States, search the Attorney General for your specific state) and you should be able to fill out an inquiry online. At least, that’s what I did for Washington state. After filing a complaint with the Attorney General, I started getting calls from not only Ryobi, but also Asurion and Home Depot. The person from Home Depot who contacted me was part of their Executive Escalations Team. The initial conversations started out well, but then I started receiving several bits of contradiction. She would say one thing, then a week or two later I was told something completely different. The level of customer service was frustrating. It got to the point where I had to only use email to make sure I had everything in writing to send back over to show her “no, this is not what you said last time”. By filing a complaint with the Attorney General’s office the company(s) are given so many days to respond. This likely varies state to state. Home Depot Buy Back After several weeks and months, Home Depot agreed to buy the mower back. They had offered to replace the mower, but there was no way I wanted to deal with anything Ryobi again. During several weeks of conversations, the Home Depot rep tried placing the long delay on the service center. They can’t replace the batteries if Ryobi says they’re backordered and doesn’t send them any. The Executive Escalations rep at first tried telling me I could use my extended warranty from Asurion to have them transport the mower back to Home Depot. If I did this, I would not be eligible for a refund. The closest Home Depot to the authorized service center was only 1.5 miles away. Essentially having to pay $300 (voiding my warranty refund) sounded absolutely absurd. I also had to get my trailer from

Ryobi Electric Zero Turn Mower – The Review Home Depot and Ryobi Don’t Want You to See Read More »

Tesla Lug Nut Removal – Caution, Most Have Caps!

tesla lug nut cap cover removal

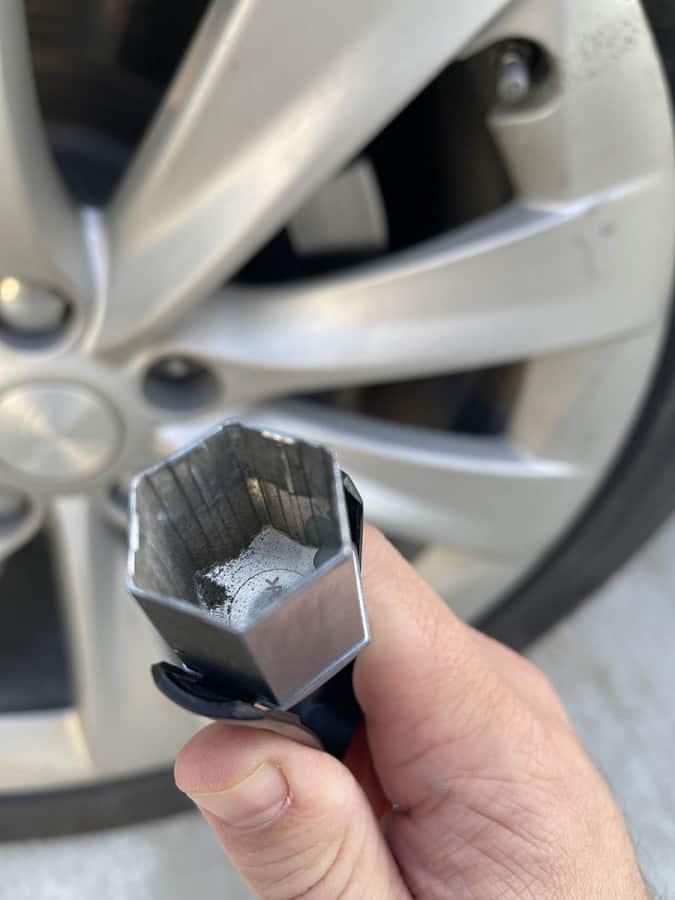
If you ever plan to swap out the wheels on your Tesla, you’ll want to invest in this inexpensive tool. This could be to remove a wheel with a flat tire or swapping in or out from a set of winter tires. Tesla models that do not have an aero wheel cover (such as certain wheel options on the Model 3 and Model Y) will have these plastic lug nut covers. If you try using a tire iron or socket on them, they will quickly break. I learned this the hard way. They have a very thin walled designed and are not designed to have any torque applied to them whatsoever. To remove these plastic wheel covers, a lug nut cap cover removal tool set will make things much easier. It’s a essentially a plastic pair of tongs. There’s a raised section that will grip onto the lug nut cap covers. This allows you to easily get a grip on the lug nut covers and pull them off. Read on as we provide more information and tips on remove the lug nut covers from your Tesla, as well as options if you get a flat tire. Lug Nut Cap Cover Removal Tool I’ve read other articles where you can try and use a pair of flathead screwdrivers, but this can cause scratching. The first time we got a flat tire, I tried calling Tesla Roadside assistance, only to be informed that I was too far from their service center for them to provide service How To Remove Tesla Lug Nut Cap Covers Step 1: Grab your lug nut cap cover removal tool. Step 2: Insert the removal tool over the lug nut. Step 3: Press inward on the removal tool to apply pressure, ensuring they have gripped onto the cap covers. Step 4: Simply pull outward to remove the cap cover. What If You Get a Flat Tire on Your Tesla? Since Tesla’s and most other electric vehicles don’t have spare tires, you’ll find yourself with fewer options for getting back on the road. Several tire shops likely won’t have replacement tires in stock either. We’ll explore some of those now. Tesla Roadside Assistance While Tesla Roadside Assistance is free, it’s typically for a certain amount of time. Per their website: Tesla Roadside Assistance is a complimentary service offered under a Tesla warranty or some Extended Service Agreements. Please refer to the terms and conditions in your warranty document or service agreement to determine whether you are eligible for roadside assistance. https://www.tesla.com/sites/default/files/downloads/roadside-assistance-policy-en.pdf Tesla Roadside Assistance is available 365 days a year, 24 hours a day, 7 days a week, however, you may find yourself having to wait a long period of time before someone is able to get to your location. Tow Truck Service In some cases you may find that you need to have your Tesla towed. Tesla strongly recommends that only flatbed trucks are used. If you find yourself having to call a towing service, make sure to specifically request for a flatbed. Also worth noting, you need to make sure to put your Tesla into tow mode in order for a tow truck to transport it. My neighbor works for the state highway patrol, and recently had a tow truck driver come out to tow a Tesla, only to have to leave because the owner was not there to put it into tow mode. We’ll add a new article on having a Tesla towed soon. Summary I’m not sure why certain manufacturers including Tesla opt for lug nut caps. Seems just having an enclosed lug nut would get the job done. However, since most Tesla wheels do have lug nut covers, having one of these tools in your glovebox at all times can certainly come in handy.

Tesla Lug Nut Removal – Caution, Most Have Caps! Read More »

How to Clean Tesla Seats

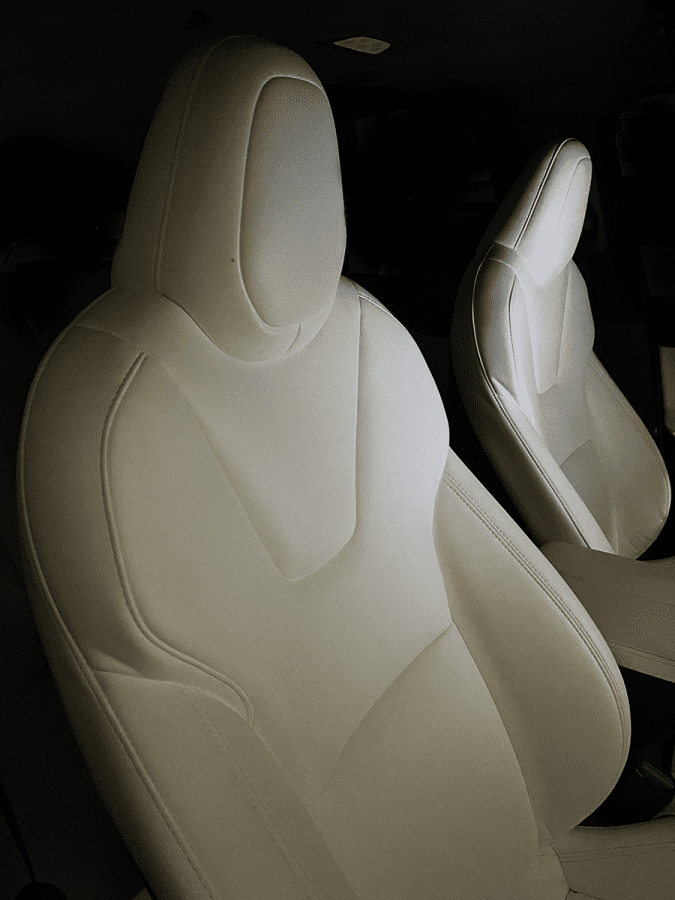
Premium seating materials now come standard across all the Tesla lineup models. Tesla seating surfaces are designed to repel stains, however, Tesla does recommend regular cleaning to maintain an as-new appearance. It’s essential to keep them clean and protected from the elements to keep them at their best. Learning how to clean your Tesla seats properly will go a long way in ensuring that you do not have to replace these costly materials prematurely. You should wipe any spills and chemical residues from interior surfaces of your Tesla as soon as possible. Use a soft cloth that’s been dampened with warm water and a non-detergent soap. Tesla recommends wiping in a circular motion, then wiping dry with a soft, lint-free cloth. Micro-fiber towels are a great choice. In the article below, you will learn about the best methods for cleaning Tesla car seats, including ways that you can protect your seats from common sources of dirt or damage like spills, pets, and UV light from sun exposure. Precautions Regarding Your Tesla Seats Tesla warns that aftermarket seat covers may inhibit the occupancy sensor’s sensitivity sensor. They may also cause staining or other damage, so be cautious of what seat covers you purchase, if you plan to do so. Tesla Active Road Reduction I believe this is in 2021+ Model X and S only, but they are also equipped with microphones in the front seats for active road noise reduction. These must not be exposed to liquids. Make sure when cleaning in these areas that you do not over-saturate the area of the seats where these microphones are located. Note the blue highlighted areas below for where these microphones are located. Blue Jean Stains on your Tesla Seats and Other Common Stains This is common on the white interior seats. Tesla recommends promptly treating dye transfer from clothing. It also mentions again to avoid harsh chemicals including certain cosmetics. I’ve heard sun tan lotion can also cause staining. How to Clean Vegan Leather Tesla Seats In 2019, Tesla made the announcement that moving forward, the seats in the Model 3 would be made of 100% polyurethane; this is a vegan-friendly alternative to genuine leather and, as such, requires special care during the cleaning process. Improper cleaning practices, including the use of harsh chemicals, can significantly impact the material’s life expectancy. The seat’s color can fade to the extent that you may need to either replace the seats entirely or live with the effects. Tesla’s vegan leather seats require careful cleaning practices that differ from what you would do if you were simply cleaning a basic cloth seat, which is covered below.  Vacuum the Car and Seats Before doing anything else, you will need to vacuum the seats. Otherwise, debris lodged within the seat’s fabrics will be smeared against the surface and only further grounded into the car seat. Be sure to vacuum any loose debris first. You can certainly use a household vacuum, but this can be hard to maneuver. More suitable alternatives include: Shop Vacuums: A good shop vacuum, like the one found here on Amazon, will have a lot more suction power than most household vacuums.  Local Car Washes: You can always drive to a local car wash, where there are usually powerful vacuums available.  Handheld Vacuums: These are quite useful for getting into places that are difficult to reach with larger vacuums, like the space underneath the car seat or the space between the seat and the center console. Removing Pet Hair from Seats Pet hair can be challenging to remove, as it sure does tend to stick around. Fortunately, there are many methods for removing pet hair from your Tesla’s seats that won’t harm their vegan leather quality. You may notice some persistent strands of hair, even after you have vacuumed the entire car out. You can pick the remaining strands up by using a sticky pet hair remover. These come in handy for removing pet hair from articles of clothing as well. Use Warm Water for Routine Cleaning Avoid harsh chemicals as much as possible. These will only further degrade the fabric, making matters worse. For routine cleaning, you are encouraged to use only warm water. Follow these steps for routine seat cleaning: Wet a microfiber cloth with warm water. Gently wipe across the surface of the fabric using the wet microfiber cloth. Use another, dry cloth to wipe the surface dry.  Use a Mild Soap or Detergent for Deep Cleaning If the need arises for you to use something more potent than just water to remove tougher stains, you should start by trying a mild detergent and water solution; this should help refresh the car’s inside without potentially degrading the material the seats are made of. First, you’ll need to make or choose your desired mild detergent solution:  Natural Solution: Mix 2 parts vinegar to 1 part water in a clean spray bottle.  Laundry Detergent: These products are already formulated to handle potentially sensitive materials like artificial leather. Dilute the detergent with warm water, approximately one teaspoon to every 16 ounces of water. Add the mixture to a spray bottle. All-Purpose Cleaners: Opt for Biokleen Spray, which is marketed as an eco-friendly alternative to traditional cleaners. Note: You should also have a second spray bottle with clean, warm water present for rinsing purposes.  Then, follow these steps to clean your seats: Test out your cleaning solution by applying it to a small area of the seat that is not visible. If it doesn’t appear to stain the material, you can proceed by applying the cleaner to small sections one-by-one until all the seats are cleaned. Use a microfiber cloth to rub the solution into the seats.  Don’t leave the cleaning solutions to air dry; this can cause the surface of the seats to become stained with soap marks. After you have cleaned a section, immediately rinse it off with warm water. Wipe the seat dry with another clean cloth.  Note: Always use separate cloths

How to Clean Tesla Seats Read More »

Tesla Custom Light Show

tesla custom light show

With Tesla’s 2021 “Holiday Update” that began rolling out around Christmas Eve, they added a new light show to the Toybox, but also the ability to create your own custom light shows! This is available on the Tesla Model 3 and Model Y, as well as the refreshed 2021 Model S and Model X. The new update included a new light show (new soundtrack and sequence compared to what was available on the first gen Model X. With this latest update, you can use your own soundtrack and light sequence! We’ve compiled a couple great resources for how to design your own custom Tesla light show or where to download files that others have already created. Read on to learn more! How to Create Your Own Custom Tesla Light Show Once again, it appears this will only work for Tesla Model 3’s and Y’s as well as the refreshed 2021 Model S’s and and X’s. The open-sourced software you’ll need to use is called xLights. Audio File and Command Lines You’ll need either an .mp3 or .wav file for the audio, however WAV is recommended. Light shows are also currently limited to 5 minutes of run and the number of command lines you can use in xLights is also limited. Step by Step Instructions This site here is a great resouce, Tesla Light Show page on GitHUB by the user JVB-Tesla has all the information you should need. How to Download and Setup an Already Made Custom Light Show TeslaLightShare.io is a great resource for custom Tesla Light Show’s. This site has a collection of files created by various individuals who have uploaded their creations to share. Projected Tesla Logo From New Matrix Headlights It appears that Model 3’s and Y’s produced possibly in November 2021 and later received updated matrix headlights. What are matrix headlights you might ask? They are comprised of a cluster of LED’s. These cluster allow for “adaptive lighting” in various situations such as on turns. It’s expected that Tesla will incorporate adaptive lighting for these headlights in an upcoming software update. This video posted on Twitter was one of the first to show the new Model 3/Y matrix headlights: pic.twitter.com/vbyxp5jf1R — Paul Kelly ?? (@shortword) October 9, 2021

Tesla Custom Light Show Read More »

DeWalt DW735X Portable Planer and Stand – Assembly and Review

dewalt dw735x planer and stand

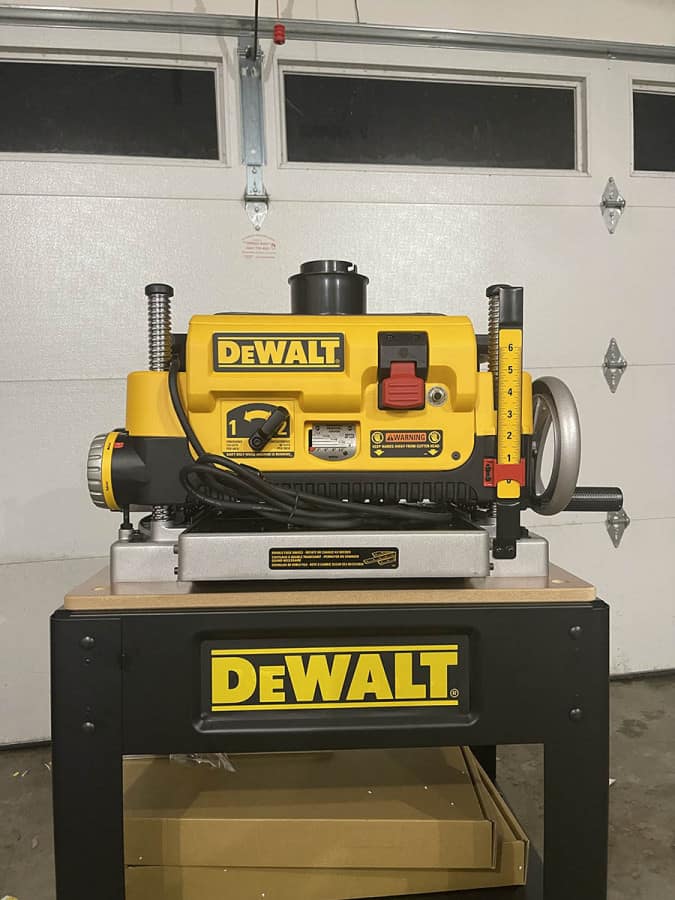
The DeWalt DW735X Planer is one of the top portable planers currently on the market. I recently purchased the DW735X with DW7350 stand as a combo deal. What’s the Difference Between the DeWalt DW735 and the DW735X? The only difference betweeen the DeWalt DW735 and DW735X is extra components that are included with the DW735X. These additions are an infeed and also outfeed table and an extra set of planer knives for the cutter head. In fact, if you order a DW735X, the planer itself will be marked as the DW735 model. Does the DeWalt Planer Come with Blades Already Installed? Yes, the blades are already installed. If you’re not familiar with DeWalt planers and purchase a DW735X, it might be confusing to see blades within the package. I had to double-check on this before turning it on that a set was in fact installed. This is the extra set of blades that comes with the DW735X and will not be included with the DW735. Does a Planer Make a Lot of Sawdust? Yes. This was the sawdust of just a few 1×4’s I ran through. Granted, I made multiple passes, but this can get messy fast. A dust collection system is definitely recommended and will be on my list for future upgrades. Where is the DeWalt DW735X Made? The DeWalt DW735X Planer is manufactured in Taiwan. Assembly of the DW735X Planer DeWalt Planers are just about ready to be used straight out of the box. For the DW735 (and 735X), you’ll need to install the Depth Adjustment Crank Handle. The steps are pretty straight forward: Note: The Crank Handle Shaft has a keyed, flat surface on one side. Specs for the DeWalt DW735 and DW735X DeWalt DW7350 Heavy Duty Mobile Planer Stand The DeWalt Mobile Planer Stand has a solid 5 star review on both Amazon and other sites I checked. It does, however, come with a couple design quirks I found to be odd. Use of the foot pedal is quite awkward, especially with the cross bar support: The second is the fact they used two nuts rather than welding a nut to the lower base to attach the leveling legs. You’ll find holes pre-drilled (and labeled) to fit the DW735 (and DW735X) as well as the DW733/DW734. This upper shelf is made of particle board. Other Stand Options You can always mount the DeWalt Planer to a bench or look at universal planer stand options. There are stationary and rolling stand options available from various manufacturers on Amazon and through other retailers. Of course, there’s also the DIY route of welding your own cart or building one out of wood. Operation of the DeWalt Planer I haven’t used a planer since my dad helped me with a wood project back in high school. A friend of his had some weather oak. Just a few passes on the planer at the wood shop at the local Navy base had it looking pristine. Using this planer, I certainly needed some tips on settings. This video from Make Haven provides an excellent overview: Cost of the DeWalt DW735X The DW735X currently retails for about $700. It was middle of November when I was looking to purchase one, so I was in search of Black Friday and Cyber Monday deals. Deals seemed quite limited, but I did come across a great sale at Acme Tools that also included the stand for $599. Amazon Prime Day apparently had the planer by itself for around $500 earlier in the year. The DW7350 Planer Stand retails for around $150. How much is the DeWalt 735X currently on Amazon? The prices do fluctuate, check below: How much is the DeWalt 735X with stand combo?

DeWalt DW735X Portable Planer and Stand – Assembly and Review Read More »

How to Build a Hidden Door Pool Cue Rack

This is another in-progress project I’m working on for the cabin. With the scrap wood left over from the Murphy bed cabinet I had enough to build a door. There’s a few kits available on the market for hidden doors, and specifically hidden doors with pool cue racks, but one’s I came across started out at $1200 USD and were made of particle board. With no particle board currently in the cabin, I didn’t want to start adding any. I’m still a novice with furniture woodworking, so I called upon my brother-in-law to give me a hand over at his shop. Some of our rough sketch work to figure out what we were trying to build. Definitely don’t try to follow our chicken-scratch. Planning out for your own build certainly advised though, measure twice, cut once. Building the Main Box of the Hidden Door Some photos as we built the initial box structure of the door, I’ll add more descriptions later. Several clamps keep everything in place for the glue to dry. In this photo, you see multiple sections for the back panel. I may have been able to get one single piece from the Murphy bed scrap wood cut differently, oh well. This ended up with 3 pieces. The upper shelf was positioned to hide the gap at the top. We also placed a trim piece to hide the lower section. Shelves for the Hidden Door Pool Cue Rack Originally we intended to have the barrel staves go flush to the edge of the door, however, re-thought our decision on this. The overall intent is to make the door as inconspicuous as possible and will have some fixed out trim. Based on this, the edge of the door will be hidden when closed. After spending a good amount of time figuring out how to notch the staves to fit flush, the idea was scratched. This image also shows a couple pool cues we used to determine rough placement of the shelves. I didn’t snap a photo, but we had shelves cut to width and traced the contour once the staves were cut to size. A fairly quick cut on the bandsaw, one last dry fit, and the shelves were ready to be drilled. Drilling the Shelves Forstner bits were used to drill the holes for the shelves. The lower shelf was drilled to a depth of 3/8″ an inch using the depth gauge on the drill press. The upper shelf was drilled all the way through. Routing the Edges A router was used to give a softer edge to the holes, a bit of a chamfered edge. Barrel Stave Biscuit Joints Here’s an image of a biscuit joint. Glue should be strong enough to hold the barrel staves in place, but I will also have screws from the door sides also holding them into place. The screws will be countersunk and plugged. Here’s the “lower shelf” where the pool cues will rest. Using a Forstner bit always lives a detent in the middle, but I plan to glue in some felt pieces later. Dry Fit Before Final Assembly of the Shelves A quick dry fit before the shelves were screwed into place (from the side and back). The barrel staves will be stained and final assembly later. Primary Structure Complete Here’s the end of our second day of work. The door was now ready to haul over to the cabin. I brought it back over to my house in our enclosed trailer. The door, along with the Murphy bed cabinet plywood will be hauled over to the cabin soon. I’m planning to use five standard door hinges. If they don’t work, I’ll look at other hinge options. At the Cabin and Hinged I was surprised, but I was actually able to fit the hidden door, all but two pieces of the Murphy bed cabinet, laminate flooring, and a handful of other items into our Tesla Model X. Didn’t have to wait on my dad or neighbor to help haul it over in their truck after all. Here’s the initial install: Hinges for the Pool Cue Hidden Door Rack There are some “specialty” hinges for hidden doors. Some of the ones I saw didn’t seem they would give the right pivot point I was looking for. I ended up installing a total of 5 standard door hinges. The package stated 2 hinges were rated for up to 100 pounds, 3 hinges could handle 150 pounds. I’m sure this door is quite a bit lighter than 150 pounds, but figured I’d go with 5 hinges just to help prevent any sagging. Re-Trimming the Doorway I pulled the cedar trim and had to cut and/or re-position several pieces. I also cut down a wider piece for the top trim that would keep the original trim location at the top, but also was now tall enough to cover the top of the door. Notice the light color of the knotty pine where the trim used to be. The previous owner had several pictures and other items on the wall. Where these were located showed varying color depending on how long they were there for. He had mentioned give it a couple years and it will darken. Wood Plugs My brother-in-law made some wood plugs from some scrap wood from the same plywood. They have a slight taper and with a bit of wood glue, will permanently hide counter-sunk screws. I used a Japanese flush cut trim handsaw for this. As the name implies, it gives a nice, flush cut. More on this tool later. What’s Next? I still have some sanding and staining on the door itself to finish up. Most of this work likely won’t happen until the spring when the weather starts to warm up. I’ll also work on a compartment for the bottom to store additional pool table items like the brush and extra chalk. The door is also going to require some shimming, I have some gaps on

How to Build a Hidden Door Pool Cue Rack Read More »

How to Build and Install a Murphy Bed Kit

I recently purchased a Rockler I-Semble Murphy bed kit. This kit comes with all of the hardware needed to build a Murphy wall bed, minus the wood to build the cabinet. It also comes with dimensions for the plywood cuts to build the cabinet. I took advantage of using the cutting service at our local home improvement store rather than leaving with full sheets of plywood to have to cut myself. The associate let me know the upper headboard is below the minimum cut size. More than likely, I could have had it cut off first. Instead, I left with just one piece that still needed to be cut. With the left over “scrap” plywood, I had enough to build a hidden door. More to come on this build as well. Rockler I-Semble Murphy Bed Kits The I-Semble Murphy Bed Hardware Kits are available for vertical and horizontal configuration. They offer kits for twin, full, and queen size beds. Based on the room I’ll be installing our Murphy bed in, vertical was the only option for us. We also opted for the queen size. The Hardware Here’s everything that comes with the kit (minus the packs of bolts, nuts, and screws). Again, you have to purchase your own plywood for the cabinet. It also does not include #8 x 2″ screws, dowels, or wood glue. Also not listed in the instructions was an 8mm Allen wrench, more on that later. Tools Required (Not Included) Per the instructions (the copy I received was last revised December 2018), these are the required tools that are not included: Drill Saw Circular Saw or Table Saw Stud Finder Tape Measure Pencil 3/8″ Nut Driver or Socket Wrench I lightly used an impact driver for the bed frame Phillips Screwdriver Doweling Jig Drill Bits 13/64″, 5/16″, 3/16″, 5/32″, 3/8″, and 27/64″ #8 Countersink Bit 8mm Allen Wrench This was not listed in the instructions Quality Control Issue When I picked up the Long Center Frame Support, I could hear something rattling inside. I certainly didn’t want to have this sound occur every time the bed was raised or lowered, so I tried getting whatever it was out. I assumed it was either a piece of welding wiring or a piece of metal that was punched out. With a flashlight looking inside of one of the holes, it appeared to be a round piece of metal. It also sounded as though there were multiple. I tried getting it out through the center hole, but it wasn’t going to be easy. Next, I double-checked the instructions to confirm the center hole on the end bracket wasn’t used for anything, which it wasn’t. I then drilled a larger hole into the bracket to make getting these pieces out much easier. After widening the hole, these pieces came out fairly easily. I assume a stamping machine was used to punch the holes out on this piece and it wasn’t fully cleared when the end brackets were welded on. With that out of the way, it was time to start assembling the bed frame. Murphy Bed Frame Assembly Following the I-Semble instructions, everything is fairly straight forward. There are several bolts, nuts, and washers however, so it can be a bit time consuming. I laid out all the parts and began assembly. To speed things up, I did use an impact driver, but made sure not to apply any torque and used a socket and ratchet to get everything “hand tight”. Here’s the frame fully assembled: Slat Assembly I missed this at first, but there are actually two different slat caps. The double slat caps are intended to be used on the middle. I used them on the outside as well and ended up having to use a flat screwdriver to pry them back up and re-do the slats I had already completed. Per the instructions, you want to leave Row 8 and Row 20 open. This is to allow room to later install other pieces. Also, on queen size beds you’ll leave Row 11 open as well. I missed the queen size call out and had to remove Row 11. My inspectors calling out that I should not have installed Row 11 yet: Tip: I found it easiest to install the left and right slat caps, then push the middle cap into place. The instructions do you mention you may need to use a mallet, but I didn’t find this necessary. Your results may very. Cabinet Build The instructions call for the cabinet build to be done first, but I knew it was going to be a while before I was going to pick up the plywood. So, I assembled the bed frame first. For the queen size Murphy bed, you’ll need 5 sheets of 4’x8′ plywood. Wood prices have skyrocketed in the last year or two, but have started coming down a bit. I spent $71.58 USD for each sheet in November 2021. I went with a finished maple plywood, it has a veneer on one side. The veneer side will be used for the inner portion of my cabinet and I will either stain or add slats to the exterior. My goal is to get it assembled, then I’ll focus on some aesthetics later. Plywood Cuts This is as far as my build has gone. I have the sheets cut, but need to haul them over to our cabin and then begin assembly. The instructions do not include a cut diagram, so I mapped out what I thought would be the best cut layout for our queen size bed. Feel free to use these for your own reference, but I’m not liable. Be sure to verify your required measurements. Again, this is for the queen size Murphy bed. And here’s the cut layout I went with, once again, for a queen size bed: Assembling the Cabinet Here we go, cabinet time! At first I thought I’d have to bring most of the plywood for the cabinet

How to Build and Install a Murphy Bed Kit Read More »

Can Tesla Cars Tow Trailers? The Facts Explained

towing with a tesla

In the United States, around $18 billion worth of recreational vehicles are sold in any given year. A fifth of that are trailers. With the growing popularity of Tesla’s electric cars, many people are wondering if these vehicles, which are designed to travel light and rely on batteries, can tow trailers. A Tesla Model X can tow trailers. This Tesla car can easily tow trailers up to 5,000 pounds (2,267 kilograms) in weight. The tow package was made standard some time in 2018. When ordering a brand new Tesla Model Y, a tow package can be added for $1,000. The Model Y has a towing capacity up to 3,500 pounds (1,587 kilograms). If you’ve considered buying a Tesla car, but wondered if it can tow your trailers, then this guide could provide much-needed answers.. Your next trailer-towing vehicle could be an electric-powered Tesla. Tesla Factory Tow Packages and Specs The Model X currently comes standard with the tow package. The Model Y has an optional tow package. In Europe, the Model 3 also has an optional tow package. There are also aftermarket options. Additional Energy Use Among the different vehicle types, electric vehicles (EVs) are probably the most limited when it comes to towing. One of the biggest limiting factors is the energy required. Towing a trailer will use a substantial amount of additional energy, drastically reducing your battery’s range. Long distant towing will require a lot more stops to charge. Range Anxiety Towing requires more power because of the additional work your electric car does. As such, towing puts a strain on your batteries, and will almost certainly shorten the driving range you get on your electric vehicle. This is similar on an internal combustion engine vehicle. You’ll get less mileage when towing, but it can be magnified on an electric vehicle. Most consumers tend to prefer electric cars that can deliver the most range, allowing them to drive longer on a single full charge. Show them an electric vehicle with a shorter range, and not only do people refrain from buying the car, but those who own them also tend to give a low satisfaction rating. With the shorter range, especially while towing, it’s easy to scare off potential buyers. Especially if they plan on doing a lot of towing with the vehicle. Tesla Model 3 Towing Other Electric Car Models Can Be Used for Towing There are quite a few choices if you want to buy an electric vehicle that can also tow a trailer. Some of the most popular include: Audi e-Tron Mercedes EQC Jaguar I-Pace Rivian R1T While basic towing capability is a plus, it’s important that your car can tow something on the heavier side; for example, a tow trailer.  Tesla Cars Can Tow Trailers The Tesla Model X SUV has enough room for seven seats and a range of 340 miles (547 kilometers). This SUV goes from 0 to 60 miles per hour (0 to 97 kilometers per hour) in just 2.5 seconds with a peak power of 1,020 horsepower. Tesla states that the Model X can handle up to 5,000 pounds (2,268 kilograms). The Tesla Model X even comes with its own tow bar that you can hide away when you’re not using it. Trailer Mode Connecting a trailer to your Model X will trigger Trailer Mode to activate when the wiring harness is connected. When this happens, your vehicle’s: Rear parking sensors, auto park, and autosteer are disabled. Location-based and automatic height adjustments are disabled. Autopilot steering will not work. The AEB brake force is significantly decreased. Power Concerns Range is one of the major concerns people have about electric cars. Towing a trailer or camper uses up a lot energy than a regular drive or joyride. But how does the Tesla Model X address these issues? The long-range versions of Tesla’s models have an estimated range of: Model 3: 353 miles (568 kilometers) Model S: 412 miles (663 kilometers) Model Y: 326 miles (525 kilometers) Model X: 360 miles (579 kilometers) These estimates show that the Model X has the second longest range in Tesla’s current lineup. Its range is only beaten by the smaller Model S, which only has five seats and 28 cubic feet (0.8 cubic meters) of cargo capacity, as opposed to the Model X’s seven-seat and 88 cubic feet (2.5 cubic meters) capacity. However, towing with your Tesla Model X will mean a much shorter range. The reduction in how far you can go on a single charge can differ depending on how heavy the trailer is, as well as the added weight of everything inside the trailer. The range will also be shortened depending on the kind of terrain you’re driving on. Should You Use the Tesla Model X for Towing? Sure, the Tesla Model X can tow a trailer. But it might not be an excellent idea to buy a Tesla if your main purpose is to tow a trailer.  Tesla Model X loses a significant amount of driving range when it’s towing. A real-world test conducted by Australia’s Car Guide shows that towing halves the Tesla Model X’s driving range. Driving on its own, it will use up to 21.4 kilowatt-hours for every 100 kilometers (62 miles).  But towing a 1,746-kilogram (3,850 pounds) trailer, it needed 48.1 kilowatt-hours to travel the same distance, almost doubling the amount of charge required. Road conditions can affect towing performance, and you’ll spend more fuel when towing, even if you use something with a combustion engine.  Car Guide brought a Landcruiser VX along for the ride, and with the trailer attached, it needed only 10.35 liters (2.7 gallons) of gas for every 100 kilometers (62 miles). It then required 17.2 liters (4.5 gallons) to cover the same distance with a caravan attached to it. That’s only a 66 percent increase, compared to the 112 percent raise for Tesla. A Word of Caution: Towing = Longer Charging Time One of the things that one should consider when

Can Tesla Cars Tow Trailers? The Facts Explained Read More »

What Happens if Your Tesla Runs out of Battery?

tesla out of charge

A frequent question perspective buyers (and owners) likely have around electric vehicle ownership is what happens if your vehicle runs out of charge. Clearly it’s best not to allow your Tesla to run out of charge, but in the real world it can happen. Essentially, you’ll need to have the vehicle towed to somewhere it can be charged, preferably a Tesla Supercharger for fastest charging possible or to your intended destination (assuming you don’t need it charged faster at that location). Perhaps in the future we’ll have more vehicle to vehicle charging options. There are some mobile charging companies popping up, but they’re not as widespread with service and charging times can be much slower. For the first time in 6 years of electric vehicle ownership, I got down to a displayed 0% charge on a vehicle – our Tesla Model X. Read along as I detail how I misjudged the amount of energy I would need for a towing trip I made a handful of times previous. Big Factors that Affect Your Range This was a trip in which I was dealing with three of the biggest energy draining variables associated with electric vehicles: Towing a trailer Uphill driving through a mountain pass Colder temperatures in the low to mid 30’s (Fahrenheit) My destination was to a cabin we recently purchased in north Central Washington and was another trip I was hauling our 6×12 enclosed cargo trailer. In fact, this was a trip I had just made a week or two prior without issue. The Trip I stopped off at Monroe, WA and Supercharged to 81% before I took off. The Tesla estimated I would reach my destination with 47% charge. I knew this wasn’t the case since I was towing a trailer and going through the mountains. It was also colder temperatures. While the vehicle does adjust expected range when towing, I’ve come to expect a fluctuation up to 30% on previous trips to to our cabin with the enclosed cargo trailer. With an expected 47% at destination, I thought for sure I’d get to the cabin with at least 17% charge or more. When I First Had Concern Traveling east of Stevens Pass is mostly a downhill descent. I noticed my estimated range at arrival started to drop substantially. I kept an eye on things and the expected percentage upon arrival continued to drop. Range Anxiety Kicks In As I’m probably less than a mile from my turn, I notice the expected range now shows I’ll reach our cabin with only 2%. At this point I’m starting to worry and punch in the next nearest Supercharger which is in Leavenworth, WA. It shows I’ll reach the Supercharger with 4%, so I figured that will give me a better buffer than trying to reach the cabin. The Supercharger was approximately 15 miles away at this point. I decide to keep the Supercharger as my new destination and slowly watch the estimated range drop to 3%, a few miles later 2%. Panic Mode Sets – Warning Message I Can’t Reach my Destination As mentioned above, I have now seen the estimated percentage drop from 4% to 2% and I’m officially going into a panic mode. I’m now considering whether or not I should detach the trailer along the highway somewhere to Supercharge and come back for it. I decide to keep going, and see the estimated range now drop down to 1%. I’m now a few miles from downtown Leavenworth and my battery has now hit 1% and it is estimating I will get to the Supercharger with 0%. As I continue traveling, I’m nearing the downtown area, but I’m getting a warning I need to charge before I can reach my destination. I keep pushing onward as there aren’t many areas to pull over to see what happens. As I hit downtown, I’m still 1.5 miles from the supercharger and there’s imminent worry I won’t make it to the charger. Trying to find a 110v plug isn’t an option I wanted to consider, so I continued on. Reaching the Supercharger with 0% Luckily, I make it into the Dan’s Food Market parking lot where the Tesla Supercharger is located. No one else is charging, so I make a wide u-turn to pull in sideways to avoid having to disconnect the trailer, still wondering if the vehicle is going to simply power off. With relatively short cables at Superchargers, pulling in sideways doesn’t always give enough reach. I literally don’t know if I’ll need to pull up a few inches further (and whether or not I’ll have charge to be able to do so). The charging cable does reach, and I begin charging and can finally take a sigh of relief. Conclusion This is certainly not a situation I want to experience again. Ironically, I already planned on this being the last trip we made to the cabin towing a trailer until the Spring a week prior. This certainly affirmed it though. Despite seeing gradual drops in range as the weather began getting colder, this was by far the most energy used on the same trip with the same trailer. It may have even been the lightest load I was carrying this time. I’ve seen videos where other owners have shown a bit of additional range despite showing 0% which is the only reason I continued driving. See the warning message later appear that I needed to stop to charge in order to reach my destination was certainly worrisome. Word of advice, even though it takes longer to charge once you hit 80% (or even 70%), sometimes those extra minutes to get additional charge may be worth it. Especially in colder environments, uphill driving, and certainly when towing a trailer. If I didn’t make it to the Supercharger (those last several miles were nerve racking), it would have been time for a call to Tesla Roadside assistance or possibly other towing services.

What Happens if Your Tesla Runs out of Battery? Read More »

How Long and How Much to Charge a Tesla

how long to charge a tesla

Tesla has long been known as the best of the best in electric car design. Their cars are stylish and come equipped with every innovation Tesla can pack into them. However, how do Tesla’s electric vehicles stack up from a practical standpoint? Does the charging length and capacity of a Tesla speak to their stellar reputation? The length of time it takes to charge a Tesla depends on three factors: the charging system, the battery capacity, and the onboard charger. While knowing the time needed for a charge is essential for planning purposes, you cannot overcharge your Tesla due to the car’s monitoring features. It is typically recommended to charge your Tesla between 50-80% charge, depending on your daily driving needs. Charging to 100% frequently can prematurely degrade your battery. With three factors impacting charging time, it is quite the math problem to figure out how long it takes to charge your Tesla, and although you cannot overcharge your Tesla, you can reduce the battery life with certain charging practices. Do not get stressed yet! We have researched for you. Keep reading for everything you need to know about charging a Tesla! The Basics of Charging a Tesla Before we can start looking at the specifics of charging a Tesla, it will be helpful to cover exactly what happens when you charge an electric vehicle. When we fuel a gasoline-powered vehicle, we think of distance in miles per gallon. This many gallons will get me this far. Electric vehicle’s fuel capacity is in kilowatts per hour (kWh). The car stores so many kWh in its battery, which you use up as you drive. The distance you can go on 1 kWh depends on the car, your driving, and the terrain. When you charge an electric vehicle, the charger ability is measured in kilowatts of energy, but the battery storage within the car is in kilowatts per hour, so what is happening? Kilowatts is the speed of energy flow, while kilowatt-hours is the amount of energy stored. A charging unit has a kilowatt rating, which tells you how fast it can transfer kW to your Tesla, while the Tesla itself has a kilowatt per hour storage, which tells you how much energy your Tesla can hold. Thus charging time is determined by how fast the energy is flowing (kW) and how energy your Tesla can hold (kWh). Sounds simple enough, right? Higher kW means faster-charging speed, and higher kWh means more time needed to fill the battery and a longer-lasting charge. Now that we understand the basic principle let’s look at the specifics that change charge time. The Onboard Charger Most electrical outlets from which we get electricity use AC (alternating current). However, batteries, such as the one in your Tesla, use DC (direct current). This means that your Tesla must have a system to convert the AC into DC that can be stored in the battery. This system is called the onboard charger. The onboard charger has its own restrictions on how fast it can convert energy. Teslas come with either an 11.5 kW (48 amp) or a 7.7kW (32 amp) onboard charger. If you plug your Tesla into an AC outlet, then, no matter what the outlet’s power, it cannot charge at a faster rate than the onboard charger will allow, 11.5kW or 7.7kW depending on the Tesla. It can, however, charge at a slower rate. The amp ratings on the onboard charger represent the max the system can handle. The kW ratings given are based on charging your Tesla with a 240V AC outlet, which is the highest AC to which you would have access. The math behind this is quite simple. kW is the product of amps and voltage divided by 1000. If you plug your Tesla into a 240V outlet and your Tesla’s onboard charger has an amperage of 32, then your kW would be 240 x 32/1000, which equals 7.68kW, which Tesla has rounded to 7.7kW. To ensure your Tesla is reaching its kW rating, you will need to ensure that the onboard charger is pulling the maximum amount of amps it can. For a 48 amp onboard charger, Tesla thus recommends a 60 amp circuit breaker, and for a 32 amp onboard charger a 48 amp circuit breaker. Levels of EV Chargers The first, and also most important, thing to consider when figuring out how long you need to charge your Tesla is the charging system. The charging system determines your kilowatts, which is to say that it determines the speed at which energy is transferred to your Tesla. The more kilowatts a charging system uses, the faster your Tesla will charge. There are 3 levels of electric vehicle charging systems. These levels are divided by their voltage ratings. Level 1 Level 1 EV charging is charging your vehicle with a standard 120V outlet, which is what a basic electrical outlet around your house is. Level 1 EV charging (120V) is the slowest form of charging. It generally only provides 2 to 4 miles of driving for every hour of charge. A 120V outlet at your house is AC. Thus the onboard charger will come into play to convert this to DC. If your Tesla has the 11.5 kW 48 amp onboard charger, then plugging it into a 120V outlet only allows a charge of around 5.8 kW. At that rate filling, a 100 kWh battery will take at least 17 hours. Except there is a problem. 48 amps are how much your onboard charger can handle, but that does not necessarily mean that is what your outlet is giving. A 120V outlet probably only has 15 amps. Knowing that your Tesla’s charging rate decrease to 1.8kW. Filling a 100kWh battery will take around 55 hours. These numbers come from an ideal setting in which things such as temperature and efficiency do not also reduce charging time. In addition, Teslas charge more slowly as they reach capacity in order to protect the battery.

How Long and How Much to Charge a Tesla Read More »