DIY Tool Charging Station Wall Using Scrap Wood and Hidden Cords
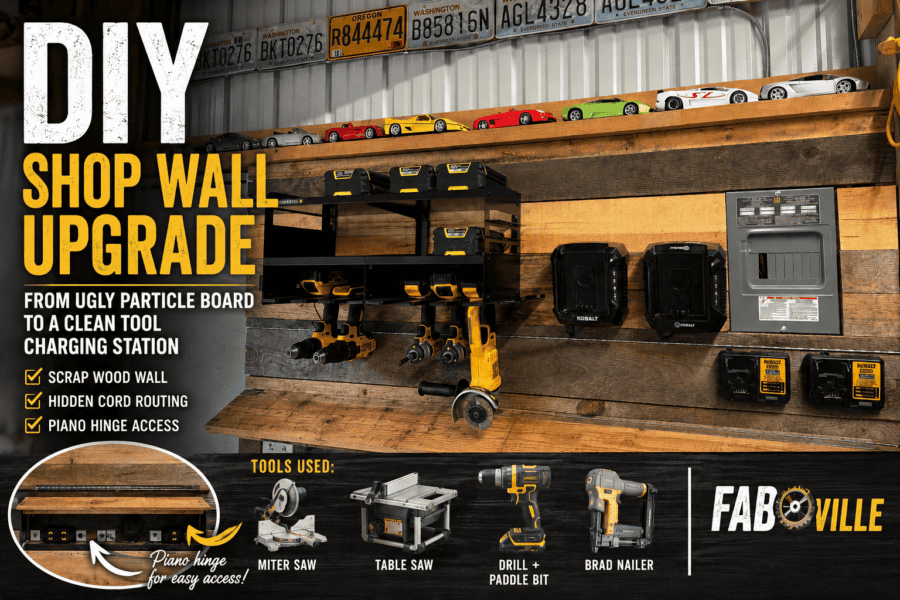
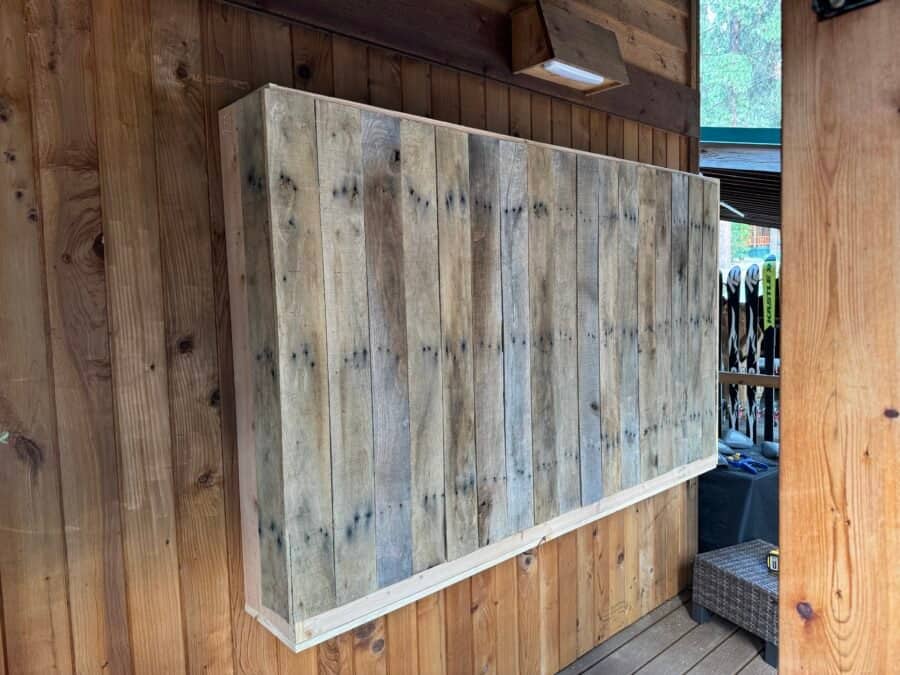
There are always those projects in the shop that technically work… but you still can’t stop thinking about improving them. For a few years now, I had a section of particle board mounted to the wall in my pole building shop that served as a charging station and storage area for my cordless power tools. Functionally, it worked pretty well. I drilled holes through the board so the charger cords could route behind it, helping eliminate visible cable clutter. The setup held several chargers along with a power tool organizer and definitely kept things more organized than having chargers spread everywhere across benches. But aesthetically? It wasn’t great. The particle board always looked temporary, and after buying a newer,larger power tool organizer, I started reconsidering the entire wall setup. Rather than mounting the new organizer here, I decided to relocate my older organizer — which was about half the size — and completely rebuild this section of the wall using scrap wood pieces I already had in the shop. The entire area now has a bit of rustic, but much more finished, upcycled workshop look. Building the Scrap Wood Slat Wall To make the wood slats work properly, I first had to add some additional partial framing behind the wall. Since the slats varied slightly in size and thickness, the extra framing gave everything a much more secure mounting surface. I also knew wood movement could become a factor over time. Seasonal humidity changes can cause boards to expand and contract slightly, especially in a pole building shop environment. I may re-size things in the future. I considered several options during planning: In the end, I decided to keep the project simpler. Since I was already planning to incorporate a piano hinge into the design, I didn’t want to add unnecessary material or complexity where it wasn’t really needed. Hidden Cord Routing One feature I wanted to retain from the old setup was hidden cord management. To accomplish this, I simply drilled holes large enough for the charger plug ends to pass through. These holes were positioned near the center of where each charger would mount, allowing all the cords to remain hidden behind the wood wall. The result keeps the charging area looking much cleaner while avoiding a mess of dangling wires. The Piano Hinge Upgrade One of the biggest improvements over the previous setup was adding a piano hinge toward the bottom section of the wall. While I only had to once or twice, with the old single-piece particle board, I had to completely remove the panel anytime I needed to remove or add a charger. The piano hinge now allows the lower section to swing open easily, giving quick access to the power strip and wiring behind the wall whenever needed. It’s one of those small upgrades that dramatically improves usability and future maintenance. Tools Used for the Project This was a fairly straightforward DIY workshop project overall, but a few tools definitely made things easier: The table saw ended up being especially helpful since several scrap boards needed slight trimming for a more uniform fit. Upcycled Workshop Style I intentionally used boards that didn’t match. The different wood tones and textures give the wall a reclaimed, upcycled workshop look that fits the shop really well. I may still stain the boards later for a more unified color tone while still preserving some contrast and variation between the pieces. For now though, I really like the raw industrial feel it adds to the space. Final Thoughts This was a project I didn’t get around to for a while, but was overdue as I actually needed to put one of the chargers back on the wall, but didn’t want to keep the old particle board. The wall is cleaner, more functional, easier to service, and far more visually appealing than the old particle board setup. The hidden cord routing keeps everything tidy, the piano hinge adds easy access, and the scrap wood design gives the space a custom-built feel without spending much money. The 72″ piano hinge was $24 from Home Depot. Best of all, it finally feels like a permanent part of the shop rather than a temporary solution that stayed around for years.
DIY Tool Charging Station Wall Using Scrap Wood and Hidden Cords Read More »