Electric Vehicles

Tuyoung Cybertruck Roof Rack Review & Install (A Fraction of OEM $$$)

tuyoung cybertruck aftermarket roof rack cross bar

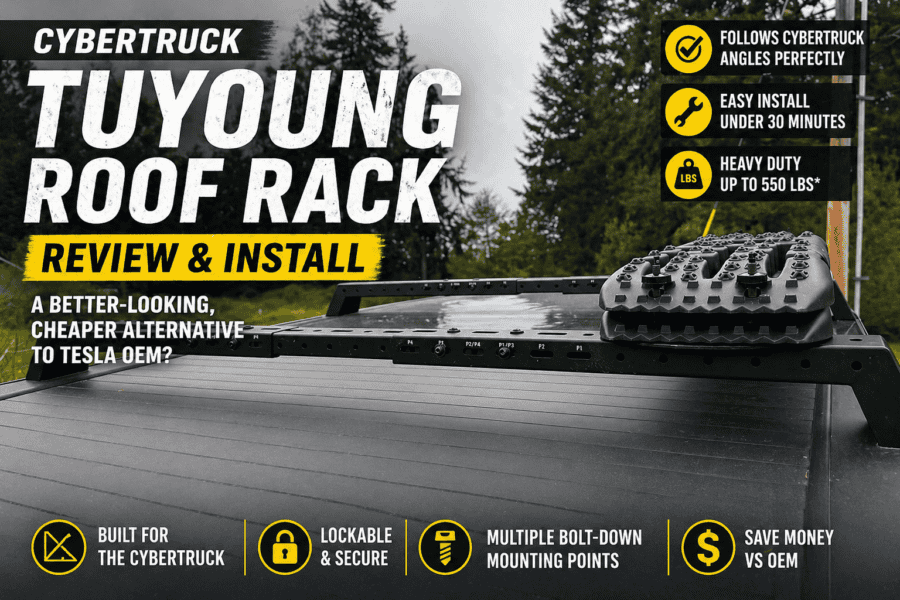
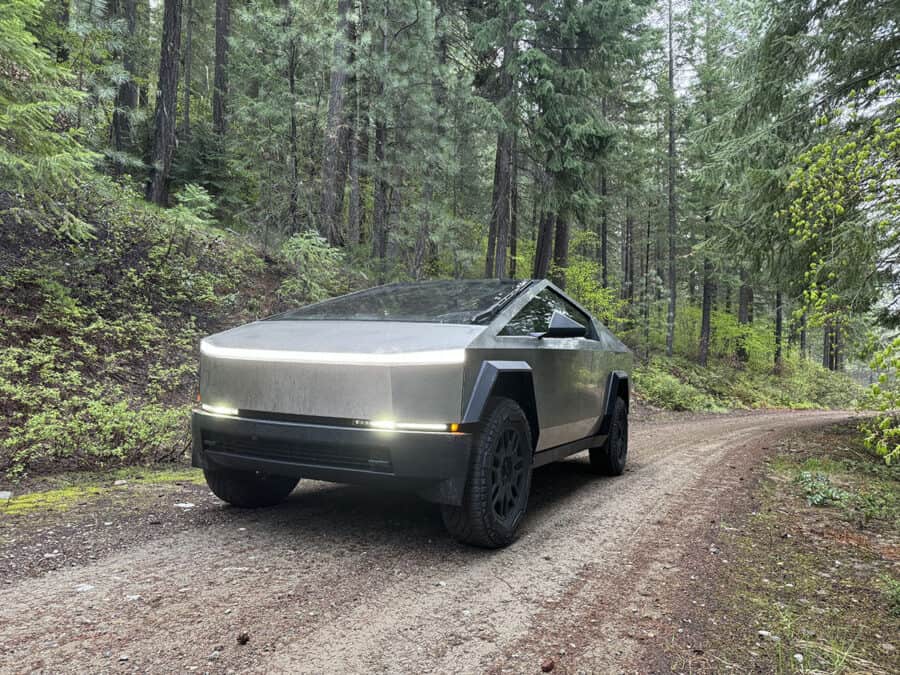
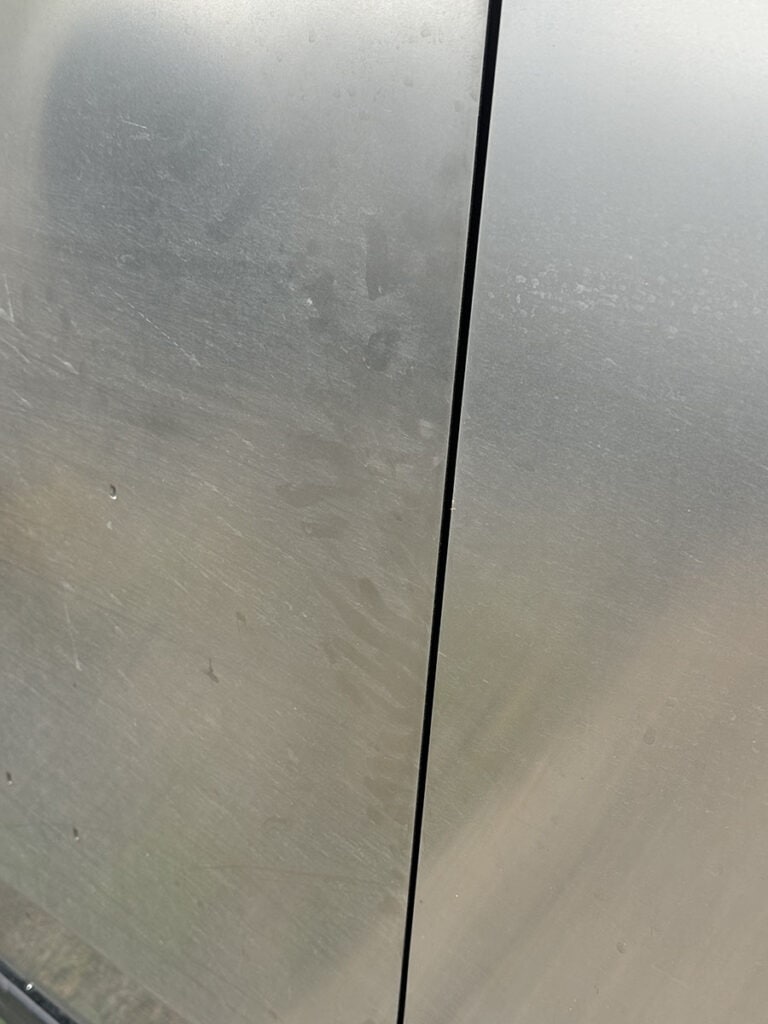
Tuyoung Cybertruck Roof Rack Review: Better Styling Than Tesla OEM? If you’re anything like me, one of the first things you notice about the Tesla Cybertruck is how intentional every line and angle is. That’s exactly why I passed on the OEM roof rack. It works—but the curved crossbar design doesn’t match the truck’s flat, angular aesthetic. So I went looking for something better… and landed on this: 👉 Tuyoung Cybertruck Roof Rack Cross Bars B0DRTXW698 (Amazon affiliate link) 🔥 Quick Verdict (Before We Dive In) The Rack I Chose 👉 Tuyoung Cybertruck Roof Rack Cross Bars B0DRTXW698 ✔ Designed specifically for Cybertruck✔ Follows sail panel angles✔ Adjustable mounting positions (for which of the 4 positions on the truck you want to install)✔ Multiple bolt-down mounting holes 🛠️ Installation (Real-World Experience) Install is straight forward. Bolt the 3 piece sections together depending on the position on the truck you want to install. Install the mounting feet, then one nut on each side then mounts the cross bar to the truck. What You’ll Need Install Steps Figure 1 Figure 3 Figure 4 👉 No drilling. No modification. Straightforward. ⚠️ Important Tradeoff (The “Con” That Matters) This is something most reviews won’t tell you—but it’s important: Geometry vs Compatibility The reason I chose this rack might be its biggest limitation – depending on what accessories you want to use. Because of the larger, angular crossbar design: 👍 The Workaround (And Why It’s Still Worth It) The rack includes multiple bolt-down mounting holes, which means: 💡 This actually makes it better for: 👉 But less ideal if you frequently swap accessories using clamping systems that typically use “thumb screws” that don’t require any tools to remove. 🏁 Quick Decision Guide 🧰 Recommended Accessories Here’s where you start stacking revenue 👇 Cargo Storage (High Conversion) Rooftop Cargo Box ✔ Great for road trips✔ Weatherproof✔ Works with bolt-on adapters Recovery & Overland Gear Traction Boards 👉 MAXTRAX MKII Recovery Boards ✔ Perfect for snow / sand / mud✔ Easy bolt-down mounting 🛶 Water Sports Setup Kayak Mount (Requires Adapter) 👉 Yakima JayLow Kayak Carrier ⚠️ May require custom bracket due to crossbar shape For this trip I just used ratchet straps, but the kayak also scratched the cross bar in a couple of spots. 🔧 Mounting Hardware (HIGHLY Recommended) Universal Mounting Plates / Hardware 👉 Rhino-Rack Universal Mounting Plate Kit ✔ Makes bolt-on accessories easy✔ Solves compatibility issue 🔗 Tie-Down Essentials Ratchet Straps 👉 Rhino USA Ratchet Straps ✔ Strong + reliable✔ Essential for any rack setup 💡 Pro Setup Ideas (Great for Future Content) This rack is PERFECT for: Final Verdict 👉 Tuyoung Cybertruck Roof Rack Cross Bars B0DRTXW698 If you care about: This is one of the best upgrades you can make. Just know this: You’re trading: For:

Tuyoung Cybertruck Roof Rack Review & Install (A Fraction of OEM $$$) Read More »

⚠️ Cybertruck PCS Issue? My PowerShare Failure → “Fixed Itself” → 24A Limit → Rev G Replacement (Full Timeline)

tesla cybertruck pcs2 error

I wanted to share a full timeline of a PCS (Power Conversion System) issue I just went through with my Cybertruck, because the way it failed was not obvious at first. This is certainly an increasingly known issue. This might help if you’re seeing weird PowerShare behavior or charging limitations. ⚡ Phase 1: PowerShare Worked… But Intermittent During a recent outage, I used PowerShare to run the house. It worked, but: My daughter’s were home from school after a closure because of the storm that knocked out power throughout the town. They mentioned the internet was frequently dropping and lights would occasionally flicker. I reached out to Tesla, but they recommended I reach out to my electrician. No response from my electrician, so I decided to see if I could get anywhere with Tesla again. ⚠️ Phase 2: “Unable to Charge” Error (Weeks Later) A few weeks later I got: “Vehicle unable to charge” When I checked the details: 👉 It pointed to a PCS / PowerShare-related fault So I scheduled a service appointment. In the error log, I noticed it had a second PCS2_a095 error that mentioned PowerShare unavailable. 🔄 Phase 3: It Starts Charging Again (False Confidence) Here’s where it gets tricky… I left the truck plugged into my 120V UMC, and about a day later: 👉 It started charging again like normal. So I: In hindsight… probably a mistake. However, I also wasn’t confident with Tesla’s response that they knew what the issue truly was. ⚡ Phase 4: 240V Charging Exposes the Real Issue Several days later, I plugged into a 240V EVSE. Immediately noticed: At that point, I was pretty confident: 👉 PCS issue wasn’t gone—it was just partially failing So I rescheduled service. 🔧 Phase 5: Tesla Replaces PCS (Now “Rev G”) Tesla diagnosed it and replaced the PCS under warranty. Apparently they’ve updated this component multiple times. Ideally this will be a permanent fix. I’ve heard this is several thousands of dollars to fix if out of warranty. 🧠 What Made This Hard to Catch This wasn’t a clean failure. It: 👉 It gave just enough normal behavior to second-guess the issue. 🔍 Key Symptom to Watch For If I had to call out the biggest red flag: Charging capped at 24A on 240V That seems to be a strong indicator something isn’t right with the PCS. 🛠️ Where I’m At Now (2 Weeks Later) I’m about 4 weeks into the new Rev G PCS: But I’m definitely watching it closely. 🔁 What I’m Doing Differently Now Going forward: 💡 Takeaways for Other Owners If you’re seeing anything weird: Tesla had asked me several questions when I first contacted them. They asked if there were any other accessories I had installed on the truck, if I had used the power receptacles in the vault for anything, etc. My rescheduled appointment was nearly a month out. It certainly seems they are more aware of the issue now. Many feel this should be a recall, I definitely agree with the number of failures that seem to continue to pop up.

⚠️ Cybertruck PCS Issue? My PowerShare Failure → “Fixed Itself” → 24A Limit → Rev G Replacement (Full Timeline) Read More »

Cybertruck Integrated Central Control Storage Box Installation & Review (TesStudio / CyberGearCo)

tesla cybertruck center console organizer

Ongoing Review: Fitment, Durability, Noise & Storage Performance Over Time Cybertruck Integrated Central Control Storage Box: Installation, MOLLE Integration & Ongoing Review The Tesla Cybertruck features some of the most unique interior design choices of any modern vehicle—and while the center aisle area is spacious, it’s also underutilized. After experimenting with different organization options and MOLLE accessories, I finally purchased the Integrated Central Control Storage Box from Amazon, a modular center console upgrade distributed by TesStudio, CyberGearCo, and several other vendors. I picked mine up on Amazon during a Black Friday sale for $224.99 (sold by TesStudio under the Amazon name TESCYBERMODS). Today, this organizer typically retails between $269.99–$299.99, depending on the seller. Currently, there’s a coupon on Amazon bringing the price down to $269.99. This article includes:✔ Full installation steps✔ MOLLE panel mounting details✔ What fits (and what doesn’t)✔ Pros & cons✔ Future modification ideas✔ And an ongoing review section that I’ll update over time—including durability, squeaks, rattles, and storage performance. Why I Upgraded My Cybertruck Center Console I previously added a Foronetry Floor Lower Center Console Mat so I could mount a BuiltRight Industries Tech Panel MOLLE without drilling into Tesla’s OEM interior. I mounted a fire extinguisher using Quick Fist clamps, and while this setup worked, it didn’t offer the organizational structure I wanted. The Integrated Central Control Storage Box fills this space perfectly, adds multiple compartments, and provides an ideal mounting platform for additional gear. It also adds extra storage for phones—but it would have been even better if the manufacturer had included inductive charging, especially given that Tesla’s OEM wireless chargers are known to have reliability issues. Hopefully future revisions include this. Installation Guide for the Cybertruck Integrated Storage Box Installation took me around 20–25 minutes. Here are the official steps from the included manual, followed by my hands-on notes. Installation Steps My Real-World Assembly Notes Instruction reference: Finished install: MOLLE Panel Integration (BuiltRight Industries) After installing the organizer, I re-mounted my existing BuiltRight MOLLE Tech Panel directly onto the new storage box. The process was simple: I originally mounted a fire extinguisher on my MOLLE panel when I previously had this tech plate installed on a Foronetry Floor Lower Center Console Mat, but after a quick test fit, it was clear the extinguisher was too tall for the new console. For now, I swapped to my KC HiLiTES multi-tool flashlight using a Quick Fist mount. I may add a second flashlight or explore alternative MOLLE-mounted accessories. This mod is one of my favorite aspects of the new console—mounting gear to the organizer instead of the factory Cybertruck interior keeps everything reversible and clean. Review: Pros & Cons After Initial Installation ⭐ Pros ✔ Significantly increases usable storage From compartments to phone slots and side pockets, the upgrade makes the Cybertruck’s center aisle far more functional. ✔ OEM-style fit and finish Once assembled, the unit feels sturdy with a clean, factory-like appearance. ✔ MOLLE-friendly mounting surface Perfect for flashlights, tools, radios, or emergency gear. ✔ Straightforward assembly Other than two tight-fitting pieces, the installation is beginner-friendly. ⚠️ Cons & Wish List ❗ No inductive charging included The organizer adds storage for phones—but misses a huge opportunity by not including wireless charging.Given Tesla’s history of OEM inductive charging issues, this would’ve been a major selling point. ❗ Tight tolerances on Parts D & F These sections require patience and extra effort. ❗ Cupholders may go unused Functionally fine, but I’m not convinced I’ll use them often. Future Modifications I’m Planning I’m already considering the next steps: Ongoing Long-Term Review (Updates Coming) Over the next several weeks and months, I will update this article with: Bookmark this page—more updates coming. Final Thoughts (Initial Verdict) At its current price point, especially when discounted, the Integrated Central Control Storage Box is one of the most useful interior upgrades for the Cybertruck. It adds meaningful storage, improves organization, and gives you a solid platform for MOLLE-mounted accessories. While inductive charging would have made the phone slot far better, the overall utility of this upgrade still makes it worth the buy.

Cybertruck Integrated Central Control Storage Box Installation & Review (TesStudio / CyberGearCo) Read More »

🔥 XKGlow Cybertruck Light Bar Review & Install Guide

xkglow tesla cybertruck lightbar installation and review

Is the XKGlow XKMAX Light Bar Worth It for Tesla Cybertruck? If you’re searching for a XKGlow Cybertruck light bar review or trying to figure out how to install one on your Tesla Cybertruck, you’re in the right place. I recently installed the XKGlow XKMAX Roof Light Bar (MX-CTLB) on my Cybertruck, and in this guide I’ll walk you through: 🛠️ Tools & Materials Needed: 🔌 How to Install the XKGlow Cybertruck Light Bar 1. Test the Light Bar First (Pre-install) 2. Access the Roof Power Feed 3. Connect the Wiring Harness Using the included heat-shrink solder connectors: Apply heat until the solder melts and the connector fully seals. 👉 This creates a strong, weather-resistant connection. 4. Position the Light Bar 5. Enable Roof Power (Cybertruck UI) 6. Install Mounting Hardware 7. Secure to the Cybertruck Roof (this is the most tedius step) Even with the shortened allen head wrench provided, it is extremely tight to try and get inside of the XKGlow bracket to tighten the bolts, especially the ones towards the front of the truck. In my opinion, it would have been better if they had holes drilled out on top of the bracket to fit the allen head wrench through. 8. Align & Tighten 9. Mount the Controller 10. Setup the App & Customize Tip: Change the default mode in the app under Config > Default Mode 🌟 Product Review: XK Glow XKMAX Light Bar for Tesla Cybertruck ⭐️⭐️⭐️⭐️½ (4.5/5) 🔦 Performance (Brightness & Output) This thing is seriously bright. Perfect for: 📲 App & Smart Features The XKGlow app is surprisingly solid: It’s not just a light bar—it’s a fully customizable lighting system. 🧰 Installation Experience If you’ve done basic wiring before, this is very manageable. What stood out: Biggest challenge: 🧼 Fit, Finish & Design This is where the XKGlow light bar really shines. ⚠️ Things to Know Before Buying 🤔 Is the XKGlow Cybertruck Light Bar Worth It? ✅ Yes — if you want: ❌ Maybe not if: Final Thoughts The XKGlow Cybertruck Light Bar is one of the better-designed aftermarket lighting upgrades available right now. It combines: …and actually feels like it was built for the Cybertruck. I’ll continue updating this post over time with: Biggest Complaints As mentioned on step 7, it’s very tight trying to fit the shortened allenhead wrench inside of the mounting bracket to secure the light bar to the vehicle. Additional design considerations should have been implemented. Offroad performance: This is a one I’m trying to find my own solution for. I’ve used the off-road light bar on forest roads. Around 30-35mph I’ve noticed the light “bounce”. The bracket mounting location is too far back from the light. You can push up on the bracket and see there’s flex. This causing the bracket to move just enough to where you’ll see the light bounce in front of you on uneven surfaces. I may use reinforcement brackets attached to my cross bar to see if that does the trick. If it’s still not rigid enough, a modification of the XKGlow bracket might be in the future for me. Tesla has moved from the adhesive mounting of the OEM lightbar to a bracket system that connects underneath the applique. A reinforcement bracket welded into the XKGlow should tighten things up, but pre-runner style reinforcement bars would be much faster to fabricate and install. Cybertruck XKGlow installation instructions provided by the manufacturer which currently seem to have a broken link from their product listing on their website.

🔥 XKGlow Cybertruck Light Bar Review & Install Guide Read More »

Creating a Custom Cybertruck Vault Shelf with 3D-Printed Brackets and Milwaukee Packout Wall Mounts

cybertruck custom milwaukee packout vault shelf

The Tesla Cybertruck’s vault provides a massive storage space, but maximizing its usability requires some creativity. I recently designed and installed a custom shelf in the vault using 3D-printed brackets, extruded aluminum, and Milwaukee Packout wall plates. Here’s how I did it and what I learned along the way. Why Build a Custom Shelf? While the aftermarket currently has a couple molle shelf options for the vault, I felt they were a bit pricey at around $500 and didn’t quite provide what I wanted. I was looking at a modular, durable, and efficient way to store tools and gear—enter the Milwaukee Packout system. My goal was to create a shelf that securely mounts Packout wall plates while keeping the vault’s floor space open for larger items. Materials Used The Build Process Step 1: Designing the 3D-Printed Brackets The key component of this build was the custom 3D-printed brackets that attach to the Cybertruck’s L-Track system. Instead of using bolts, I designed a wedge-fit mechanism with slots that securely engage with the L-Track, preventing movement. However, bolts can still be added for extra security if needed. Each bracket was also designed with slots for T-slot nuts and bolts, allowing easy mounting of the extruded aluminum frame. Step 2: Mounting the Extruded Aluminum For the shelf’s structure, I used 2040 extruded aluminum. Initially, I planned to mount it flat, but I found it had too much flex. Switching to a vertical orientation significantly improved rigidity. The aluminum was attached to the brackets using T-slot nuts and bolts, ensuring a strong, adjustable connection. This was the Aluminum Extrusion Hardware Accessories I purchased from Amazon. While the description stated “not easy to rust”, if I see any signs of corrosion I’ll look at getting a different set. Step 3: Installing the Milwaukee Packout Wall Plates With the aluminum frame securely in place, I mounted two Milwaukee Packout wall plates. These provide a rock-solid base for stacking Packout toolboxes, organizers, and storage bins, making it easy to customize my vault storage. Lessons Learned and Future Improvements Current Milwaukee Packout Cybertruck Setup These are the Milwaukee Packout cases I currently have. A 106 piece Milwaukee socket set, drill bit set, and a Packout case I currently store some of my Molle panel mounting accessories in. Final Thoughts One of the biggest advantages of this custom setup is its cost-effectiveness. Compared to aftermarket solutions, which can be quite expensive. If you have access to a 3D printer, this DIY approach with brackets and extruded aluminum was far more affordable while still offering durability and functionality. The modular design, durability, and Packout compatibility make it a game-changer for anyone looking to maximize their Cybertruck’s storage potential. If you’re considering a similar setup, 3D printing custom brackets combined with extruded aluminum and Packout mounts is a solid solution. We’re going to make a few small adjustments to the design, but will likely upload these brackets to one (or multiple) of the 3D file sharing sites such as MakerWorld. Stay tuned for future updates as I refine the design and test its weight capacity! Have Questions or Suggestions? Let me know in the comments! Would you build something similar in your Cybertruck? Also, be sure to check out our other Cybertruck articles!

Creating a Custom Cybertruck Vault Shelf with 3D-Printed Brackets and Milwaukee Packout Wall Mounts Read More »

How to Install a MOLLE Panel in the Tesla Cybertruck’s Frunk

The frunk of the Tesla Cybertruck offers a unique storage space, and adding a MOLLE panel is a great way to keep your gear organized. This DIY project is straightforward and provides a custom solution to making the most of your Cybertruck’s storage. Here’s how I installed a MOLLE panel using quick disconnect fasteners, along with some tips to make the process easier. NOTE: This does require drilling into a factory panel. Materials Used: Step 1: Test fit where you want to install the MOLLE You’ll want to make sure there was enough clearance for the frunk to close based on where you plan to mount the MOLLE panel. I also wanted to make sure there was enough space not to rub at the bottom of the frunk. I took some measurements, but also used small blocks to prop it up at one point to ensure the frunk would close without issue. Step 2: Remove the Frunk Panel The first step is to remove the plastic frunk panel. The panel merely snaps into place. There’s a couple slots at the bottom that can help give you a grip. This gives you full access to the space where the MOLLE panel will be installed. Optionally, you could use a trim removal tool. Step 3: Test Fit the MOLLE Panel Once the panel was removed, I test-fitted the MOLLE panel again to determine the ideal height and positioning. This helped me visualize how the panel would sit and made sure it wouldn’t interfere with the frunk’s operation. Step 4: Mark the Mounting Points I temporarily attached the quick disconnect bolts and used a pencil to mark the drill points on the plastic frunk panel. Taking this step ensures the panel will align perfectly when mounted and that my spacing is correct. Step 5: Measure Twice, Drill Once After marking the drill points, I double-checked all measurements. Once everything was confirmed, I drilled the mounting holes. Remember, accuracy here is key to avoid any alignment issues. Step 6: Attaching the Quick Disconnect Hardware I had some excess threadlocker you’ll see in the picture that was later wiped off. I had some excess threadlocker you’ll see in the picture that was later wiped off. NOTE: Depending on your hole locations, you may need to sand or grind down the honeycomb reinforcement pattern for your hardware to attach flush. A tool such as a Dremel or oscillating tool can work well. In my case, the bolts were quite long and I ended up cutting them down with an angle grinder to the appropriate length. Step 7: Attach the MOLLE Panel With the holes drilled, I installed the panel using the quick disconnect fasteners. To make sure the MOLLE panel stays firmly in place, I used threadlocker on the bolts. This added step ensures a secure hold, even with the Cybertruck’s rugged use. I ended up mounting the quick disconnect fasteners in the corners. This particular fastener type would have required a large diameter hole to be drilled, so I ended up using an existing slot. With the serrated nut surface, it holds tight. If you plan on using a different style fastener including a simple bolt and nut setup, you could probably use one of the existing circular holes to mount. I plan to mount a DIY Not-a-Flamethrower once I get it finished up. I plan to use it for starting camp fires. Final Thoughts This MOLLE panel installation is a simple yet effective way to keep the Cybertruck’s frunk organized. The quick disconnect fasteners make it easy to remove and reattach the panel if needed, providing flexibility for your storage needs. With this setup, I now have a solid, reliable way to secure essential items in the frunk.

How to Install a MOLLE Panel in the Tesla Cybertruck’s Frunk Read More »

Does the Tesla Cybertruck Have Onboard Power?

In an age where versatility and utility are paramount for any vehicle, the Tesla Cybertruck stands out not only for its futuristic design but also for its remarkable onboard power capabilities. Tesla, renowned for pushing the boundaries of innovation, has equipped the Cybertruck with a suite of power outlets that transform it from a mere vehicle into a mobile power station. Let’s dive into the specifics of the Cybertruck’s onboard power system and explore how it can revolutionize the way we use our vehicles. djtzsfrw Power Where You Need It: Inside the Cabin Two 110V Power Outlets The Cybertruck’s interior is a blend of comfort, technology, and utility. Among its many features are two 110V power outlets located strategically for maximum convenience: Powering Up the Outdoors: In the Bed of the Truck The rear bed of the Cybertruck is where its utility truly shines, offering power solutions that are perfect for outdoor enthusiasts, contractors, and adventurers alike. Two 110V Power Outlets Located in the bed of the truck are two more 110V outlets. These outlets are designed to handle a variety of tasks: One 240V Outlet In addition to the 110V outlets, the Cybertruck also features a powerful 240V outlet. This high-capacity outlet is a game-changer for several reasons: The Future of Mobility and Utility The Tesla Cybertruck’s onboard power system exemplifies how vehicles are evolving to meet the diverse needs of modern users. By integrating multiple 110V outlets and a 240V outlet, Tesla has ensured that the Cybertruck is not just a mode of transportation but a versatile tool for work, recreation, and exploration. This feature, combined with the Cybertruck’s impressive range, durability, and performance, positions it as a leader in the future of electric vehicles. Whether you’re on a job site, at a remote campsite, or simply on the go, the Cybertruck’s onboard power system offers unparalleled convenience and capability, making it a true power hub on wheels. So, next time you consider what your vehicle can do for you, think about the Tesla Cybertruck. It’s more than just a truck; it’s your mobile power station ready to handle whatever you throw its way.

Does the Tesla Cybertruck Have Onboard Power? Read More »

Cybertruck Off-Road Package Update: Master the Roughest Terrain

cybertruck off-roading with off-road mode

Tesla’s Cybertruck has been turning heads since its debut, and the latest off-road package update promises to elevate its rugged capabilities even further. For adventurers and off-road enthusiasts, this update introduces a suite of new features designed to enhance the Cybertruck’s performance on challenging terrains. Here’s a closer look at what’s new. A week after we took delivery our Cybertruck, we received an over-the-air software update that included the initial release of the off-road package. Here’s what it currently includes! Overland Mode: Steady Handling Across Varied Terrain The Overland Mode now boasts advanced features to provide more consistent handling and better overall traction. Whether you’re navigating rock-strewn paths, gravel roads, deep snow, or sandy trails, the Cybertruck’s enhanced Overland Mode is designed to keep you steady and in control. The updates ensure that the vehicle adapts to different surfaces, improving grip and stability for a smoother ride. Baja Mode: Ultimate Control and Flexibility For those who crave high-speed off-roading thrills, the updated Baja Mode delivers. With vehicle balance optimization and freer handling when Stability Assist is set to manual, drivers can now enjoy a more dynamic driving experience. The new Terrain slider allows for fine-tuning of the vehicle’s performance across various off-road conditions, giving you the ultimate control to tackle everything from dunes to desert tracks. Locking Differentials: Conquer the Unconquerable One of the standout additions to the Cybertruck’s off-road arsenal is the inclusion of locking differentials. This feature is crucial for traversing uneven or slippery terrains where a wheel may lose traction. By engaging the locking differentials, the Cybertruck can distribute power more evenly across all wheels, helping it move through low-traction environments effortlessly. To use the locking differentials, you can select from options available in the vehicle status area or through the Off-Road app on the touchscreen. This feature is not only essential for hardcore off-roading but can also be beneficial in everyday scenarios, such as getting unstuck from a snow bank. However, it’s important to use caution—engaging the locking differentials on high-traction surfaces like asphalt can damage the drivetrain. Always refer to the Owner’s Manual before utilizing this feature. Trail Assist: Focus on Steering Trail Assist is designed to maintain a steady cruising speed on rough or steep terrain, allowing you to concentrate on steering. Unlike traditional cruise control, Trail Assist stays active even when you brake, resuming the set speed as soon as you release the pedal. This feature can be adjusted via the right scroll wheel, making it easy to control your speed without taking your eyes off the path ahead. To enable Trail Assist, navigate to Controls > Dynamics > Off-Road Mode > Trail Assist. Remember, this feature does not automate steering or obstacle avoidance, so remain vigilant and ready to take immediate action. Refer to the Owner’s Manual for detailed instructions on using Trail Assist effectively. Conclusion With these updates, Tesla’s Cybertruck off-road package is more capable than ever. The enhanced Overland Mode, new Baja Mode, locking differentials, and Trail Assist collectively make this vehicle a formidable force in any off-road scenario. Whether you’re tackling rocky trails, sandy deserts, or snowy paths, the Cybertruck is equipped to handle it all. Embrace the adventure with confidence and enjoy the unparalleled performance of Tesla’s latest innovations.

Cybertruck Off-Road Package Update: Master the Roughest Terrain Read More »

How to Clean Finger Prints from Cybertruck Stainless Steel

cybertruck finger prints

Cleaning your Tesla Cybertruck requires special attention to maintain its appearance, particularly due to its stainless steel panels. Unfortunately, finger prints on the exterior of the Cybertruck have been a common complaint. Finger prints on the Cybertruck often come from people opening and closing the doors. Here’s a quick guide based on Tesla’s recommendations: Cybertruck Finger Prints: Recommended Glass Cleaner While some have used and been happy with liquid glass cleaners such as Windex, many more have gone with an ammonia free foaming glass cleaner from Sprayway. I was first introduced to this product when I had the windows tinted on my first truck many, many years ago. Sprayway seems to continue to be a top choice amongst tint installers. The foaming solution will not run down the sides of your vehicle nearly as much as a liquid glass cleaner. Spot Cleaning the Cybertruck Additional Tips: By following these steps, you can effectively remove fingerprints and small stains from your Cybertruck, keeping it looking sleek and new. There are other products such as Bar Keeper’s Friend people have used, but a glass cleaner often works for most smaller cleaning touchup jobs. We’ll have more soon on recommendations for cleaning the entire exterior of the Cybertruck. Be sure to check out more of our Cybertruck content!

How to Clean Finger Prints from Cybertruck Stainless Steel Read More »

Tesla Cybertruck Towing Capacity Compared to Other Gas Trucks

how much can the cybertruck tow?

When Tesla unveiled the Cybertruck, its futuristic design and impressive specs quickly made headlines for it’s polarizing design. In this blog post, we’ll compare the towing capacity of the Cybertruck to other similar-sized trucks to see how it stacks up. Tesla Cybertruck: A Brief Overview Before diving into comparisons, let’s quickly recap the Cybertruck’s key specifications: These figures position the Cybertruck as a serious contender in the truck market. But how does it compare to its competitors? Ford F-150 The Ford F-150 has long been a leader in the truck market. Known for its reliability and versatility, the F-150 offers several configurations and towing capacities depending on the model. The F-150 outshines the Cybertruck in maximum towing capacity and payload, but the Cybertruck’s futuristic features and electric powertrain present a different kind of appeal. Chevrolet Silverado 1500 The Chevrolet Silverado 1500 is another heavyweight in the truck world. Known for its robust performance and durability, the Silverado offers a strong competition. While the Silverado has a slightly higher towing capacity compared to the Cybertruck, its payload capacity is marginally lower. RAM 1500 The RAM 1500 is praised for its smooth ride and luxurious interiors, in addition to its towing capabilities. The RAM 1500’s towing and payload capacities are competitive, though still not quite reaching the Ford F-150’s maximum towing prowess. GMC Sierra 1500 The GMC Sierra 1500 offers a blend of performance, technology, and premium features, making it a strong competitor in the truck market. Similar to the Silverado, the Sierra 1500 slightly exceeds the Cybertruck’s towing capacity but matches its payload closely. Conclusion The Tesla Cybertruck’s towing capacity of up to 11,000 lbs puts it in a competitive position among some of the most popular trucks on the market. However, range of electric vehicles when towing is greatly reduced. For those prioritizing maximum towing capacity, the Ford F-150 remains the leader. However, for those looking for a blend of futuristic technology, impressive towing and payload capacities, and sustainability, the Cybertruck is an exciting option worth considering. As the truck market evolves, the introduction of electric models like the Cybertruck will continue to push the boundaries of what these vehicles can achieve.

Tesla Cybertruck Towing Capacity Compared to Other Gas Trucks Read More »