How to Convert an M1101 to a 6×5.5 Bolt Pattern
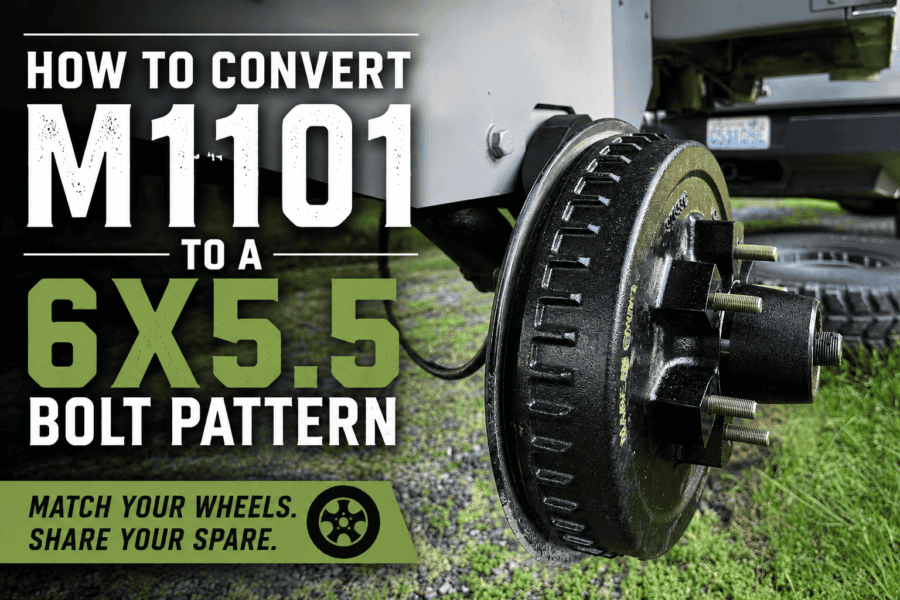
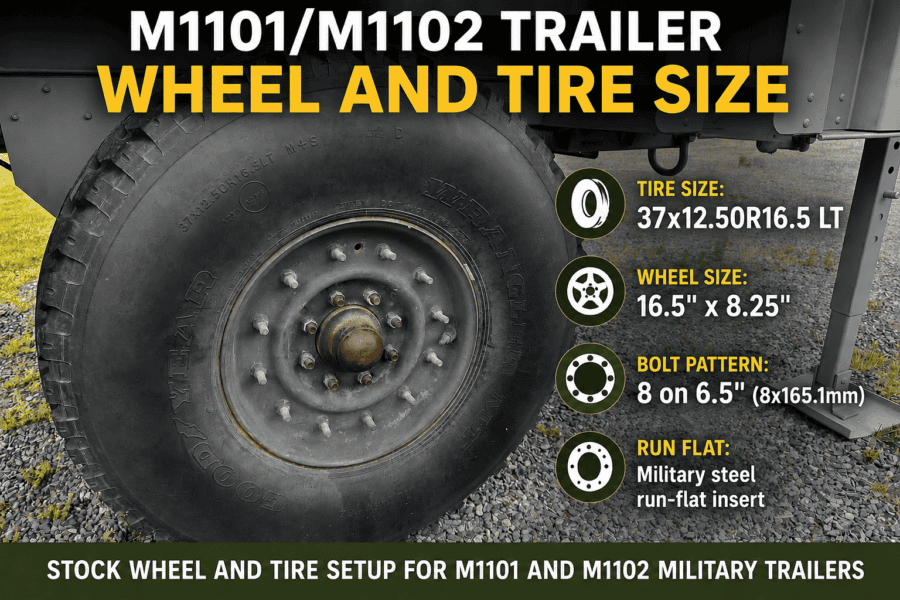
One of the first modifications many M1101 owners make is replacing the massive military wheels with something that matches their tow vehicle. The factory 8-lug wheels and 37-inch Goodyear MT tires are incredibly durable, but they’re also: Converting to a 6×5.5 bolt pattern opens the door to thousands of wheel and tire options while allowing many owners to share a spare tire with their truck or SUV. Here’s everything you need to know before making the swap. Why Convert to 6×5.5? The 6×5.5 (6×139.7mm) bolt pattern is one of the most common light truck patterns in North America. Vehicles that commonly use it include: This opens the door to many aftermarket off-road wheels as well as OEM. Matching your trailer to your tow vehicle means: Factory M1101 Wheel Specs From the factory, the M1101 includes: The complete wheel and tire assembly weighs well over 150 pounds, making roadside tire changes a chore. The Simplest Conversion Fortunately, the axle itself does not need to be replaced. Instead, most owners simply replace the brake drums/hubs with units drilled for a 6×5.5 bolt pattern while keeping the factory axle and surge brake system. A commonly used replacement is the Dexter K08-201-97 hub and drum assembly, designed for 5,200-pound trailer axles with a 6 on 5.5 bolt pattern. It includes bearings, seals, a grease cap, and lug nuts, making it one of the easiest bolt-on conversion options. Parts You’ll Need Most conversions require, these will typically come as a kit: If your brakes need attention, this is an excellent opportunity to replace: Basic Installation The conversion is surprisingly straightforward. Because you’re working with bearings and brakes, take your time and follow the manufacturer’s torque and bearing preload procedures. Choosing Wheels One advantage of converting to 6×5.5 is the huge variety of wheels available. Popular sizes include: Common tire sizes include: The right combination depends on your intended use and tow vehicle. What About Offset? Wheel offset matters. Too much positive offset can reduce clearance to the suspension. Too much negative offset increases bearing loads and widens the trailer. Whenever possible, test-fit one wheel before purchasing an entire set. I took several measurements against the OEM wheel and then measured the wheels from my tow vehicle. The Hub-Centric Challenge This is where many conversions become more complicated. Most trailer hubs are lug-centric, meaning the wheel is centered by the lug nuts. Many OEM truck wheels—including Tesla wheels—are hub-centric, meaning they’re centered by the hub bore. While a standard 6×5.5 trailer hub gets you the correct bolt pattern, the hub pilot may not fit your wheels. Unfortunately, this is a dimension that seems to be lacking from several manufacturers. Should You Keep the Military Tires? If your original tires are still in good condition, selling them can help offset much of the conversion cost. Military wheels with run-flat inserts are still desirable for: Is It Worth It? For most civilian owners, absolutely. The conversion offers several benefits: Unless you’re building a historically accurate military restoration, converting to 6×5.5 is one of the best upgrades you can make. Frequently Asked Questions Can I keep the factory surge brakes? Yes. The hub conversion does not require changing the hydraulic surge brake system. Do I need a new axle? No. The factory axle can typically be retained when using compatible 5,200-pound hub and drum assemblies. Can I use Toyota wheels? Yes. Many Toyota wheels use the 6×5.5 bolt pattern. Just verify offset, center bore, and brake clearance before installation. Can I convert my M1101 to electric brakes? Yes, more to come on this later. Can I use Cybertruck wheels? Not directly. Although a 6×5.5 conversion solves the bolt pattern issue, Cybertruck wheels require an 84.1 mm hub-centric pilot, it seems most pilot hubs are too large and you will likely need adapters. More to come on this. Final Thoughts Converting an M1101 to a 6×5.5 bolt pattern dramatically increases your wheel and tire options while making the trailer far more practical for everyday use. Whether your goal is matching your tow vehicle, reducing weight, or improving serviceability, the conversion is one of the highest-value upgrades available. Just remember that bolt pattern is only one part of the equation. Before buying wheels, verify offset, backspacing, brake clearance, and hub bore to ensure everything fits correctly the first time. More of Our M1101 Content M1101 Paint Refresh ChatGPT Designed, 3d Printed M1101 Replacement Marker Light Housings M1101/2 12 Volt Conversion Purchasing an M1101 Trailer
How to Convert an M1101 to a 6×5.5 Bolt Pattern Read More »