The Cabin

Best Material for Soffit Vents and Tips for Preventing Rodent and Bird Damage

using stainless steel hardware cloth for soffit vent screeens

Soffit vents are an important part of your home’s exterior, as they help to ventilate the attic and prevent moisture from building up. When choosing soffit vents, it is important to select a material that is durable, resistant to pests, are long lasting, and easy to maintain. If you have a new house, shop or other structure being built, it’s certainly worth looking at upgrading the soffit vents now, before they potentially have issues later. Material Options for Soffit Vents The best material for soffit vents is stainless steel. Stainless steel is highly durable, resistant to rust and corrosion, and easy to clean. It is also pest-resistant, so you don’t have to worry about rodents or birds chewing through the vents. If the stainless steel mesh is merely stapled on, they could however allow pests to eventually push them loose. This happen on my sister’s house, and birds were able to get into the attic. Other materials that are commonly used for soffit vents include aluminum and vinyl or a fibermesh. Aluminum is also a good choice, as it is durable and resistant to rust. However, it is not as strong as stainless steel and can be more easily damaged by pests. Vinyl is the least expensive option, but it is also the least durable and can become brittle and crack over time. Here’s a picture of our soffit vents where the squirrels chewed through. In total, they chewed through four different locations. If you have had problems with rodents or birds chewing through your soffit vents, there are a few things you can do to prevent this from happening again: At our cabin, I had to deal with squirrels that chewed through the fibermesh screens. Squirrels Chewing Through Soffit Vents at My Cabin Earlier this year, I started to notice that some of the soffit vents at my cabin were damaged. I could see holes in the screens, and there was evidence of squirrels chewing on the wood. After believing I had eradicated the squirrels, I didn’t want to take the chance of trapping any inside. I ended up duct taping some paper over the damaged soffit screen areas to make sure there wasn’t any signs of squirrels trying to chew their way back out (or into the cabin). For this repair, I had to remove the fascia board and tongue and groove soffits in order to access the vents. I then replaced the vents with stainless steel hardware cloth. I bought a roll of hardware cloth from the local hardware store. Unfortunately, they didn’t have any smaller rolls, so I have to buy one that was about 3 feet wide. The plan was to cut them down to size with an angle grinder, but I was out of cutting discs. I didn’t have many other metal cutting tools at the cabin, but I did have my reciprocating saw with just a wood cutting blade. Fortunately, the wood cutting blade was able to go through the stainless steel hardware cloth fairly easily. Make Your Soffit Vents Stronger I was told by an exterminator to make sure to use screws for attaching the new screen material. Birds and rodents can push through screen and eventually work staples loose. I’m sure as wood contracts and expands over the years, it can cause the staples to loosen on their own too. The local hardware store didn’t have many exterior wood screw options available in shorter lengths, so I ended up using 3/4″ roofing screws. This will make it much more difficult, ideally impossible, for rodents to get back in. One side of the cut out was ride on the edge of the tongue groove, so I did have to stick with only staples on the one side. Since I didn’t have a staple gun at the cabin, I bought one from the local hardware store. The gun wasn’t able to drive all the staples in, so I had to go back with a hammer to get all of them down. Additional Tips for Protecting Your Soffit Vents Here are some additional tips for preventing rodent and bird damage to your soffit vents: By following these tips, you can help to protect your soffit vents from rodent and bird damage. Best Material for Soffit Vents and Tips for Preventing Rodent and Bird Damage Soffit vents are an important part of your home’s exterior, as they help to ventilate the attic and prevent moisture from building up. When choosing soffit vents, it is important to select a material that is durable, resistant to pests, and easy to maintain. The best material for soffit vents is stainless steel. Stainless steel is highly durable, resistant to rust and corrosion, and easy to clean. It is also pest-resistant, so you don’t have to worry about rodents or birds chewing through the vents. Other materials that are commonly used for soffit vents include aluminum and vinyl. Aluminum is also a good choice, as it is durable and resistant to rust. However, it is not as strong as stainless steel and can be more easily damaged by pests. Vinyl is the least expensive option, but it is also the least durable and can become brittle and crack over time. If you have had problems with rodents or birds chewing through your soffit vents, there are a few things you can do to prevent this from happening again: Soffit Vent Fire Safety Since our cabin is in a brush fire zone, I took advantage of the free fire safety inspections our local fire department provides. The inspector actually called out the fibermesh screens in our soffit vents. A big focus for fire prevention is making sure there aren’t small areas that embers can set, eventually creating a fire. Replacing the soffit vents with stainless steel had been on my list of to-do items, but with other projects I put it off a while longer until squirrels forced the issue. Conclusion The wrong material or not using the right fasteners

A Winter Wonderland Adventure Right Out Our Door: The Unique Sledding Platform at Our Cabin

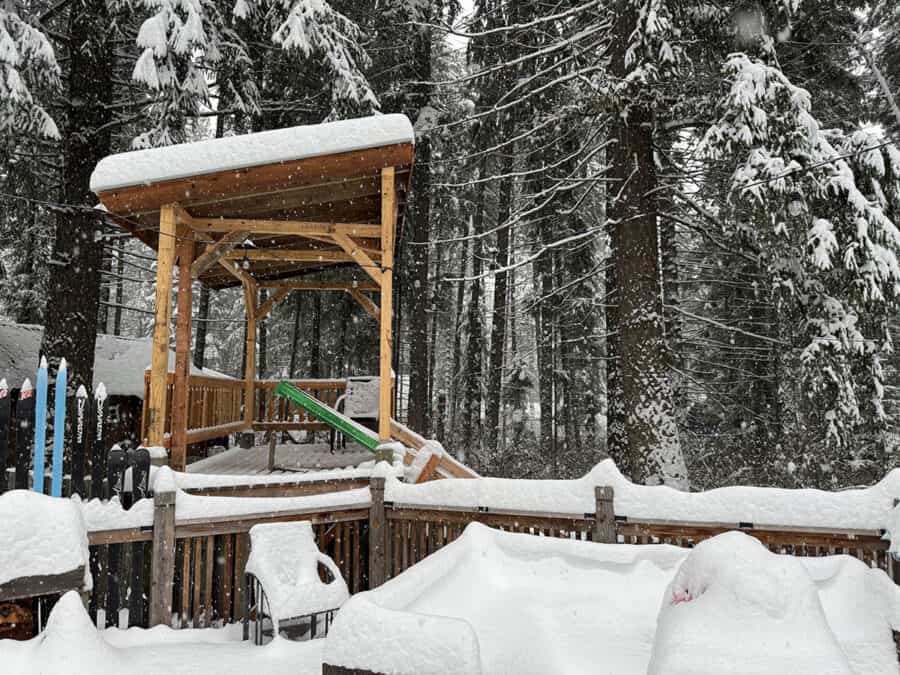
The previous owner of our cabin built a fairly unique sledding platform just off of the deck. Our cabin is located East of the Cascade Mountains in Washington state where we receive approximately 89″ of snow every year. The platform stands about 7 feet off the ground, fun winter activities for our family and friends when enough snow hits and we’re not out on the snowmobiling trails. Innovative Sledding Platform Design At its core, it boasts a unique design feature that makes it a true standout: a tilting “staging area.” This ingenious addition adds an extra layer of convenience to the sledding experience. Rather than trying to get the sled (and yourself) onto the slide, it tilts down to make it easy for the rider to get read. When a sledder’s weight shifts forward, the staging area tilts downward, propelling them down the slide and into a world of snowy adventure. Keeping the Snow in Place The use of 2×4’s in the slide not only keeps the snow packed but also prevents it from sliding down with the rider. This design choice, however, comes with its quirks, such as the tendency to accumulate pine needles throughout the year. It can also collect rain water. To combat this, a single drainage hole was drilled in each section, allowing most of the rain water to drain away (assuming the hole isn’t blocked by pine needles). I’ll have to work for ways to improve this later. Safety First (Well, Next After 2 Years) While exhilarating, the initial version of the platform raised some safety concerns for our family. We had worries about the absence of railings both on the slide, however, my wife later decided she wanted railings added to the platform itself. DIY Pallet Repurposing To address these concerns, I decided to repurpose some pallets for the build. We were able to get some 12 foot long pallets that used 4×4’s for the lower structure. I was able to re-use these to build up the framing to support some 2×4’s to mount railing balusters. This addition not only enhanced safety, but will also added a rustic charm to the structure. Current State and Future Plans Here’s a short video showing the first phase of the sledding platform and how the “staging area” functions: I still need to buy some cedar and cut additional balusters. The balusters I used came from the railing of one of the lofts, but it wasn’t enough. We may also consider adding a second slide later as well. I’m also going to build a roof, which we’ll cover next… Keeping the Snow Off (Adding a Roof) Our 13 year-old daughter suggested another addition: a roof above the platform to reduce the snow accumulation. Secondly, it would protect the platform from the elements, extending its usability throughout the year, our 7 year-old is already calling the structure her clubhouse. I’m trying to see if I can install the roof before the weather turns too cold, we’ll see how things go as I have other projects still on the list as well. UPDATE: I did get the roof built just before the weather turned too cold and wintery. I’ll update this section more soon. Here’s the railing balusters finished up: Conclusion: Our cabin’s sledding platform is a true testament to the creativity and craftsmanship of its previous owner. With its unique design, ongoing improvements, it’s a staple of our winter adventures, especially for our kids. As we eagerly anticipate the coming winter, we look forward to sled-filled days and nights under the stars with this incredibly fun sledding platform that has brought joy and excitement to our cabin. I’ll add more pictures and videos when we get our first decent snow accumulation of the season!

DIY Overhead Storage Door with Block and Tackle Pulley

diy overhead storage door with block and tackle pulley for opening

There’s something about a cabin in the woods that brings a sense of tranquility and nostalgia. But when it comes to practicality, sometimes a little DIY magic is needed to make your cabin space more functional and visually appealing. In this blog post, we’ll take you through an inspiring woodworking project to enclose an overhead storage area with a custom built diy overhead storage door using repurposed wood and a block and tackle pulley system. The Challenge The previous owner who built our cabin had a fairly small shed with an overhead storage area. Unfortunately, this storage area was completely open and I wanted to come up with a solution to close it. We used this space to store some blow mold Christmas decorations, but it certainly looked a bit tacky. From the street, the decorations could be seen as well. It was time to transform this neglected space into something more practical and aesthetically pleasing. The Materials I had some damaged tongue and groove slats from a closet I removed to make room in the game loft for our racing arcade cabinets. Previously, I had already cut these slats down to remove the damaged area. With these slats laying around for a few months now, it seemed like the perfect usage to make the overhead door with these. Repurposed Wood Here’s the closet I removed… The tongue and groove is quite thin, as far as I know it’s nearly, if not completely impossible to remove without damaging it. Lots of cutting down, running the slats through the table saw. Staining the Overhead Door I need to pick up some more stain, but I’ll use the same stain I used for the main door of the shed. It does have a decent amount of weight to it, so I’m not sure if I’ll take the door back down to stain or leave it in place. Stay tuned for that… Conclusion What started as an open and unsightly overhead storage area in the cabin’s shed was transformed into a functional and visually appealing space. This woodworking project showcased the power of repurposing materials and creative problem-solving. The use of a block and tackle pulley system added a touch of nostalgia, harking back to simpler times. If you’re looking to enhance your cabin space and have some repurposed wood lying around, consider taking on a project like this one. Not only will it breathe new life into a neglected area, but it will also infuse your cabin with rustic charm and character. Happy woodworking, and may your cabin always be a haven of peace and creativity!

Ski-tastic Deck Balusters: A Unique Twist for Your Mountain Cabin Deck on a Budget

snow ski upcycling for deck balusters.

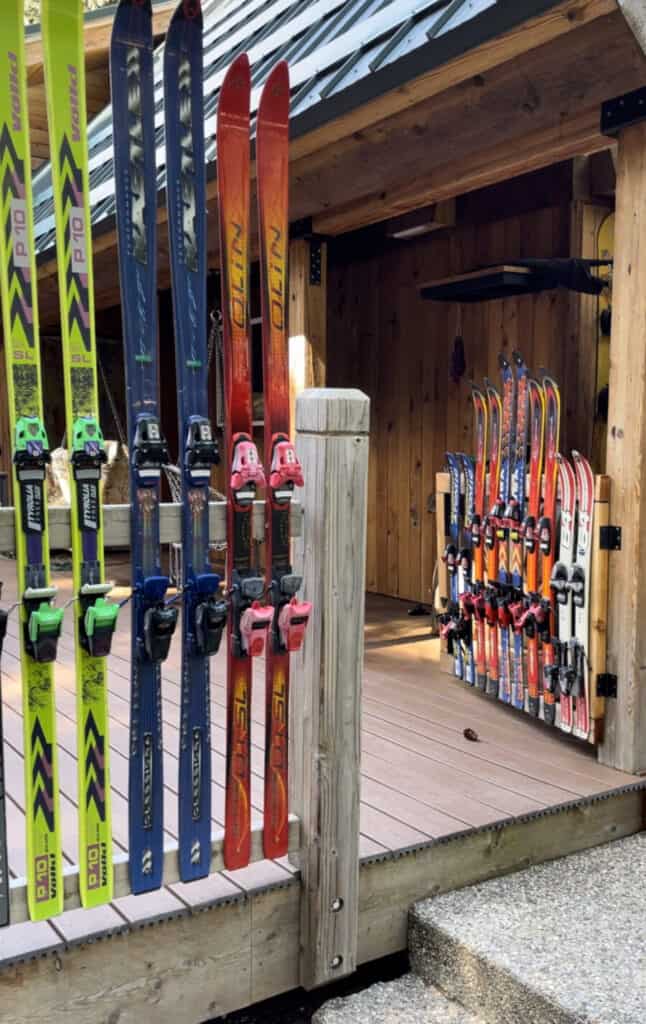
When you’re decking out your mountain cabin, it’s natural to want something that captures the essence of the outdoors and your adventurous spirit. If you’re looking for an unconventional and cost-effective way to make your deck stand out, consider using snow skis as deck balusters. This creative approach combines rustic aesthetics with a touch of adventure without breaking the bank. In this blog post, we’ll guide you through the process of repurposing snow skis as deck balusters and explain how this option can save you money compared to traditional balusters. Enclosing Our Deck My wife wanted to fully enclose the deck at our cabin so that we could have our dogs there too without worry of them running off. The previous owner built a large, 900sf deck, but it wasn’t fully enclosed. With how expensive wood has gotten, I chose to go with a more creative approach by upcycling old snow skis that might wife picked up. We were able to get some of the skis for free at our neighborhood “free” day where neighbors put items they no longer want at the end of the driveway. She also found several pairs at Goodwill for only $1-2 when they had the clearance sales. Why Snow Skis? Using snow skis as deck balusters is a brilliant idea that brings a touch of winter magic to your mountain cabin year-round. Here’s why this approach is not only unique but also budget-friendly: Materials and Tools Needed Before you get started, gather the following materials and tools: Installation Steps Follow these installation steps for your budget-friendly ski balusters: Conclusion Repurposing snow skis as deck balusters is not only a unique design choice but also a budget-friendly one. At the current price of cedar 2x2s, choosing used skis that were free or only $1-2 per pair is a much cheaper option that allows you to achieve a stunning deck makeover without breaking the bank. So, embrace the charm of ski-tastic deck balusters, save some money, and enjoy the outdoors in style!

Crosley Jukebox, No Sound – Simple Troubleshooting Guide

crosley jukebox

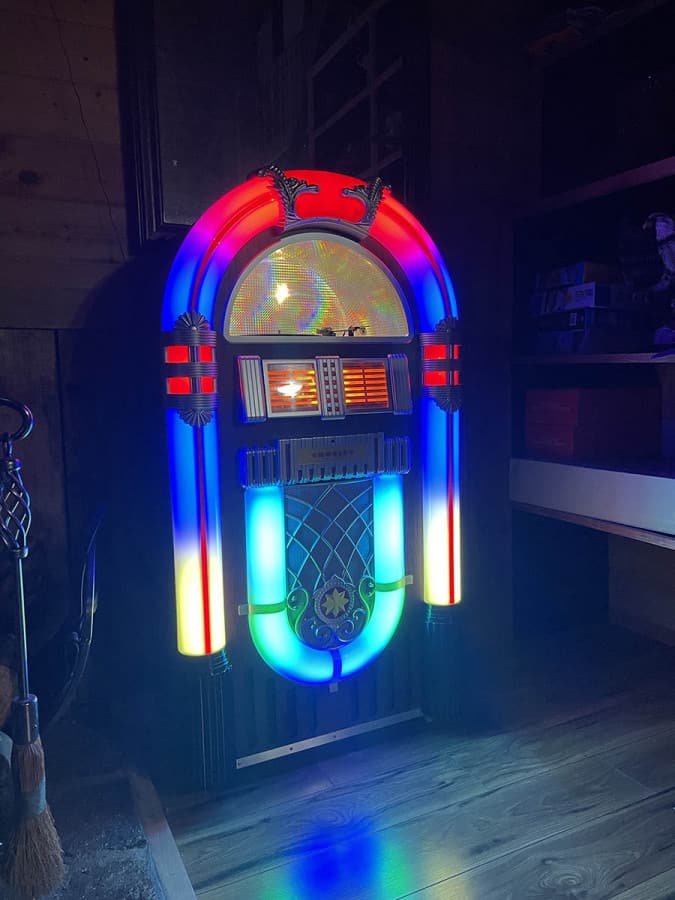
The Crosley jukebox is a smaller, much cheaper jukebox inspired by the popular, almost timeless Wurlitzer 1015. It’s almost the Arcade1up of jukeboxes for those familiar with these cheaper, 3/4 sized arcade cabinets. I had purchased the Crosley jukebox model number CR1704A-WM for my 13 year-old daughter, but after just a couple months it would not produce any audio no matter what input source was selected. I contacted Crosley support, and this is what the responded with: The first two are obviously just to provide proof of purchase and establish the warranty period. The third is where the troubleshooting actually begins, and in my case, confirmed our unit had a bad board. It requires simply moving the switch to the off position for the autostop function of the turntable, read on to see what Crosley’s response was. Troubleshooting (Per Crosley Support) Per Crosley, they instructed me to move the autostop switch of the turntable to the “off” position. By doing this made the turntable continues to spin when the jukebox is on, but sound did start to play from all sources now. This was not how it originally operated, nor should it. This is the selector switch highlighted below: Replacement Board for the Crosley Jukebox After I confirmed for Crosley that all inputs were now producing sound, they replied back in a couple of days and stated they ordered a replacement board. Unfortunately this board is backordered, and they mentioned their current estimate for the part is about 90 days, but it arrived about a month later. They also provided a PDF with instructions on how to replace the board (for when the replacement arrives). Below are screenshots of the images from those instructions below along with the required text: Crosley CD Player Repair Instructions CR1704, v2 Summary These jukeboxes by Crosley certainly have some flaws. I’ve seen reviews from others who mentioned the sound on theirs stopped working. It’s clearly an issue they’ve had since they were ready to send out a new circuit board from one simply troubleshooting step. We’ll see how things hold up with the new circuit board. I would like to get a true jukebox from Rockola or another brand at some point, but the price far exceeds these, but the quality does as well. The Walmart we purchased ours from had them marked down to $447 back in November 2022. Retail price is $497, but I recently saw them marked down on clearance for just $350.

Top Tech Picks to Keep Your Vacation Home Safe

For those with vacation homes, or investment properties that are left vacant for extended periods of time, keeping the property secure can be a challenge. Fortunately, there is an array of tech solutions designed to address these safety needs. From surveillance systems and access control systems to smart technology and automated locks, here are some top tech picks to keep your vacation home safe. My choices for what I wanted to monitor unfortunately didn’t fit under one manufacturer’s system, so I ended up using products mostly from Ring and Nest. Currently, each system has its own gaps, although that could change in the future. I’ve also used smart locks from Eufy and Ultraloq. Security Cameras: Security cameras are a great security tool for vacation homes and investment properties, allowing you to monitor the premises from anywhere with an internet connection. With advances in technology, security cameras can now be remotely operated to pan or zoom, as well as provide alerts when motion is detected. You can also opt for a camera system with night vision capability. Smart Thermostat: A smart thermostat can be a great security measure for vacation homes, as it allows you to remotely monitor and adjust the temperature in your home from anywhere. Smart thermostats also have built-in security features such as intruder alerts, while some models can even be set to shut off the HVAC system if there has been an unauthorized access attempt. Water Leak Sensors: Water leak sensors are a great security tool for vacation homes, as they can detect any water leaks or floods in the property. The sensor will alert you via text or email so that you can take measures to avoid damage to your home. Furthermore, some of these sensors can even be programmed to shut off the water main if a leak is detected. Adding on to my Ring security system, I went with multiple Ring Alarm Flood and Freeze Sensors. I have them in front of our water heaters, near the washing machine, and the sinks. Nest currently does not offer flood sensors. Smart Smoke Detectors: If you have a traditional smoke detector, it won’t do you much good if you can’t hear when it’s going off. Ring offers a smoke and carbon monoxide “listener”. The device does not actually detect smoke or carbon monoxide, rather it’s designed to work with UL listed smoke and CO detectors that are 10 years old or less. Therefor, I opted to go for the Nest Protect Smoke and Carbon Monoxide Detector. These are just a few examples of the security measures you can take to protect your vacation home or investment property. With advancements in security technology, there’s no excuse not to ensure that your house stays safe while you’re away. With the right security system in place, you can be sure that your vacation home is secure and protected while you’re away. Invest in security tech today, and rest assured knowing your property is safe.

How to Winterize Your Vacation Home or Cabin

Winterizing your vacation home or cabin is an important part of ownership. Not only does it help protect your property from the elements and keep your energy bills low, but it also helps you avoid expensive repairs down the road. Whether you’re getting ready for a winter getaway or just want to make sure that everything is in good shape when spring rolls around, here are some tips on how to winterize your vacation home or cabin. First, inspect the exterior of your home for any damage that may have occurred over the winter months. Make sure that all of the windows and doors are sealed tightly to prevent drafts, and check gutters and downspouts for blockages. If there is any loose shingles or damage to siding, take care of those repairs as soon as possible. Next, winterize the water system to prevent pipes from freezing. Start by draining all of the faucets and toilets in the house, then disconnect garden hoses and insulate any exposed pipes with foam insulation. If you have an outdoor swimming pool, winterize it as well by clearing out debris, draining the water, and covering it with a winterizing tarp. Winterize your heating system to ensure that you stay comfortable all winter long. Have your furnace inspected by a qualified technician and replace the filters if necessary. Make sure to keep an eye on carbon monoxide levels in the home as well, since this is a silent yet deadly winter hazard. Windows and Doors Insulate windows and doors – Sealing any gaps or cracks around windows and doors with caulk or weather stripping can help keep cold air from entering your home. It’s also a good idea to use window film to provide extra insulation in the winter months. Install storm shutters – Installing storm shutters can help protect your windows from debris during a snowstorm. Heavy Snow Areas When it comes to heavy snowfall, prevention is key for keeping your home safe and secure. Taking time to properly prepare your home during the warmer months can help reduce the risk of serious damage caused by a heavy snowstorm. Here are some simple steps you can take to protect your home from heavy snow: 1. Clean out gutters and downspouts – Cleaning out your gutters and downspouts before a heavy snowstorm can help prevent the buildup of snow around your house. This can help reduce the amount of stress on your roof, as well as keep water away from the foundation of your home. 2. Trim trees – Trimming overhanging tree branches can help prevent them from breaking off and causing damage to your home during a heavy snowstorm. 3. Check your roof – Checking the condition of your roof before a snowstorm can help ensure that it is strong enough to support the weight of the snow. If you detect any weak spots, have them repaired as soon as possible. 4. Clear walkways and driveways – Clearing your walkways and driveway of snow before a storm can help reduce the amount of shoveling you will need to do afterwards. It’s also a good idea to apply a coat of de-icer after the snow has stopped, as this will make it easier to remove any remaining snow and ice. 5. Snow Buildup – Make sure snow does not build up next to the house, especially against wood siding or in other areas where melted snow can get into areas to cause possible damage. Cedar siding such as this can become damaged, several home owners will install metal roofing a few feet from the bottom of their house or cabin to prevent snow contact with the wood. By taking the time to properly prepare your home for a heavy snowfall, you can help reduce the risk of damage and keep your family safe throughout the winter months. Following these simple steps can make a huge difference in protecting your home from heavy snow. Additional Tips Have emergency supplies on hand – It’s always a good idea to have emergency supplies such as flashlights, batteries and food ready in case of a power outage caused by a heavy snowstorm. Monitor weather reports – Staying up to date on local weather reports can help you plan ahead and be prepared for any severe winter storms headed your way. Take time to familiarize yourself with the National Weather Service’s winter storm safety tips, as this can give you useful information in case of an emergency. By taking the time to winterize your vacation home or cabin, you can rest assured that it will remain in good condition throughout the winter months. Regular maintenance and inspections are key to ensuring that your property is safe and sound while you’re away, so be sure to check on it periodically throughout the winter season. With the right winterizing measures in place, you can ensure that your vacation home or cabin is always ready for a winter getaway.

Mario Kart 8 Racing Cabinet (Old Cabinet Conversion to Nintendo Switch)

mario kart 8 racing cabinet

This is a project I had been looking into for a few months. New sit-down racing arcade cabinets such as Mario Kart DX can be quite pricey, coming in around $13K USD for a single cabinet. You’re also typically limited to just one game. I wanted to setup a 2 player racing arcade cabinet at our cabin for the game loft, and started exploring various options. We had temporarily setup an OpenWheeler racing wheel cockpit, but it just didn’t seem to delivery the experience I was looking for. I then started looking at building my own cabinet or possibly converting an old cabinet. In case you hadn’t figured it out, I opted to convert an old cabinet. Sega Rally Arcade Cabinets For this project, I started with an old Sega Rally racing game which was made in 1995. I found it for sale on my local Craigslist for $600. Being over 25 years old, it had certainly seen better days, but felt it would give me a solid starting point. Other Cabinet Considerations Ridge Racer and Rush 2049 have some intriguing design qualities to their cabinets. I was trying to find a pair of these, but did not have any luck. I looked into buying another pair of cabinets out of state, but with shipping wasn’t cheap. One seller advised I go through uShip.com, I was receiving quotes for over $2600. That wasn’t going to happen. I’ve seen pinball machines shipped last year across country for around $500. Even with 2 cabinets, the prices I was receiving seemed extremely high so I continued to see if I could find anything locally. Shipping these doesn’t seem like the most budget-friendly approach. I would certainly recommended trying to find something local. In all honestly, I think you typically need to be flexible, these games aren’t readily available. The Original Sega Rally Racing Cabinets I ended up picking these up just under an hour away from our house. The seller was able to confirm dimensions for me and I quickly realized I wasn’t going to fit two of these in the SylvanSport trailer. My neighbor was actually borrowing our 6’x12′ enclosed cargo trailer and so I was without it for about a week. Fortunately, the seller was willing to hold them for me. To Keep Original or Modernize I’m sure this build will not sit well with some who may feel cabinets such as these should be restored to their original condition. Others may be against a Nintendo system in a Sega cabinet. This cabinet had multiple issues. The screen for player 1 had a distorted image and the accelerator did not work. The previous owner thought it could be a ROM or board issue for the screen and a potentiometer with the pedal. Cabinet 2 had audio issues. Both screens had significant “burn in”. The kids got a chance to play them, but seemed to agree they would prefer to have the option of playing multiple, modern games. The decision was then made to do a full conversion. Sega Rally Billboard / Topper The Race Leader section of plexi did have a crack, this might help convince me to have custom graphics printed sooner than later. If I do go with new graphics, I’ll think of something else to use than “Race Leader” since it won’t be functional. With the original Sega Rally game, it did show which player was leading, so this is functionality I will lose in my Nintendo Switch conversion. Gutting and Cleaning After getting the cabinets home, I unloaded them into the shop. I connected everything and powered them to see the original functionality. It was also quite dirty. Steering Wheels The original wheel is quite a bit heavier and robust then PC-based racing wheels. Unfortunately, from what I’ve ready, they are extremely difficult to try and get re-wired, especially if being using for multiple games. A lot of times controls need to be remapped for each individual game. To keep things simple and easy, I went the plug-and-play route. I purchased a pair of the Hori Racing Wheel Mario Kart Pro Deluxe. These racing wheels are USB and simply plug into the Nintendo Switch docking station. Unfortunately, they do not include haptic feedback. Transporting (again) and Setting Up in the Cabin Loft I’m not sure the total of weight of these cabinets, but they’re certainly not light. After getting them hauled over to our cabin, I decided to remove the seat, and unbolt the main cabinet from the base. These made it much more doable for getting up to the loft with the help of my brother-in-law and nephew. Modernizing and Simplifying This was a big factor in the decision to update to a newer system. Trying to troubleshoot and get 25 year old hardware working again for an older, single game didn’t seem like the approach I wanted to take. Here’s a look at the under seat hardware: Gameplay – 2 Player Action Without the Split Screen Going back even to the original Mario Kart on the Super Nintendo I found it annoying having a split screen for two players. Back then, I don’t believe it was possible to setup two separate screens. Today, however, WiFi makes it a lot easier! While you do have the option of using the Online Play mode, we’ve been using the Wireless Play. In this mode, one player will create a lobby, then others can join. I’ll add some images for this later. Having to go in and setup the Wireless Play is a few more steps than just sitting down to a Mario Kart DX (or other racing game) and inserting some tokens, but I feel the tradeoff going to modern technology was well worth it. We’ve had extended family who have thoroughly enjoyed it, even though things were only temporarily setup. Requirements With this type of configuration, you do need to have a Nintendo Switch and game for each setup. For two cabinets, you need two Nintendo

Custom Wood Door Insert

custom wood door insert

This post will be updated with additional information, but for now, here are some photos of a custom wood insert I created for a wooden door that had a broken glass insert. Rather than get a new (or used) door, I figured I’d add a wood insert from some old 2×6’s I had laying around.

How to Install a Bi-Fold Door

how to install a bi-fold door

In this post we’ll go through the steps to install a bi-fold door. The installation time took me around 20 minutes. Everything is fairly straight forward, however this is the first bi-fold door I’ve ever installed and it did have to figure out a couple things along the way. I’ll provide some of these lessons learned that weren’t included in the instructions. Particularly with the pivots and hinges. This particular door is by Frameport, and unlike some other designs, this one has several size options, 13 to be exact. I opted for the 6-Panel style. However, louvered designs as well as others are also available. Follow along as we go through the installation process. Required Tools for Installing a Bi-Fold Door The tools for installation were fairly basic and minimal, here’s what I used: Unboxing the Bi-Fold Door After a string of wet or damaged deliveries of larger items recently, I was pleasantly surprised to find this door was delivered free of damage. Bi-Fold Door Hardware Here’s the included hardware: The hardware packs are attached quite secure to the doors, just pull up on the plastic near the arrow to remove. Step 1 Mark Position of Track The instructions that came with the door mention marking the center of your top jamb on each side of the opening and center point. I had mine offset, as I didn’t want the doors recessed that far into the jamb. So, for my particular install, the track was only about an inch from the outer walkway. Step 2 Insert Plastic Guide For the second step, you’ll insert the plastic guide into the track. Note, this guide will be positioned on the side of the doorway that is NOT hinged. As stated in the instructions, make sure the scooped surface of the guide is facing up towards the solid, flat side of the track before mounting. Step 3 Mount the Track Using the previous marked lines in Step 1, you’ll now mount the track using the three flat-top screws. Note: You’ll use position the upper hinge slide bracket (the one with the black set screw) to the side you plan to have the outside of the door hinge. The plastic glide is for the non-hinged door edge. Step 4 Mounting the Bottom Bracket Next step is to install the bottom bracket. I had tile in this area, but if you have carpet you may need to push the bracket down into the carpet so it doesn’t sit too high. I also opted not to drill into the tile to get a screw at the end. The two screws into the door jamb seem to be enough so far. Step 5 Knurled Hinge Pin For this step, you need to thread the knurled hinge pivot all the way into the plastic sleeve. Once you’ve done that, you’ll tap it into place with a mallet (or hammer). The directions called for hammer, I opted to use a mallet. Note: Be sure to thread the knurled pivot all the way in, otherwise when you go to hammer it into the door the plastic sleeve could become damaged. After installing the knurled hinge pivot, the instructions mention back the metal pin out from the sleeve approximately 1/4″. My door opening must be a bit tighter (possibly from the tile). I ended up having keep mine fully threaded. Your results may vary. Then, insert the top two plastic pivots and lightly tap them into position to fully seat. Step 6 Install the Door You’ll now push upright to align and insert upper the plastic pivots into the sliding hinge guide and track guide in the top track. More than likely you’ll have to angle the door to get them into position, then seat the bottom knurled pivot into the serrated slot of the bottom bracket. Step 7 Square Up the Door Now, it’s time square up the door and make final adjustments. Be sure to loosen the set screw on the upper sliding hinge bracket and move it to the necessary position within the track. Once in position, re-tighten the set screw. Test opening and closing the doors to make sure everything operates smoothly. The doors should have equal spacing on all sides. Step 8 Adjust for Height If you need to adjust the height of your bi-fold doors, lift the door from the floor bracket. You’ll rotate the bottom pivot clockwise to raise, or counter-clockwise to lower it. Step 9 Install the Pull Handle For this step, you need to drill a 3/16″ hole in the center of the guide door. Use the long screw from the backside to attach the knob. Finishing Options The instructions do show a few finishing options to hide the metal upper track. I’ll likely add a piece of cedar wood later, but for now, it’s functional. Staining the Bi-Fold Doors I don’t plan to stain our door, but that could change. The majority of the walls in our cabin are a knotty pine that have darkened over the years from UV exposure from the sun. If anyone is considering this same brand of door, there are specific instructions that come with it regarding painting or staining. Notably, the top and bottom edge surfaces are factory-sealed with two coats of UV cured protection. This means they’ll likely needed to sanded if you plan to paint them. They also will not absorb stain. So, if you plan on painting or staining, just be sure to read the instruction that come with your door. Summary All in all quite pleased with this bi-fold door. The lines don’t match up with the trim along the wall, so I’ll see if that bothers me over time. Definitely going to have to wait for the door to darken from UV exposure, as it certainly stands out right now. Otherwise, I may have to consider staining it, possibly a similar color as our exterior doors. The installation was fairly straight forward and easy, so big plus there! It