Reviews

Product Reviews

EGO Z6 52″ Electric Zero Turn Mower Review

ego 52 inch electric zero turn mower

Here’s the latest edition to our electric family. I recently took delivery of our new, 52″ EGO electric zero turn mower. The EGO is replacing our previous Ryobi zero turn mower which, like many other owners have experienced, had significant battery degradation after less than a year. The EGO Zero Turn Delivered! It was on Memorial Day I missed a call from Ace Hardware, they left me a voicemail stating the mower was ready for delivery. I called them back shortly after seeing the missed call and listening to the voicemail. They mentioned they still needed to attach the handlebars, or could deliver the mower fully crated. Since it would be easier and faster for them to deliver it on the crate, I didn’t mind having to go through assembly. Assembly After unbolting and removing the side walls of the crate, assembly consists of just a couple parts. The handle bars and seat which will be bolted on. You’ll also snap in the hose connectors to the deck. Batteries: Ryobi Zero Turn vs. EGO Zero Turn Some of the biggest differences so far between the Ryobi and EGO zero turns come down to the batteries, here are some key differences: Ryobi EGO Battery Warranty Only 1 year 5 years Battery Type Lead Acid Lithium Batteries Ease of Removal Cumbersome Easy How Do You Charge the EGO Z6 Zero Turn Mower? The EGO Z6 comes with a 110v charger. Simply plug the charger into a common household outlet and plug the other connector into the mower. You also have the option of charging the batteries with a standalone charger. How Much Does the EGO Zero Turn Mower Cost? Cost is certainly a major factor in just about any purchase. The EGO 52″ Zero Turn Mower certainly isn’t cheap, it has an MSRP of $6,999.00. The EGO 42″ Zero Turn Mower was at $4,999.00 last year, but was increased to $5,499.99; although certain retailers such as Lowe’s is currently listing it back down to $4,999.00 again. More to Come! It’s only been 4 days since I’ve owned the EGO, but I will continue to update this post with updates as we get more use out of it.

NewAge Products Pro 3.0 Series Storage Cabinet 10-piece Set (Review and Installation)

newage pro series storage cabinet

NewAge Products manufactures various items from outdoor kitchen sets to garage storage solutions. In this article, I’ll cover their Pro 3.0 Series 10-Piece Storage Cabinet. From deliver to installation. Damage Upon Arrival Things definitely didn’t start out well. Unfortunately, multiple cabinets had sustained some damage. I promptly contacted NewAge, and they did send replacement doors and some touchup paint. The outer boxes didn’t appear to be too concerning, but once I got things opened up their were certainly some concerns. Cabinet Damage This was the most concerning damage, one of the “locker cabinets” had a large scratch and was dented. An overhead cabinet door had badly bent aluminum trim, but I was able to easily bend this back into position. Several Scuffed Pieces There was quite a bit of scuff marks inside the cabinets, one worse than the others. Styrofoam packaging was broken on this one and the inner contents were fairly loose inside because of it. For the most part, the scuff marks were able to be wiped off. It didn’t look like anything to worry about, but there was visible damage once opened in various areas. I thought this was an odd choice for shipping the lighting that is used for under the overhead storage shelves. At least they made it in one piece. They were fully shrinked wrap (which I removed before this photo) after being taped to the boxes. Assembly and Install The main cabinets are extremely heavy. It will definitely help to have at least 2 adults to moves these into position. Installing NewAge Storage Cabinets in a Pole Building Since I was installing my cabinets in my shop that’s a pole building, there aren’t many vertical support beams. The builders installed a 2×6 about halfway up the wall which provides additional support. It also established how far back I could install the walls. For mounting surface of the overhead cabinets, I installed a 4×6 beam (see photo below). Once installation location was determined, I placed the first cabinet. From there, I began installing the first overhead cabinet. This can be done with one person if you have something to support the cabinet (see 2×4’s below). However, a second set of hands would make things go eaiser. Continuing along installing the remaining overhead cabinets and using a step platform (and cabinets) for temporary support while installing. Installing the Benchtop Surface Installing the Lighting The included lighting uses adhesive magnets to install below the overhead cabinets. The light is quite warm, I prefer a cool white for lighting and have since replaced this lighting. Pegboard Installation NewAge does offer a pegboard that fits into the opening below the overhead storage and above the benchtop surface. However, I prefer the the steel pegboards from Wall Control. Overall Perception Other than the damage, a very solid product. A few packaging improvements, possibly QA before boxing, and also additional care by the courier will substantially improve the customer experience. It’s very frustrating to receive a product with this amount of damage.

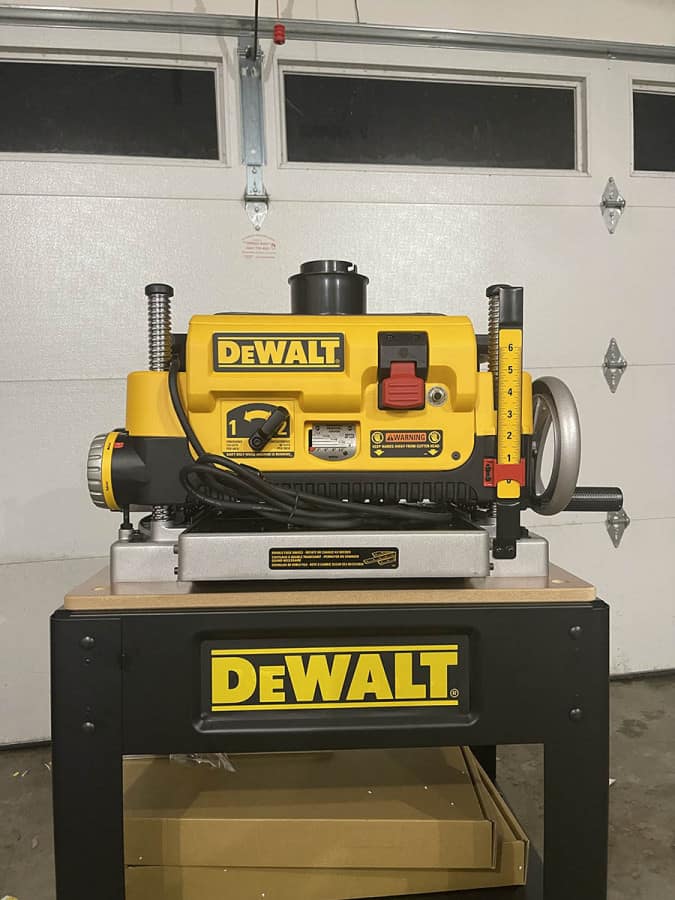
DeWalt DW735X Portable Planer and Stand – Assembly and Review

dewalt dw735x planer and stand

The DeWalt DW735X Planer is one of the top portable planers currently on the market. I recently purchased the DW735X with DW7350 stand as a combo deal. What’s the Difference Between the DeWalt DW735 and the DW735X? The only difference betweeen the DeWalt DW735 and DW735X is extra components that are included with the DW735X. These additions are an infeed and also outfeed table and an extra set of planer knives for the cutter head. In fact, if you order a DW735X, the planer itself will be marked as the DW735 model. Does the DeWalt Planer Come with Blades Already Installed? Yes, the blades are already installed. If you’re not familiar with DeWalt planers and purchase a DW735X, it might be confusing to see blades within the package. I had to double-check on this before turning it on that a set was in fact installed. This is the extra set of blades that comes with the DW735X and will not be included with the DW735. Does a Planer Make a Lot of Sawdust? Yes. This was the sawdust of just a few 1×4’s I ran through. Granted, I made multiple passes, but this can get messy fast. A dust collection system is definitely recommended and will be on my list for future upgrades. Where is the DeWalt DW735X Made? The DeWalt DW735X Planer is manufactured in Taiwan. Assembly of the DW735X Planer DeWalt Planers are just about ready to be used straight out of the box. For the DW735 (and 735X), you’ll need to install the Depth Adjustment Crank Handle. The steps are pretty straight forward: Note: The Crank Handle Shaft has a keyed, flat surface on one side. Specs for the DeWalt DW735 and DW735X DeWalt DW7350 Heavy Duty Mobile Planer Stand The DeWalt Mobile Planer Stand has a solid 5 star review on both Amazon and other sites I checked. It does, however, come with a couple design quirks I found to be odd. Use of the foot pedal is quite awkward, especially with the cross bar support: The second is the fact they used two nuts rather than welding a nut to the lower base to attach the leveling legs. You’ll find holes pre-drilled (and labeled) to fit the DW735 (and DW735X) as well as the DW733/DW734. This upper shelf is made of particle board. Other Stand Options You can always mount the DeWalt Planer to a bench or look at universal planer stand options. There are stationary and rolling stand options available from various manufacturers on Amazon and through other retailers. Of course, there’s also the DIY route of welding your own cart or building one out of wood. Operation of the DeWalt Planer I haven’t used a planer since my dad helped me with a wood project back in high school. A friend of his had some weather oak. Just a few passes on the planer at the wood shop at the local Navy base had it looking pristine. Using this planer, I certainly needed some tips on settings. This video from Make Haven provides an excellent overview: Cost of the DeWalt DW735X The DW735X currently retails for about $700. It was middle of November when I was looking to purchase one, so I was in search of Black Friday and Cyber Monday deals. Deals seemed quite limited, but I did come across a great sale at Acme Tools that also included the stand for $599. Amazon Prime Day apparently had the planer by itself for around $500 earlier in the year. The DW7350 Planer Stand retails for around $150. How much is the DeWalt 735X currently on Amazon? The prices do fluctuate, check below: How much is the DeWalt 735X with stand combo?

Lawnmower Trailer: HaulMaster Dump Cart Review and Assembly

haulmaster-dump-cart-trailer-ryobi-zero-turn-mower

Wanting to be able to haul small loads around our property, I was looking at small trailer carts to use with my zero turn lawnmower. I wasn’t looking to spend too much, and ultimately decided on the HaulMaster 10 Cubic Ft. Heavy Duty Trailer Cart.

Tips for Socket Organization

dewalt organizer - socket organization

Socket organization solutions aren’t always expandable or convenient. I’ve used rails in the past that aren’t always the most convenient to carry around. If you get a few extra sockets of a particular size, it can throw a wrench (pun intended) into your organization methods. If you’re like most people, I’m sure you’ve experienced digging through a toolbox looking for the right size socket you need. Socket Organization – Rails Many years ago I bought a 300 or so piece mechanics tool set and bought several socket rails to try and keep them attached. I still had several sockets that were leftover and many rails that weren’t filled up. Overall, I just didn’t find this method very practical for my use. At least, certainly not when trying to create a custom solution. My newer Kobalt set came with rails that are removable from the main case. At least these are sized for a specific set of sockets. No extra slots, etc. It simply was designed to fit. They are however, somewhat difficult to pull off their clip. I imagine over time it will wear a bit on the plastic material and become easier to remove. Bin Method Instead of looking for a range of single sized sockets, with either a 1/2″ or 3/4″, I’ve found it easier to have them in one spot location. Whether it’s a 6 point, 12 point, shallow or deep socket, 1/2″ drive or 3/5″ drive, I’ve found it easiest (for me at least) to have them divided by size, and in order. So what does this look like? I have my sockets divided by metric and standard (also known as imperial), and sorted in sequential size. 8mm, 9mm, 10mm, 11mm, 12mm, etc. one after the other. This was how I organized them a few years back, I had cup which I labeled by size. I wanted to get a better feel for how space I was going to need, and planned to build a custom organizer. Ultimately, I opted to go with something a bit more generic. These are organizers by Dewalt. These bin organizers by Dewalt are decent in my opinion. I would have liked to see additional slot options for smaller compartments. I’m likely going to glue some dividers into a few spots, particularly on smaller socket sizes. Once I get everything set the way I want, I’ll label each section with what size it is. It wasn’t about trying to cram as much into a drawer as possible, but rather making sure there’s enough room for everything while still being organized. This falls in line with a concept known as 5S, which stands for Sort, Set in Order, Shine, Standardize, and Sustain. More on this below. 5S (or Kaizen) For anyone interested, the 5S methodology is a concept for keeping only what you need and giving everything a specific place of it’s own. It can help give a more efficient work area and a much cleaner and far better organized one at that. A brief overview of the 5S methodology on Wikipedia: https://en.wikipedia.org/wiki/5S_(methodology)

Looking to Organize Your Fishing Rods? Consider the Rapala Lock and Load Rod Rack – Product Review

rapala fishing rod organizer holder

Looking to get our fishing poles off of the floor (the wife has a tendency of sticking them in a corner of the garage), I decided to give the Rapala Lock and Load Rod Rack a try after seeing it on Amazon.  It’s designed so it can be mounted vertically on a wall or upside down on a ceiling, I opted for the ceiling option for my particular installation since we don’t have ton of open wall space in our garage right now as there’s several shelves around almost the entire garage.