The Workshop

80’s Film Nostalgia License Plates (Workshop Decor)

80s reproduction film license plates

Decorating a workshop can be a fun and exciting task, especially if you’re a fan of classic pop culture icons like Back to the Future, Knight Rider, and Ghostbusters. One way to show off your love for these franchises is by adding decorative license plates to your workshop walls. Not only do they add a unique touch to your space, but they also serve as a great conversation starter with your visitors. Reproduction Decorative License Plates I bought these plates from TEMU, a fairly new e-commerce company. They’re listed as metal tin signs and there’s 8 different license plates available. If you haven’t purchased from TEMU before, it can take a couple of weeks, but I’ve ordered a handful of items so far. Back to the Future License Plates Let’s start with Back to the Future. This iconic film franchise has captured the hearts of millions of fans around the world with its time-traveling adventures and unforgettable characters. One of the most recognizable elements of the movies is the DeLorean time machine, which features a customized license plate reading “OUTATIME”. I also purchased the “2015” license plate that was used in the sequil movie. Knight Rider License Plate Next up is Knight Rider, a classic 80s TV show that starred a talking, crime-fighting car named KITT. The show’s signature license plate read “KNIGHT” and it’s an instantly recognizable symbol of the series. Adding this license plate to your workshop wall will show off your love for this beloved show and its futuristic technology. You could even pair it with a KITT replica model to create a truly immersive display. Ghostbuster Ecto-1 License Plate Finally, we have Ghostbusters, a classic 80s film that blended comedy, horror, and science fiction in a unique and unforgettable way. The Ghostbusters car, a converted 1959 Cadillac Miller-Meteor ambulance, featured a license plate that read “ECTO-1”. This plate has become a symbol of the franchise.. It’s a great way to pay homage to the classic film and its iconic vehicle. Mounting the License Plates I just screwed the plates into a horizontal 2×6 of the wall of my pole building. I did this with some other license plates as well. Others may have other creative ideas for mounting including lighted frames, but I opted for a quick and easy install for now. Build Quality These license plates are a standard size plate. I’m not sure what gauge metal they’re made out of, but they’re a bit thinner than state issued plates. While the letters are NOT raised, the edge of the frame is embossed, so these are completely flat. In conclusion, decorative license plates from Back to the Future, Knight Rider, and Ghostbusters are a great way to add a unique touch to your workshop while showing off your love for these classic pop culture icons. Whether you’re a die-hard fan or just appreciate the nostalgia these franchises evoke, adding these plates to your decor is sure to make your workshop a conversation starter for years to come.

How to Organize Your Workshop

5s foam tool organizationi

For many people, a garage is much more than a place to park their cars. It is often a space for hobbies, projects, and other creative endeavors. Whether you are a DIY enthusiast, a woodworker, or an automobile enthusiast, having a well-organized workshop garage is essential. Staying organized helps make the most of your space and keeping your tools and equipment safe and easily accessible. In this article, we will explore some practical tips and strategies for organizing your workshop. From organization and maximizing storage space to creating dedicated workstations, these ideas can help you transform your garage into a functional and inviting workspace. Whether you have a large, wide open shop or smaller space, we’ll cover tips anyone can use. Several of this strategies are based on a methodology called 5S Kaizen. I was first introduced to this method when I was working in the medical device industry. Our supervisor over the incoming quality assurance area revamped his department based on 5S, and the results were quite noticeable! Other departments took notice and started implementing 5S themselves. What is 5S Kaizen 5S is a workplace method of organizing that involves five steps: Sort, Set in Order, Shine, Standardize, and Sustain. It aims to create an efficient and organized workspace by eliminating clutter, organizing tools and materials, cleaning regularly, establishing clear workflows, and maintaining the improvements over time. The method originated in Japan and has been widely adopted in manufacturing, healthcare, and service industries around the world. Stick with me here, and we’ll dive into how 5S can be applied to your workshop. Apply The Five Steps of 5S to Your Workshop: Additional Tips Create Dedicated Workstations In addition to storage, it’s important to create dedicated workstations in your workshop garage. This will help you stay organized and efficient while working on projects. Think about the types of projects you typically work on and create dedicated workstations for each one. For example, if you enjoy woodworking, you might have a dedicated workstation for your saws, drills, and other woodworking tools. If you enjoy auto repair, you might have a dedicated workstation for your tools and equipment related to car repair. When creating your workstations, think about the flow of your workspace. You want to make sure that each workstation is easily accessible and that you can move from one workstation to another without any obstacles or clutter. Label Everything Labeling is an important part of workshop garage organization. It helps you keep track of your tools and equipment and ensures that everything has a designated spot. Consider using a labeling system that is easy to read and understand. You might use a label maker to create clear and legible labels for each item, or you might use a color-coded system to group items by category. You can have silhouette vinyl or silkscreening on your pegboards to know what tool goes where. In addition to labeling your tools and equipment, it’s also important to label your storage containers. This will help you quickly find what you need and ensure that everything is returned to its proper place after use. Conclusion Organizing your workshop garage can be a challenging task, but it is essential to creating a functional and efficient workspace. By decluttering and sorting your items, maximizing your storage space, creating dedicated workstations, labeling everything, and maintaining your space, you can transform your garage into a place where you can work on projects and pursue your hobbies with ease. Remember, a well-organized workshop garage not only makes your projects easier, but it can also increase your productivity, creativity, and enjoyment of your hobbies.

Best Compact Lights for a Workshop

Barrina LED shop lights have become a popular choice for many people who are looking for a lighting solution that is both compact and bright. These lights are designed to provide exceptional illumination for your workspace while using minimal energy. In this article, we will explore how to install Barrina LED shop lights and their specifications in more detail. I tried a couple other lighting options for my workshop, but ended up returning them after poor design flaws that either made their install less than ideal or sub-par lighting performance. After coming across the Barrina LED lights, I’ve also added them to our carport and will be adding at least one more inside of our shed. Overview of Barrina LED Shop Lights Barrina LED shop lights are designed to provide bright and efficient lighting for garages, workshops, basements, and other spaces where you need high-quality illumination. These lights come in various lengths, from 4ft to 8ft, and are available in different color temperatures ranging from 4000k to 6500k. One of the main benefits of Barrina LED shop lights is their compact design. These lights are very slim and lightweight, making them easy to install and use. They are also linkable, which means that you can connect multiple lights together to create a continuous strip of lighting. This feature is particularly useful if you have a larger workspace that requires more illumination. Another advantage of Barrina LED shop lights is their energy efficiency. These lights consume much less energy than traditional fluorescent or incandescent bulbs, which means that they are cost-effective and environmentally friendly. In addition, they have a long lifespan, so you don’t need to replace them as often as other types of bulbs. Installing Barrina LED Shop Lights Installing Barrina LED shop lights is a straightforward process that can be done with minimal tools and experience. Here are the steps to follow: Step 1: Choose the Location The first step in installing Barrina LED shop lights is to choose the location where you want to install them. You should select a spot that provides optimal lighting for your workspace and is accessible for wiring and mounting the lights. Step 2: Prepare the Area Once you have selected the location, you need to prepare the area for installation. This involves clearing any obstacles or debris that might interfere with the installation process. You should also turn off the power to the area where you plan to install the lights to avoid any electrical accidents. Step 3: Mount the Light Fixture The next step is to mount the light fixture on the ceiling or wall. Barrina LED shop lights come with mounting brackets that you can use to attach the lights to the surface. You should use a level to ensure that the lights are straight and even. Step 4: Connect the Wiring After mounting the lights, you need to connect the wiring. Barrina LED shop lights come with a power cord that you can use to connect the lights to a power source. You should follow the manufacturer’s instructions for wiring the lights to ensure that they are properly connected and safe to use. Step 5: Turn on the Power Once you have connected the wiring, you can turn on the power to the area where you have installed the lights. You should test the lights to ensure that they are working correctly and providing adequate illumination for your workspace. Specifications of Barrina LED Shop Lights Barrina LED shop lights come in various sizes and specifications that you can choose based on your lighting needs. Here are some of the specifications of Barrina LED shop lights: Conclusion Barrina LED shop lights are a great lighting solution for anyone looking to brighten up their workspace. With their compact design, energy efficiency, and long lifespan, these lights provide excellent value for money. Installing these lights is a simple process that can be done with minimal tools and experience, making them an ideal choice for DIY enthusiasts. Whether you’re working in a garage, workshop, or basement, Barrina LED shop lights provide the bright, efficient lighting that you need to get the job done.

How to Keep Rodents Out of Your Pole Building

Rodents are a common problem for homeowners and businesses alike. They can cause significant damage to properties, including chewing through wires, insulation, and even structural components. Pole buildings are particularly susceptible to rodent infestations because of their construction, which often leaves gaps at the bottom of the siding that rats and mice can easily squeeze through. However, with the right preventative measures in place, it is possible to keep rodents out of your pole building and protect your investment. One of the most effective ways to prevent rodents from entering your pole building is to install rodent barriers at the bottom of the siding. These barriers are designed to close the gap between the siding and the ground, preventing rodents from crawling underneath. There are a variety of different types of rodent barriers available on the market, including metal flashing, mesh screens, and vinyl strips. Did you know mice can fit through gaps as small as approximately 1/4″? Stuffing steel wool into gaps can also help. Rodents cannot chew through steel wool, making it an excellent option for sealing up gaps and cracks. When using steel wool as a rodent barrier, it is important to make sure that the wool is tightly packed into the gap, as rodents can squeeze through even the smallest of openings. Inspect Regularly It is also important to inspect your pole building regularly for signs of rodent activity. Look for droppings, gnaw marks, and nesting materials, which can all indicate that rodents are present. If you do notice any signs of rodent activity, it is important to take action immediately to prevent the problem from getting worse. In some cases, it may be best to contact a local pest professional. Insulation and Vapor Barriers Rodents can also cause significant damage to insulation and vapor barriers. Insulation is often made from materials that rodents love to nest in, such as fiberglass and cellulose. When rodents nest in insulation, they can compress it, reducing its effectiveness and causing it to lose its insulating properties. Rodents can also create significant odors. Vapor barriers, which are designed to prevent moisture from entering your pole building. When rodents chew through vapor barriers, moisture can enter your pole building, leading to mold and other issues. To prevent damage to insulation and vapor barriers, it is important to keep rodents out of your pole building in the first place. By installing rodent barriers and sealing up gaps and cracks, you can create a barrier that is difficult for rodents to penetrate. The exterior should have metal trim, some times referred to as rodent barriers. Without this piece of metal to close up the bottom of your pole building, it’s almost an on-ramp for small rodents to gain access. Be Mindful of What You’re Storing It is also important to be mindful of what you store in your pole building, as certain items can attract rodents. Food sources, such as pet food and birdseed, should be stored in airtight containers to prevent rodents from getting to them. Cardboard boxes and other nesting materials should also be avoided, as rodents can use them to build their nests. If you do notice signs of rodent activity in your pole building, there are a variety of different options for getting rid of them. One of the most common methods is to use traps, which can be baited with peanut butter or other attractants. There are also a variety of different types of poisons and repellents available, although these should be used with caution, as they can be harmful to pets and children. Peppermint oil based products can help, but will be substantially diluted when used outdoors. Summary Ultimately, the best way to prevent rodents from getting into your pole building is to take preventative measures in the first place. By sealing up gaps and cracks, installing rodent barriers, and being mindful of what you store in your pole building, you can create a space that is uninviting to rodents. By taking these steps, you can protect your investment and ensure that your pole building remains in good condition for years to come. Another effective way to prevent rodent infestations is to keep the surrounding area clean and tidy. This means removing any debris or clutter around the pole building that can provide rodents with a place to hide or build their nests. Keep grass and shrubbery trimmed to reduce hiding places for rodents, and store firewood and other materials at least 20 feet away from the pole building. It is also important to address any moisture issues in and around your pole building. Rodents are attracted to areas with moisture, as it provides them with a source of drinking water. Inspect your pole building for any leaks, and make sure that the gutters and downspouts are functioning properly to divert water away from the building. If you do notice signs of a rodent infestation, it is important to take action immediately. Rodents can reproduce quickly, and a small problem can quickly turn into a larger one if left untreated. In addition to the damage they can cause to your pole building, rodents can also carry diseases that can be harmful to humans and pets. If you are dealing with a large or persistent rodent infestation, it may be best to hire a professional pest control company. They can assess the extent of the infestation and provide you with a variety of different treatment options. They can also provide guidance on preventative measures you can take to keep rodents out of your pole building in the future. Preventing rodent infestations in your pole building requires a combination of preventative measures and regular inspections. By sealing up gaps and cracks, installing rodent barriers, and being mindful of what you store in your pole building, you can create a space that is uninviting to rodents. Regular inspections can help you detect signs of rodent activity early, allowing you to take action before the problem gets out of hand.

EGO PowerStation Review

The EGO Power Station is a portable power source that allows you to charge your electronic devices on the go. This product is designed to be used outdoors, providing power to those who need it while camping, tailgating, or working on a job site. The EGO Power Station is powered by a 56-volt battery, which can be charged using a standard wall outlet or a solar panel. In this review, we will take a closer look at the EGO Power Station and see how it performs in real-world situations. Design and Build Quality The EGO Power Station has a sleek and compact design that makes it easy to carry around. It weighs only 21 pounds, which is relatively lightweight compared to other portable power stations on the market when the batteries are removed. The build quality is also impressive, with a sturdy plastic casing that feels durable and reliable. The top of the unit has a built-in handle, making it easy to carry from place to place. One thing that sets the EGO Power Station apart from other portable power stations is its weather-resistant design. It has an IP56 rating, which means it is protected against dust and water ingress. This makes it ideal for outdoor use, where it may be exposed to the elements. The power station is also designed to operate in extreme temperatures, from -4°F to 122°F. Charging and Output The EGO Power Station is powered by 56-volt batteries, which can be charged using a standard wall outlet or a solar panel. It takes about 10 hours to fully charge the battery using a wall outlet, which is relatively fast for a power station of this size. If you’re using a solar panel, the charging time will depend on the size and efficiency of the panel. The EGO Power Station has several output ports, including two USB-A ports, two USB-C ports, and two 120-volt AC outlets. This makes it easy to charge a variety of electronic devices, including smartphones, tablets, laptops, and power tools. The USB-A ports are rated at 2.4 amps each, while the USB-C ports are rated at 3 amps each. The AC outlets can provide up to 300 watts of continuous power, with a peak power output of 600 watts. Performance In terms of performance, the EGO Power Station delivers impressive results. We tested the unit by charging a variety of devices, including smartphones, tablets, and laptops. The power station was able to charge these devices quickly and efficiently, with no noticeable lag or delay. We also tested the power station with a power tool, and it was able to provide enough power to run the tool for several minutes. The EGO Power Station has a built-in display that shows the remaining battery life, as well as the output wattage and voltage. This is a useful feature that allows you to keep track of how much power you have left and how much power your devices are drawing. One thing to note is that the EGO Power Station can be a bit noisy when it’s operating at full power. This is to be expected with any portable power station, but it’s worth keeping in mind if you plan to use the unit in a quiet environment. Price and Value The EGO Power Station is priced at around $600 without batteries, which is relatively expensive compared to other portable power stations on the market. However, we believe that the price is justified given the quality and performance of the unit. The weather-resistant design, fast charging time, and multiple output ports make it a versatile and reliable power source for outdoor enthusiasts and professionals alike. Batteries While the EGO Power Station can be purchased with batteries, I went with the “tool only” station without batteries. For me, the EGO Power Station was a great way to repurpose the batteries from my EGO Zero Turn Mower. For faster charging of the batteries, I simply drop them into the mower for charging with the fast charger it came with. During power outages, we’ve used it to temporarily power our refrigeration, charge our cell phones, power our Starlink internet service, and power laptops. It’s allowed me to continue working at the house with internet despite no power. We had heavier and more frequently windstorms this past winter and went without for 3 or 4 days at one point. Plugging this into our fridge kept the temperature from rising too far and risking food going bad. Conclusion Overall, we were impressed with the EGO Power Station. It has a sleek and durable design, fast charging time, and multiple output ports that make it easy to charge a variety of devices. The weather-resistant design. is also a standout feature, making it a great choice for outdoor use. While it may be a bit noisy at full power, this is a minor drawback compared to the overall performance and quality of the unit. Another great feature of the EGO Power Station is its compatibility with other EGO Power+ products. This means that if you already own an EGO Power+ tool, such as a chainsaw or leaf blower, you can use the same battery to power your EGO Power Station. This is a convenient feature that adds value to the product. In terms of its price, the EGO Power Station may be on the higher end of the spectrum for portable power stations. However, when you consider the quality and performance of the unit, it’s well worth the investment. The EGO Power Station is a reliable and versatile power source that can be used in a variety of outdoor settings. In conclusion, the EGO Power Station is a high-quality and reliable portable power source that delivers impressive performance. Its weather-resistant design, fast charging time, and multiple output ports make it a great choice for outdoor enthusiasts and professionals who need reliable power on the go. While it may be a bit expensive compared to other portable power stations, the quality and performance

Ryobi Drill Press Review

The Ryobi Drill Press is a powerful and versatile tool that is designed to help you accomplish your drilling tasks with ease. This drill press is manufactured by Ryobi, which is a leading brand in the power tools industry. The company has a reputation for producing high-quality products that are reliable, durable, and efficient. In this review, we will explore the features of the Ryobi Drill Press and assess its performance. Design and Build Quality The Ryobi Drill Press is designed to provide you with the ultimate drilling experience. It has a sturdy and durable build that is made to last. The drill press features a cast-iron base, head, and table that provide stability and support. The base has pre-drilled holes that allow you to securely mount the drill press to your workbench or stand. The drill press has a 10-inch swing capacity, which means that it can accommodate workpieces that are up to 10 inches in height. The table can be adjusted up and down and can be tilted to a 45-degree angle to accommodate angled drilling. The table is also equipped with a depth gauge that allows you to accurately set the depth of your drilling. The Ryobi Drill Press has a 5-speed motor that can be adjusted to suit the type of material you are drilling. The speed range is between 570 RPM and 3,050 RPM, which is suitable for a wide range of drilling tasks. The motor is powerful enough to drill through metal, wood, and plastic with ease. Features The Ryobi Drill Press comes with a range of features that make it easy and convenient to use. One of the standout features of this drill press is the LED work light. The LED light is located just above the drill bit and provides excellent illumination of the work area. This is particularly useful when drilling in low light conditions or when working on intricate projects. The drill press is also equipped with a 1/2-inch chuck that can be easily tightened or loosened with the included chuck key. The chuck can accommodate a range of drill bits, which makes it versatile for different drilling tasks. The drill press also comes with a spindle lock that allows you to change the drill bits quickly and easily. Another useful feature of the Ryobi Drill Press is the adjustable depth stop. The depth stop allows you to set the drilling depth to a specific level, which is useful when you need to drill multiple holes to the same depth. The depth stop is easy to adjust and can be locked into place to ensure accuracy. Performance The Ryobi Drill Press is a powerful and efficient tool that delivers excellent performance. The drill press is easy to use and provides accurate and precise drilling. The adjustable speed motor allows you to drill through a range of materials, and the LED work light provides excellent visibility of the work area. The table is easy to adjust, and the depth gauge allows you to set the drilling depth accurately. The 1/2-inch chuck is versatile and can accommodate a range of drill bits. The spindle lock makes it easy to change the drill bits quickly and efficiently. Overall, the Ryobi Drill Press is a reliable and efficient tool that is suitable for a range of drilling tasks. Whether you are a DIY enthusiast or a professional woodworker, this drill press is sure to meet your needs. Pros Cons Conclusion The Ryobi Drill Press is a powerful and versatile tool that delivers excellent performance.

DeWalt 20v Cordless Angle Grinder Review

dewalt cordless 20v angle grinder

Angle grinders are an essential tool for DIY enthusiasts and professional tradespeople alike. They are versatile, powerful, and capable of performing a range of tasks, including cutting, grinding, and polishing. DeWalt is a renowned brand in the power tool industry, and its 20V cordless angle grinder is a popular choice among professionals and DIYers. In this review, we will take a closer look at the DeWalt cordless angle grinder and evaluate its features, performance, and overall value for money. Features The DeWalt cordless angle grinder features a 20V MAX battery that provides ample power to tackle tough jobs. It also comes with a brushless motor, which is more efficient and durable than traditional brushed motors. The motor delivers up to 9000 RPM, making it suitable for a range of cutting, grinding, and polishing tasks. The angle grinder has a 4-1/2 inch disc, which is a standard size for most angle grinders. It also has a quick-change wheel release that allows for fast and easy disc changes, reducing downtime on the job. The grinder comes with two position side handles, which provides increased comfort and control during use. The DeWalt cordless angle grinder also features an adjustable guard that allows for tool-free adjustments. The guard can be positioned in multiple orientations to protect the user from debris and sparks, enhancing safety while using the tool. Performance The DeWalt cordless angle grinder has excellent performance and is capable of tackling a wide range of tasks. Its brushless motor provides ample power and makes the tool more efficient and durable than traditional brushed motors. The motor delivers up to 9000 RPM, making it suitable for cutting and grinding tasks. The angle grinder’s 4-1/2 inch disc size is standard for most angle grinders, and it is capable of cutting through various materials, including metal, wood, and concrete. The quick-change wheel release allows for fast and easy disc changes, reducing downtime on the job. The two position side handles provide increased comfort and control during use, making it easy to tackle even the toughest jobs. The adjustable guard allows for tool-free adjustments and can be positioned in multiple orientations to protect the user from debris and sparks. The DeWalt cordless angle grinder is also designed to be compact and lightweight, making it easy to handle and maneuver in tight spaces. Its cordless design also enhances flexibility and convenience, as it can be used anywhere without the need for a power outlet or extension cord. Value for Money The DeWalt cordless angle grinder is a premium tool, and its price reflects its quality and features. However, it is an investment worth making for those who require a reliable and efficient angle grinder for their work. The tool’s brushless motor and quick-change wheel release provide enhanced performance and convenience, reducing downtime and improving productivity. The two position side handles and adjustable guard also provide increased comfort and safety during use, making it suitable for both professionals and DIYers. The cordless design further enhances convenience and flexibility, making it suitable for use in a range of environments. Overall, the DeWalt cordless angle grinder is an excellent tool that provides value for money. Its premium features and quality make it suitable for those who require a reliable and efficient angle grinder for their work. Pros Cons Conclusion In conclusion, the DeWalt cordless angle grinder is an excellent tool that is suitable for both professionals and DIYers. Its premium features, including a brushless motor, quick-change wheel release, adjustable guard, and two position side handles, provide enhanced performance, convenience, comfort, and safety during use. The tool’s cordless design further enhances its flexibility and convenience, making it suitable for use in a range of environments. While its premium price point may not be suitable for budget-conscious users, the tool provides value for money for those who require a reliable and efficient angle grinder for their work. One potential drawback of the DeWalt cordless angle grinder is its battery life, which may be insufficient for prolonged use on large projects. However, the tool’s cordless design allows for easy battery swaps, and DeWalt offers a range of battery options to suit different user needs. Another potential drawback is the disc size, which may not be suitable for large cutting or grinding tasks. However, this is a common size for most angle grinders, and users can always upgrade to a larger size if needed. Overall, the DeWalt cordless angle grinder is a high-quality tool that provides excellent performance, convenience, and safety during use. Its premium features and quality make it suitable for those who require a reliable and efficient angle grinder for their work, and its cordless design enhances flexibility and convenience.

DeWalt 18 Gauge Cordless Brad Nailer Review

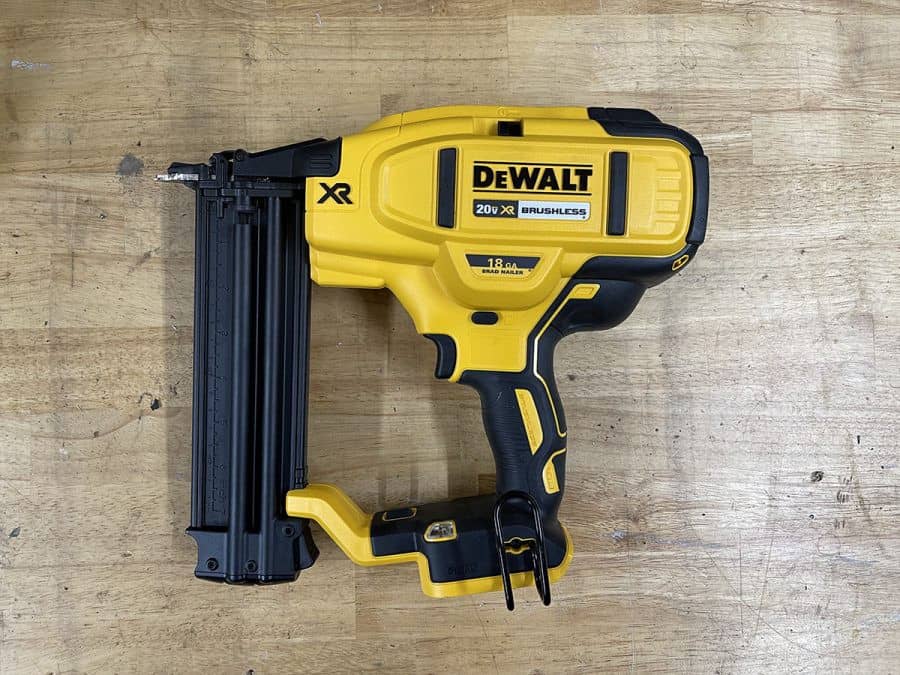
The DeWalt Cordless 18 Gauge Brad Nailer is a highly versatile tool that can help you tackle a wide range of fastening projects with ease. It is part of DeWalt’s 20V MAX system, which means that it is compatible with other DeWalt 20V MAX tools and batteries, giving you a lot of flexibility and convenience. Features The DeWalt Cordless 18 Gauge Brad Nailer is designed to work with brad nails that range in size from 5/8″ to 2″. This range makes it suitable for a wide range of fastening applications, including crown molding, baseboards, window casings, and trim work. The nailer comes with a depth adjustment wheel that allows you to control the depth of the nail, ensuring that it is flush with the surface you are nailing it into. This feature is particularly useful when you are working with delicate materials that require precision. The DeWalt Cordless 18 Gauge Brad Nailer also comes with a jam release mechanism that makes it easy to clear any jams that may occur during use. This feature is important because it can save you time and frustration when you are working on a project. One of the most impressive features of this brad nailer is its battery life. The 20V MAX battery can provide up to 1,000 nails per charge, making it a highly efficient tool that can help you complete your projects quickly and easily. Additionally, the battery is compatible with other DeWalt 20V MAX tools, which means that you can use it to power other tools in your collection. Performance In terms of performance, the DeWalt Cordless 18 Gauge Brad Nailer is one of the best in its class. It is a highly accurate and powerful tool that can drive nails quickly and easily, even in hard-to-reach areas. One of the standout features of this brad nailer is its consistency. The depth adjustment wheel ensures that every nail is driven to the correct depth, which helps to prevent the need for additional finishing work. The DeWalt Cordless 18 Gauge Brad Nailer also delivers a lot of power, which makes it suitable for use on tough materials like hardwood and engineered wood. Ease of Use The DeWalt Cordless 18 Gauge Brad Nailer is designed to be easy to use, even for those who are not experienced with power tools. It has a fairly lightweight design (compared to some other brad nailers) which makes it easy to handle. It is also cordless, which means that you do not need to worry about being tethered to a power outlet or an air hose in the case of pneumatic tools. The tool’s ergonomic design makes it comfortable to use for extended periods of time, and the grip is made of a non-slip material that helps to prevent the tool from slipping out of your hand while you are working. The DeWalt Cordless 18 Gauge Brad Nailer also has a no-mar tip that helps to prevent damage to the surface you are nailing into. This feature is particularly useful when you are working with delicate materials that can be easily damaged. Safety Safety is always a concern when working with power tools, and the DeWalt Cordless 18 Gauge Brad Nailer is no exception. However, this tool is designed with safety in mind, and it has a number of features that help to prevent accidents and injuries. One of the most important safety features of this brad nailer is the trigger lock. This feature prevents the tool from firing accidentally, which can help to prevent injuries to yourself and others. The DeWalt Cordless 18 Gauge Brad Nailer also has a safety nose that helps to prevent accidental firing. This feature ensures that the tool will only fire when the nose is pressed against a surface, reducing the risk of injuries caused by stray nails. Additionally, the tool has a dry-fire lockout mechanism that prevents the nailer from firing when there are no nails in the magazine. This feature helps to prevent damage to the tool and ensures that the nails are used efficiently. Overall, the DeWalt Cordless 18 Gauge Brad Nailer is a safe and reliable tool that is suitable for both professionals and DIY enthusiasts. Pros and Cons Pros: Cons: Conclusion The DeWalt Cordless 18 Gauge Brad Nailer is a powerful and versatile tool that can help you tackle a wide range of fastening projects with ease. It is designed with safety in mind, and it has a number of features that help to prevent accidents and injuries. While the tool is relatively expensive, it is worth the investment if you are a professional or serious DIY enthusiast who values quality and efficiency. The battery life is excellent, and the tool’s consistency and accuracy make it a pleasure to use. Overall, the DeWalt Cordless 18 Gauge Brad Nailer is an excellent tool that is well worth considering if you are looking for a high-quality brad nailer that is built to last.

Who Makes the Best Pegboards?

Wall Control Steel Pegboard

Pegboards have been a popular storage solution for decades, used in garages, workshops, and homes. Traditional pegboards are made of wood or plastic and feature evenly spaced holes where pegs can be inserted to hold tools and other items. However, in recent years, a new type of pegboard has emerged that offers numerous advantages over traditional pegboards. This type of pegboard is called Wall Control metal pegboard, and it has quickly become the preferred choice for those looking for an efficient, customizable, and durable storage solution. In this article, we will explore the key features that make Wall Control metal pegboards better than traditional pegboards. I’ll also be updating this post with installation information for my particular use case in a pole building which lacks the 16″ on-center studs a stick built shop or garage would have. Durability One of the most significant advantages of Wall Control metal pegboards is their durability. Unlike traditional pegboards that are made of wood or plastic, Wall Control pegboards are made of heavy-duty steel, which makes them more resistant to wear and tear. They are less likely to crack, break or warp, which is especially important in an environment like a garage or workshop where heavy tools are used. Additionally, the powder-coated finish on Wall Control metal pegboards makes them more resistant to scratches and rust. This means that they will maintain their appearance over time and continue to look good even after years of use. Customizability Another major advantage of Wall Control metal pegboards is their customizability. Traditional pegboards have fixed hole patterns, which limits the types of items that can be hung on them. Wall Control pegboards, on the other hand, feature a unique hole pattern that allows for more flexibility in organizing tools and other items. The holes on Wall Control pegboards are spaced at 1-inch intervals both vertically and horizontally, which means that pegs and accessories can be placed anywhere on the board. This provides greater flexibility in how items are organized, making it possible to store more items in a smaller space. In addition to the flexibility of the hole pattern, Wall Control metal pegboards offer a wide variety of accessories that can be used to further customize the storage space. These accessories include hooks, shelves, baskets, and tool holders, among others. These accessories can be easily moved around on the pegboard, making it easy to reorganize the storage space as needed. Efficiency Wall Control metal pegboards are also more efficient than traditional pegboards. The customizability of the hole pattern and accessories means that items can be stored more efficiently, taking up less space and making it easier to find what you need when you need it. In addition, the sturdy construction of Wall Control metal pegboards means that they can hold more weight than traditional pegboards. This allows you to store heavier items without worrying about the board sagging or breaking. Ease of Installation Finally, Wall Control metal pegboards are easier to install than traditional pegboards. Traditional pegboards are typically mounted on wooden strips that are attached to the wall. This process can be time-consuming and requires a certain level of skill to ensure that the board is level and secure. Wall Control metal pegboards, on the other hand, are designed to be mounted directly to the wall. The pegboards come with mounting hardware that makes installation a breeze. Additionally, the unique hole pattern on Wall Control metal pegboards makes it easy to align the board with the studs in the wall, ensuring a secure installation. Conclusion In conclusion, Wall Control metal pegboards offer numerous advantages over traditional pegboards. Their durability, customizability, efficiency, and ease of installation make them a superior storage solution for garages, workshops, and homes. Whether you are looking to organize your tools, craft supplies, or other items, Wall Control metal pegboards provide a versatile and reliable solution that will meet your needs for years to come.

NewAge Products Pro 3.0 Series Storage Cabinet 10-piece Set (Review and Installation)

newage pro series storage cabinet

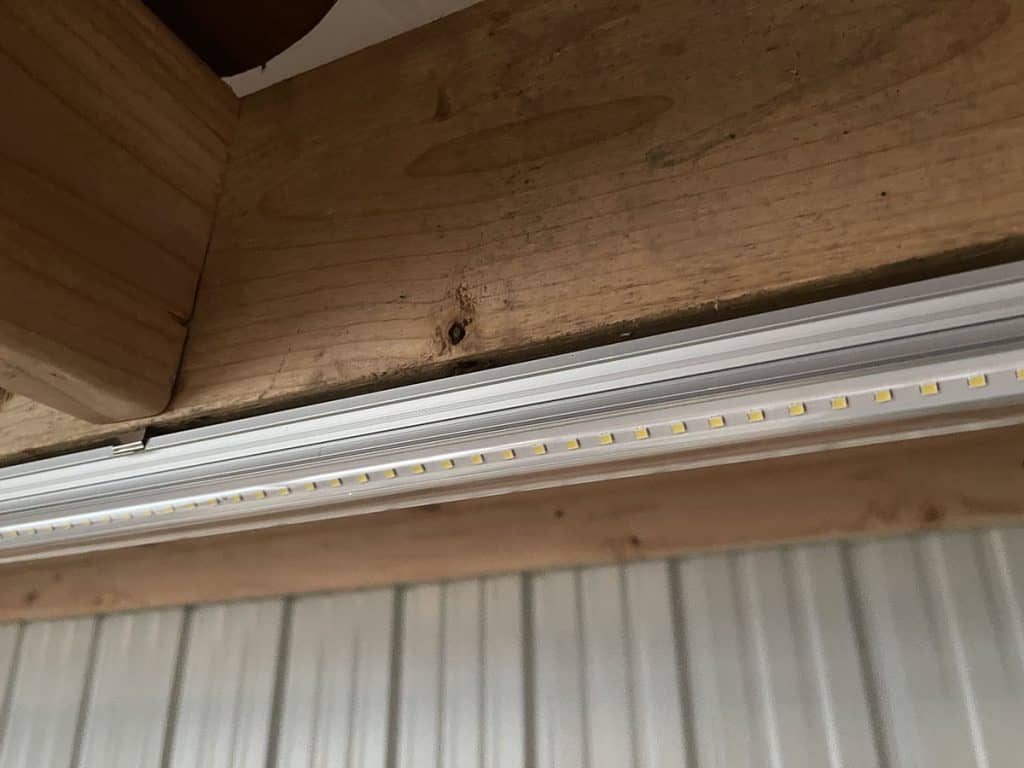
NewAge Products manufactures various items from outdoor kitchen sets to garage storage solutions. In this article, I’ll cover their Pro 3.0 Series 10-Piece Storage Cabinet. From deliver to installation. Damage Upon Arrival Things definitely didn’t start out well. Unfortunately, multiple cabinets had sustained some damage. I promptly contacted NewAge, and they did send replacement doors and some touchup paint. The outer boxes didn’t appear to be too concerning, but once I got things opened up their were certainly some concerns. Cabinet Damage This was the most concerning damage, one of the “locker cabinets” had a large scratch and was dented. An overhead cabinet door had badly bent aluminum trim, but I was able to easily bend this back into position. Several Scuffed Pieces There was quite a bit of scuff marks inside the cabinets, one worse than the others. Styrofoam packaging was broken on this one and the inner contents were fairly loose inside because of it. For the most part, the scuff marks were able to be wiped off. It didn’t look like anything to worry about, but there was visible damage once opened in various areas. I thought this was an odd choice for shipping the lighting that is used for under the overhead storage shelves. At least they made it in one piece. They were fully shrinked wrap (which I removed before this photo) after being taped to the boxes. Assembly and Install The main cabinets are extremely heavy. It will definitely help to have at least 2 adults to moves these into position. Installing NewAge Storage Cabinets in a Pole Building Since I was installing my cabinets in my shop that’s a pole building, there aren’t many vertical support beams. The builders installed a 2×6 about halfway up the wall which provides additional support. It also established how far back I could install the walls. For mounting surface of the overhead cabinets, I installed a 4×6 beam (see photo below). Once installation location was determined, I placed the first cabinet. From there, I began installing the first overhead cabinet. This can be done with one person if you have something to support the cabinet (see 2×4’s below). However, a second set of hands would make things go eaiser. Continuing along installing the remaining overhead cabinets and using a step platform (and cabinets) for temporary support while installing. Installing the Benchtop Surface Installing the Lighting The included lighting uses adhesive magnets to install below the overhead cabinets. The light is quite warm, I prefer a cool white for lighting and have since replaced this lighting. Pegboard Installation NewAge does offer a pegboard that fits into the opening below the overhead storage and above the benchtop surface. However, I prefer the the steel pegboards from Wall Control. Overall Perception Other than the damage, a very solid product. A few packaging improvements, possibly QA before boxing, and also additional care by the courier will substantially improve the customer experience. It’s very frustrating to receive a product with this amount of damage.