Wiring My M1101 Military Trailer — Here’s the Clean 7-Pin Setup
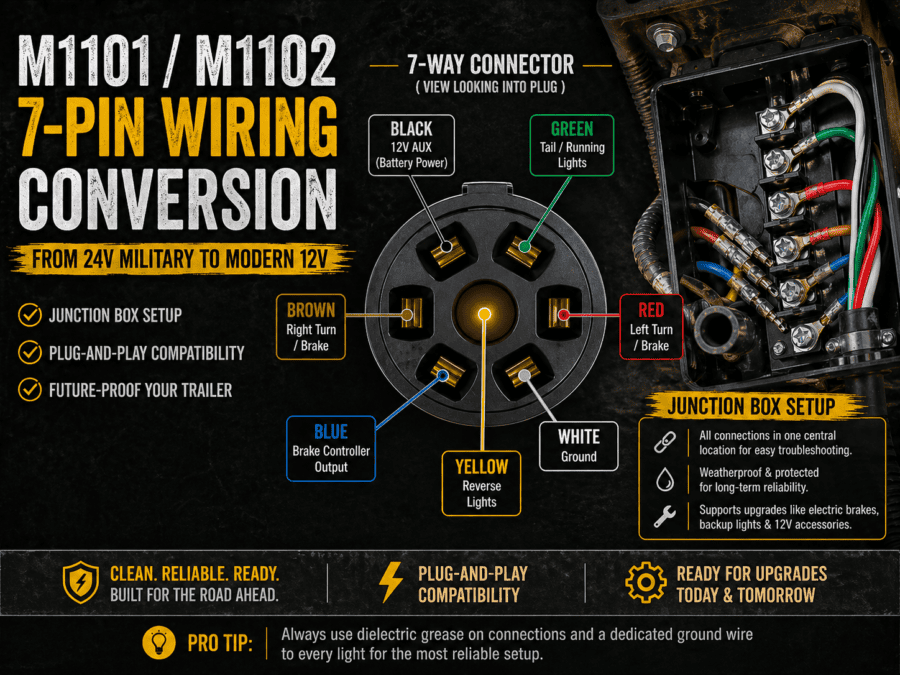
For just about everyone who picks up a military trailer, if it was purchased at a military auction you’ll find it was wired for 24 volts, the native voltage system of the HUMVEE. The first thing you’re likely looking to do is make it compatible with your civilian tow vehicle (unless you have a military HUMVEE to pair it with). One positive is you don’t have to rewire the entire trailer. When I picked mine up from auction, I brought several zip ties knowing my magnets on my magnetic tow lights wouldn’t help much on the aluminum box of the M1101. There actually seemed to be decent mounting places on the steel frame, but I still used zip ties to ensure the temporary tow lights didn’t fall. Adapters Now, there are some adapters out there, however, the general consensus is they are rather over-priced for what they are. If they’re in your budget and you want to the fastest solution, these adapters might be your best choice. Most use the 4-pin flat. I’ve also seen some 7 blade harnesses on eBay that a seller has made themselves, crimping on some packard connectors (also called shell connectors) that will plug right in to the existing quick disconnects. Then, you just have to bolt down the ground wire for the new harness. I went with the Conntek 10110-124BX 7-Way Cord & Wired Junction Box, 10.3′. For most vehicles, I wouldn’t recommend going any shorter assuming you plan to connect at the quick disconnects of the trailer. Splicing in a Harness I opted to splice a new harness myself and also went with a junction box. I considered using packard connectors, but they don’t seem readily available and more I searched for them it sounded like they weren’t used that often anymore, replaced by a new, more modern harness option. Not far from the front of the trailer box, you’ll find the packard connectors. These are quick disconnects and you’ll be able to completely remove the original 12-pin harness. From here, you have a few different options. M1101/2 Junction Box Wiring 7-pin (7-blade) junction box setup—this will also give me future expansion for possible camping lights, rock lights, or even a small battery setup. Original M1101 Wiring Harness The factory setup includes: It’s durable—but not practical. You can adapt it… but after digging into it, I realized: Rewire vs. Adapter You’ve got two paths: Option 1 — Rewire at the Packard Connections (What I Did) ✔ Clean✔ Reliable✔ Upgradable Option 2 — Adapter ✔ Quick plug and play – no splicing✔ Retains originally 12-pin harness✖ More expensive The Setup I Went With (Simple + Future-Proof) Here’s what I installed: This gives me: The Wiring Diagram (What Connects Where) This is the standard 7-pin layout I used: White → Ground – I ran a ground wire from the junction block to the existing ground near the disconnectsBrown → 22 460 Running lights Red → 22 461 Left turn / brake Green → 21 A Right turn / brake Inside the junction box, each of these wires gets its own terminal—making everything clean and serviceable. Grounding If your lights flicker, dim, or act weird… it’s almost always a bad ground. Again, I simply ran a ground wire from the grounding terminal in the junction box to the same ground location that was near the quick disconnects. Tips to use: This alone eliminates 90% of trailer wiring issues. Bonus: Wire It for Future You Even if you don’t need it yet, a 7-blade junction box is ready for: Trust me—you’ll want these later. Prep Work I ordered my harness several months ago and finally started getting around to installing it. I noticed since then some junction boxes have color coding on them. I decided to buy some oil-based paint markers so I could color code mine. It’s a lot easier than trying to read the raised plastic text. Here’s after I color coded the ends of the terminals with the paint markers. Later, I also added a stripe to the plastic just in case the terminal paint fades or peels off. M1101 12v Conversion For my installation, I ended up cutting the 3 necessary wires and crimped on non-insulated ring terminals. I cut a slit in one of the grommets of the junction box and pulled the wires through. Noticed I also added color-coded zip ties to the original M1101 wiring to match what terminal the wire needed to go to. I figured this was also easier than reading a number code on the metal tags and having to cross-reference it if I ever had to remove them for some reason. Next, it was time to make the connections. Mounting the Junction Box I ended up marking the holes for where I would bolt the junction box. I drilled the holes and then installed rivet nuts (also called riv nuts for short). Some might try self tapping screws, but I’ve found more and more projects where I’m using these rivet nuts. The junction box I purchased had 2 mounting tabs, one on each end. Here’s the first riv nut installed. Mounted and Installed 24V Lights vs 12V You technically can run the stock 24V tail lights. They certainly won’t be as bright since they were designed for twice the voltage. Since mine were mismatched when I bought the trailer, I decided to go with a new pair, but these are the taillights that came on my trailer. Especially in daylight, the passenger side incadescent wasn’t nearly as bright as the LED light that had apparently been swapped in at some point by the military. Running a “trailer light test” from the truck (hence the lights flashing). And here’s the passenger side light which I assume was original to the trailer: I swapped mine to LED HUMVEE replacement lights that were listed as 12V lights, they were made by Hecasa. Time will tell how these perform, but so far so good. When I bought my trailer
Wiring My M1101 Military Trailer — Here’s the Clean 7-Pin Setup Read More »