Charging Basics and How Long Does it Take to Charge a Tesla?
When it comes to Tesla charing, there’s a lot of options and variables. In our Tesla 101 series, we’re going to dive into some common newbie questions around Tesla vehicles. For this article, we’ll cover charging basics, everything from charging at home and on the road. Within the Tesla network and whether or not you should consider 3rd party options.
The short answer, if using a Tesla charger, press the button on the “wand”, the charge port door on your Tesla will open, and you simply insert the wand. The vehicle will automatically start charging.
The indicator light will display as white when the door opens. As soon as you insert the wand, the light will change to blue as the vehicle prepares to charge. It will then start to flash green as the vehicle begins to charge.
It certainly gets a bit more complicated than that, or at least it can with several variables to consider. Some owners may not worry about all the details, but we’ll dive into some of those variables a bit.
How long does it take to charge a Tesla. Is Tesla charging free? These are some of the questions we’ll cover.
Next, we’ll cover some of the charging types, commonly referred to as Level 1, Level 2, and Tesla Supercharging.
Level 1 vs. Level 2 Charging vs. Supercharging
Before we begin, we’ll cover a few items of terminology. Level 1 charging uses a 110v outlet. These are the standard 15 or 20amp outlets commonly found in homes throughout the US and other some other countries. This charging can be quite slow. If you are fairly low on charge, you’ll likely see a time estimate of 24+ hours to recharge.
Level 2 charging uses a dedicated 240 volt circuit. This provides much quicker charging times, up to three to nine times faster than Level 1 charging. Electricity is exponential, so if you go from a 20 amp outlet to a 40 amp circuit, the charging speed should be close to three times faster.
Tesla Supercharging
In the Tesla realm, the next step up is their Superchargers which use a 480 volt DC power source. You won’t find these in homes, this is an industrial application with considerably higher voltage. Other manufacturers such as Nissan refer to 480 volt charging as “quick charging” and Ford appears they will call their upcoming network “FordPass Chargers”. Since I’m focusing this article on Tesla, we’ll continue to use the “Supercharger” term in regards to 480 volt charging.
NOTE: A quick terminology definition. For 110 volt or 220 volt charging, electric vehicles have an onboard charger. Using either 110 or 220 volts, a vehicle is connected to an Electric Vehicle Supply Equipment (EVSE). The EVSE then safety transfers electricity to the vehicles onboard charger. Many of those who are knowledgeable on electric vehicles will quickly call people out if they refer to an EVSE as a “charger”. For 480 volt charging, the onboard charger is bypassed and these stations are considered “chargers”. In my opinion, it just adds unnecessary confusion. Very few people will refer to these units as Electric Vehicle Supply Equipment. Someone who is new to electric vehicles won’t have any idea what EVSE stands for.
Tesla Charging at Home
Most owners will do the majority of their charging at home, so we’ll discuss some of the options for charging your Tesla at home first.
Tesla Wall Connector
The Tesla Wall Connector is a popular choice for many owners. They are currently on “Generation 3” of the Wall Connector which added Wi-Fi connectivity, but also has a 48 amp output max verses the 100 amp on the previous Gen 2 Wall Connectors. Below is a chart from Tesla that shows the charge speed you can expect depending on the size of circuit breaker you’re using. The larger the amperage, the faster you will charge.
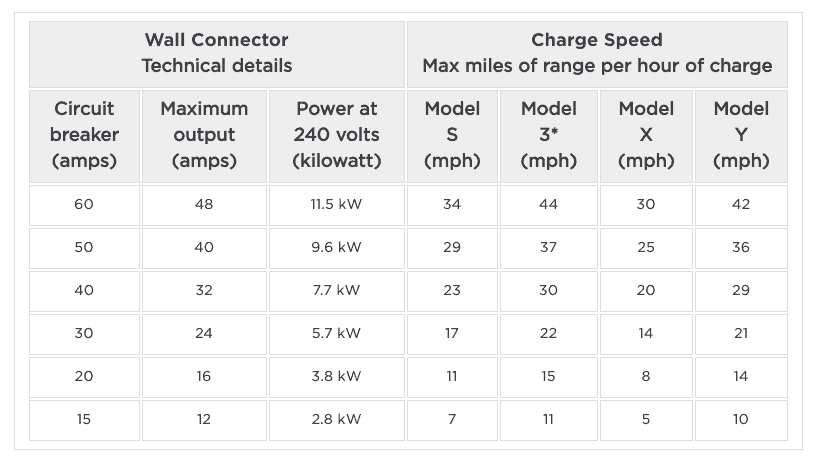
This chart is based on the current models offered. Older vehicles had various battery pack sizes and other hardware configurations that will affect these numbers.
Tesla Wall Connector Power Sharing
If you plan to own more than one Tesla and want multiple Wall Connectors, they can be used on the same circuit for “Power Sharing”. You must have the same generation Wall Connectors though, for example, you can’t combine a Gen 2 with a Gen 3 in this shared configuration. You’ll need to make sure you have two Gen 2’s or two Gen 3’s.
Wall Connector Cable Length
The Tesla Wall Connector is available in two lengths, either 8.5 feet or 18 feet. Surprisingly, this doesn’t affect the price as with some other manufacturers. I find going with the longer 18 foot cord gives you more flexibility. It can also save you from having to run longer wires from your circuit panel. It may seem trivial, you’ll likely have more cabling to wrap up (depending on your install). For mine, I ended up running my cabling behind shelving and was able to run less wiring from my circuit breaker.
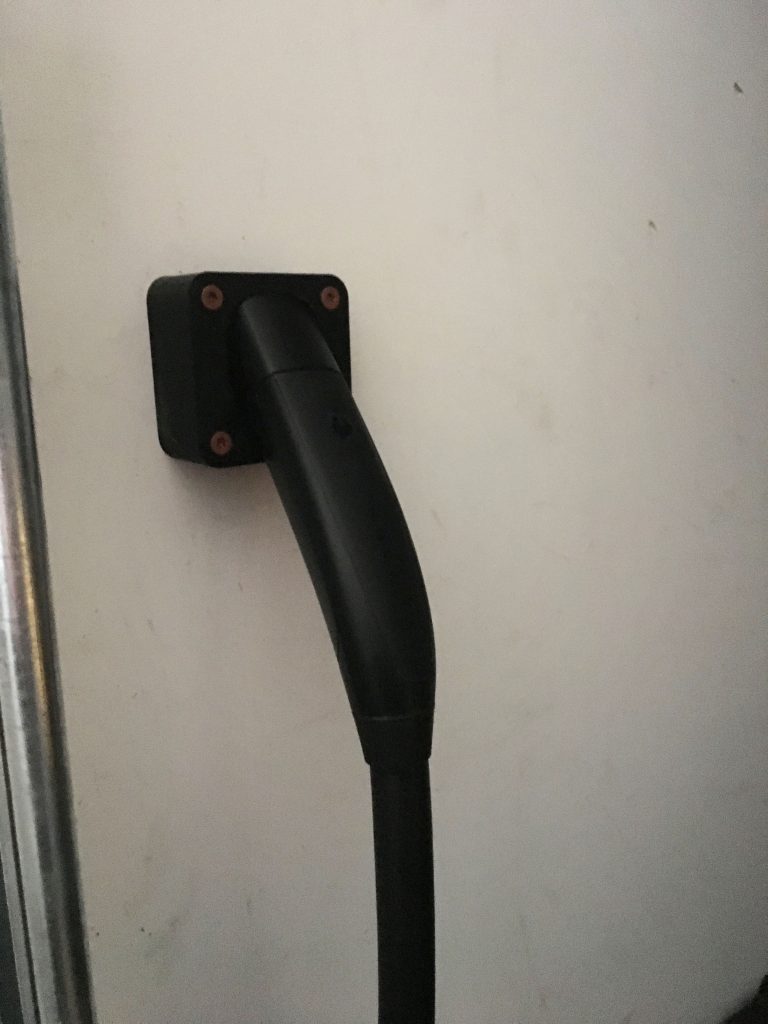
Indoor or Outdoor, Hardwired or Plug-In
If you plan to install your Wall Connector outdoors, it is typically recommend that you have it hardwired. Otherwise, you’ll need to ensure you have outdoor rated, weatherproof outlets. Be sure to check your local code if you are considering a plug-in approach outdoors to make sure you’re in compliance. Always take the proper safety precautions when dealing with electricity.
Adding a Cord?
A plug-in Wall Connector from Tesla was available, although it’s no longer listed in their store. They now have a Corded Mobile Connector we’ll discuss further below. You can also consider adding a cord to your Wall Connector. Home improvement stores sell dryer and range cords. Most commonly, they’re available for 30 amps, but you will find a smaller selection of 40 and 50 amp cords as well.
This is the 50 amp range cord by GE I purchased from Amazon for my Wall Connector. Going this route can give you the flexibility to unplug it if you move and not have to worry about leaving wires in your wall or having to connect an outlet receptacle later. By chance, if you have a welder, etc. that you only use occasionally, it could save you from having to get another circuit and outlet installed. Just simply unplug the Wall Connector to free it up for your outlet and plug in your welder.
At Home or On the Go
The Most Common Plug-In Types
Outside of the Tesla proprietary “wand”, the J1772 is probably the most common in the United States that you’ll use for Tesla. There is CHAdeMO which seems to be loosing momentum to CCS. While Tesla does sell a CHAdeMO, it’s expensive at $450. Tesla now uses a CCS port for the Model 3 and Y in Europe. If CCS continues to expand in the US, Tesla may offer a CCS adapter in the future. From my understanding, this adapter is currently only available in Europe.
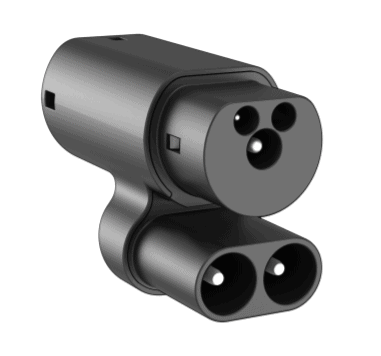
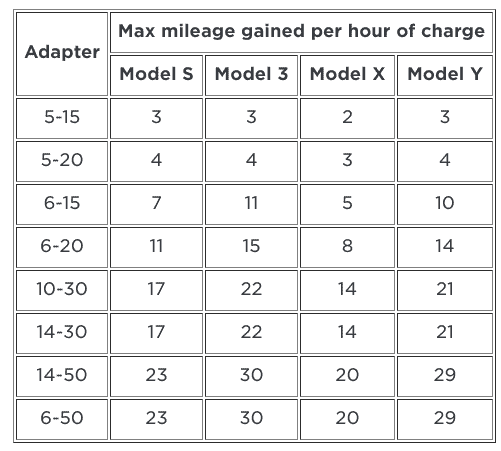
This is a list of all the adapters Tesla currently sells for the Universal Mobile Connector and the maximum miles of range per hour of charging you can expect. This will give you an estimate of how many estimated miles of range you can get for the current models based on the adapter/amperage you’re using.
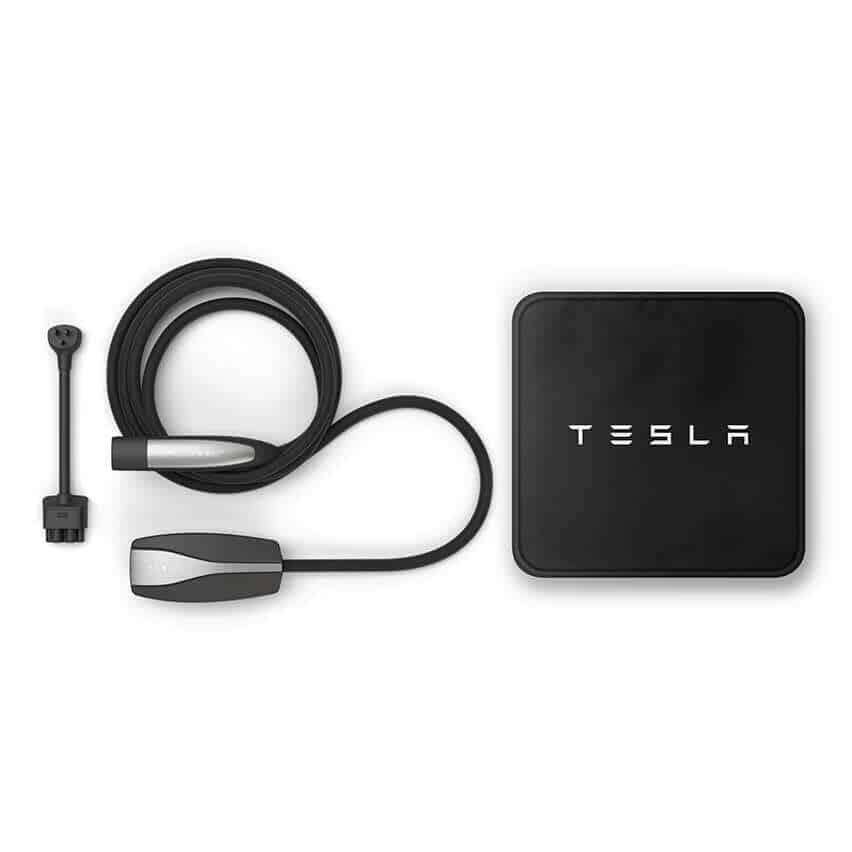
Tesla Gen 2 Universal Mobile Connector
If you buy a brand new Tesla, it will come with the Generation 2 Universal Mobile Connector Bundle. This bundle has seen less and less items over the last couple of years. Back in June 2018, it still included the a NEMA 14-50 Adapter and the J1772 Adapter. In June 2020 the NEMA 14-50 was no longer included. By September 2020, the J1772 was also excluded. These dates are merely what I’ve noticed from friends and family who have ordered. If you know of more exact dates, feel free to leave a comment below. This could be a result of Tesla rapidly expanding their charging network. Many customer may find that they simply don’t need these additional adapters.
What’s Included in the Gen 2 Mobile Connector Bundle:
- The Mobile Connector with 20ft Cable
- NEMA 5-15 Adapter
- NEMA 14-50 Adapter (no longer included)
- J1772 (no longer included)
- Storage Bag
NEMA 14-50 and J1772
The NEMA 14-50 uses a 240 volt power source and is considered a Level 2 charger. The J1772 adapter can be used with either a 110 volt power supply or 240 volt. With any 3rd party charging station, it should always be a 240 volt.
The NEMA 14-50 is a fairly common outlet. Some garages may already have one installed. Especially if someone needed a 240-volt power supply for a welder or some other higher voltage equipment. These are also commonly found at many campgrounds, which we’ll cover further below.
The J1772 allows you to adapt for EVSE’s commonly used by other electric vehicles. A few examples include the Chevy Bolt, Nissan LEAF, and BMW i3.
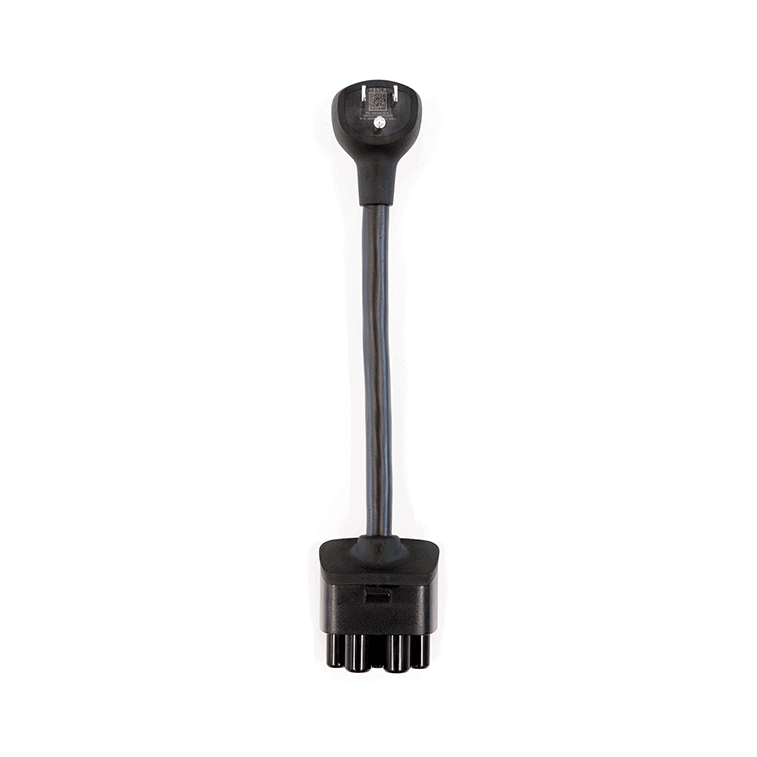
Tesla NEMA 5-15 Charging
This option is going to be the slowest, but in some cases can work just fine. My daughter doesn’t need to drive very far for work, so the NEMA 5-15 works for her needs. It does take longer, but when she only drives 14 miles round trip on average she’s not going to need a lot driving of range. With two other electric vehicles at home that use 240 volt charging sources, my panel couldn’t handle a third.
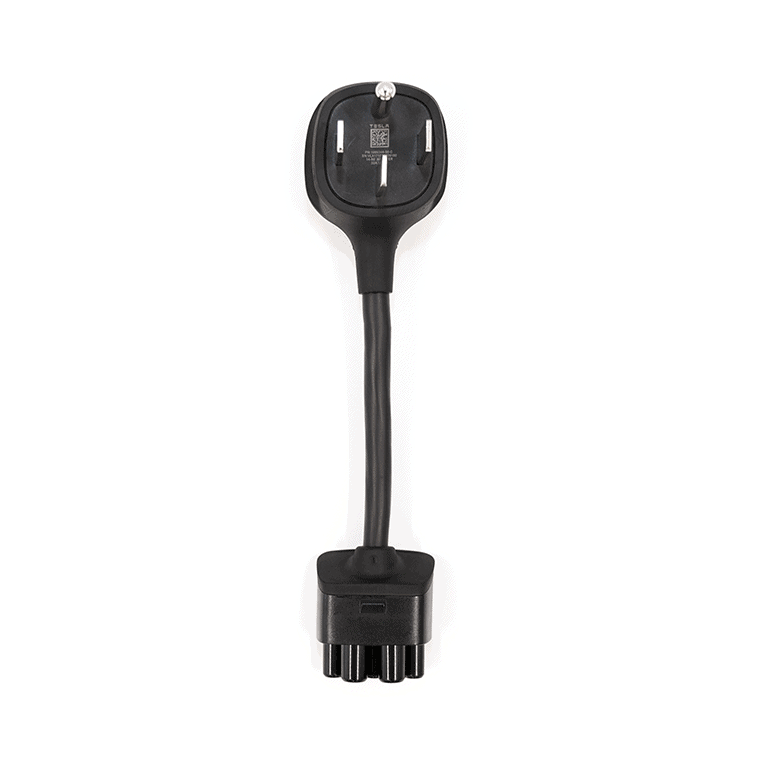
Tesla NEMA 14-50 Charging
If you buy a new Tesla which currently no longer includes the NEMA 14-50 adapter, you can buy one from the Tesla store for $35. Just be sure to order the right one for your needs. Some of these adapters have been sold out before. If you’re planning on buying a new Tesla and think you’ll need this adapter or a different one, it’s probably a good idea to consider buying it even before you take delivery of your Tesla. This will help avoid finding them sold out when you need it.
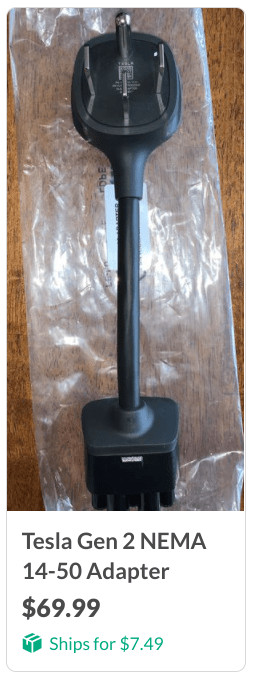
Buyer Beware: Tesla Adapter Resellers! Know the Value of What You’re Buying
Be aware of price gouging. These show up on Craigslist, OfferUp, and other online classifieds with some inflated pricing fairly often. There seems to be fair amount of people out there trying to sell these for a quick profit. Tesla has been sold out of various sizes in the past. However, I don’t see any reason for this level of price gouging.
Corded Mobile Connector
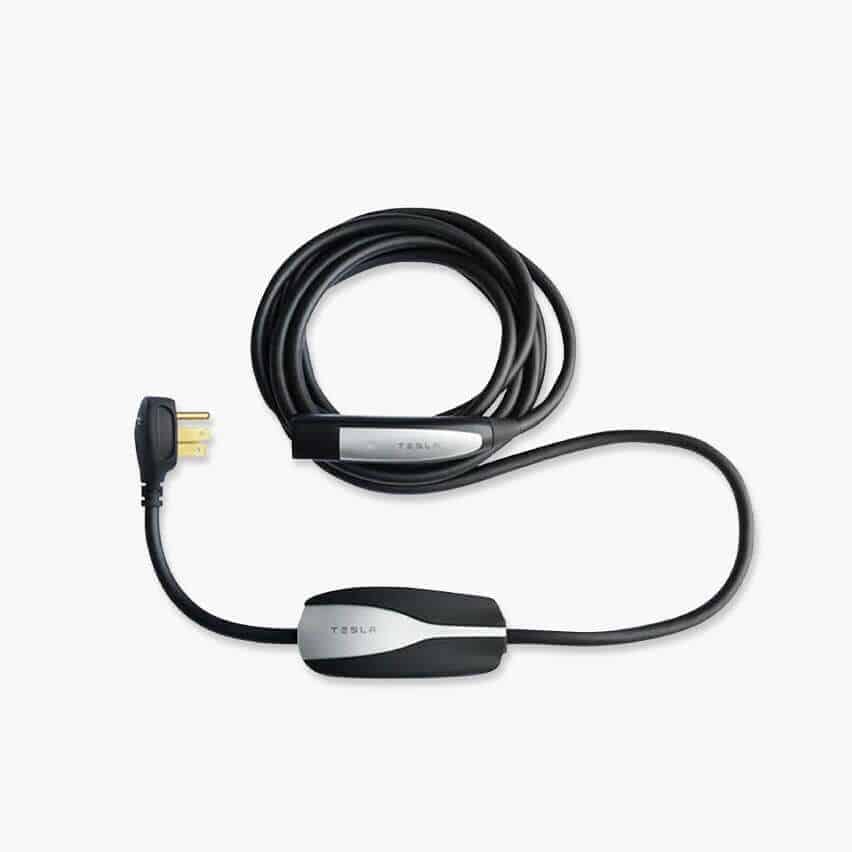
This one has a higher output compared to the Universal Mobile Connector and has a fixed NEMA 14-50 cord. Unlike the Universal Mobile Connector, this one does not have the option to plug in other adapters. It’s smaller, but also slower than a Wall Connector (depending on the amperage you use for a Wall Connector). The smaller size does make it more convenient for taking with on road trips though. If you know you’ll frequently visit locations with a NEMA 14-50, this could be a solid choice.
3rd Party Level 2 EVSE’s
Depending on whether or not you own (or plan to own) other brands of electric vehicles, a 3rd party EVSE with a J1772 adapter could be the way to go for you. If your Tesla didn’t come with the J1772 adapter, it will set you back $95 on the Tesla store. I did manage to misplace mine once and it took several weeks before I found it again. Personally, I prefer not to deal with anymore adapters than I need to, but this one has come in handy for certain locations.
EV Chargers and Rebates
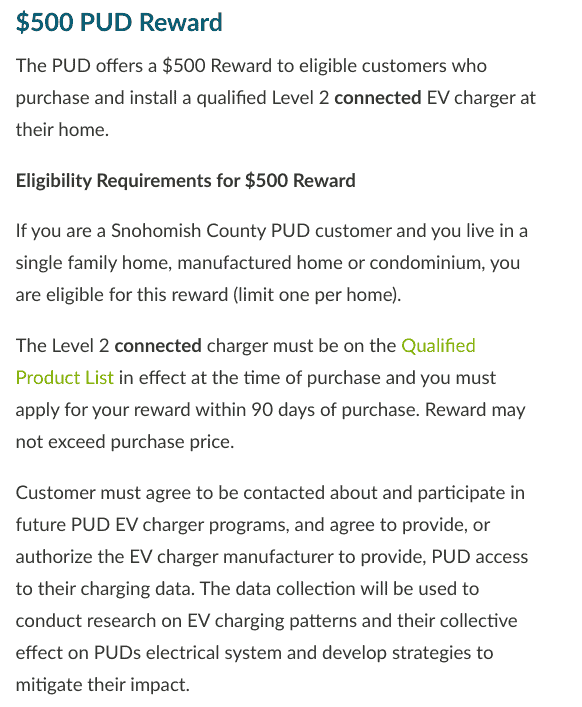
If you’re considering purchasing an EVSE, be sure to check and see if you local electric company offers any incentives. Here’s a sample of a rebate my local PUD is currently offering:
Federal Tax Credit
2020 is quickly winding down, but you can still get a 30% tax credit for installing a home charging station (including installation costs) up to $1,000 in the United States. You must claim this credit on your 2020 tax return.
How Long Does it Take to Charge a Tesla?
How long does it take to charge a Tesla is a question with many variables. These are the main factors:
- Amperage of electricity coming in
- How much energy you’re trying to add – Tesla’s have had different size battery packs over the years
- Outdoor weather can also affect charging speeds
- Maximum amperage of your onboard charger
What if You Rent Your Home?
Whether you rent a house or apartment, you may find you have limited to no options for charging while at home. Chargepoint does have an information page if you live in an apartment or condominium. On this page you’ll find a template for a letter you can send to your property management. They mention these 3 steps:
- We work with your property management to install EV charging.
- You pay a low monthly service fee plus the cost of electricity.
- We reimburse your property management for the electricity you use.
How Much Does it Cost to Hire an Electrician?
Every application will be different. There will be a difference in material cost if you need to running wiring 5 feet from your breaker panel or if you need to go 40 feet, etc. Heavier gauge wiring will also cost more, so depending on what amperage you plan to use will factor in as well. Can your existing panel handle the extra circuit or will you need a substation? There’s a chance you could also require additional electrical work depending on your particular application. These are all questions to ask your electrician.
Typical Cost
The short answer though, it seems that around $1,000 is average for installation of a Tesla Wall Connector or any other EVSE. Just realize it can, and will vary. You may also need to have an inspector come out depending on your codes in your local area. Some counties/ordinances may require permitting.
Should You Consider Installing a Wall Connector Yourself?
If you feel comfortable with electricity, know the necessary safety protocols, than you can certainly consider installing it yourself. Just make sure you know what you’re doing and what your local building codes require when it comes to adding a new circuit.
DIY Safety Precautions
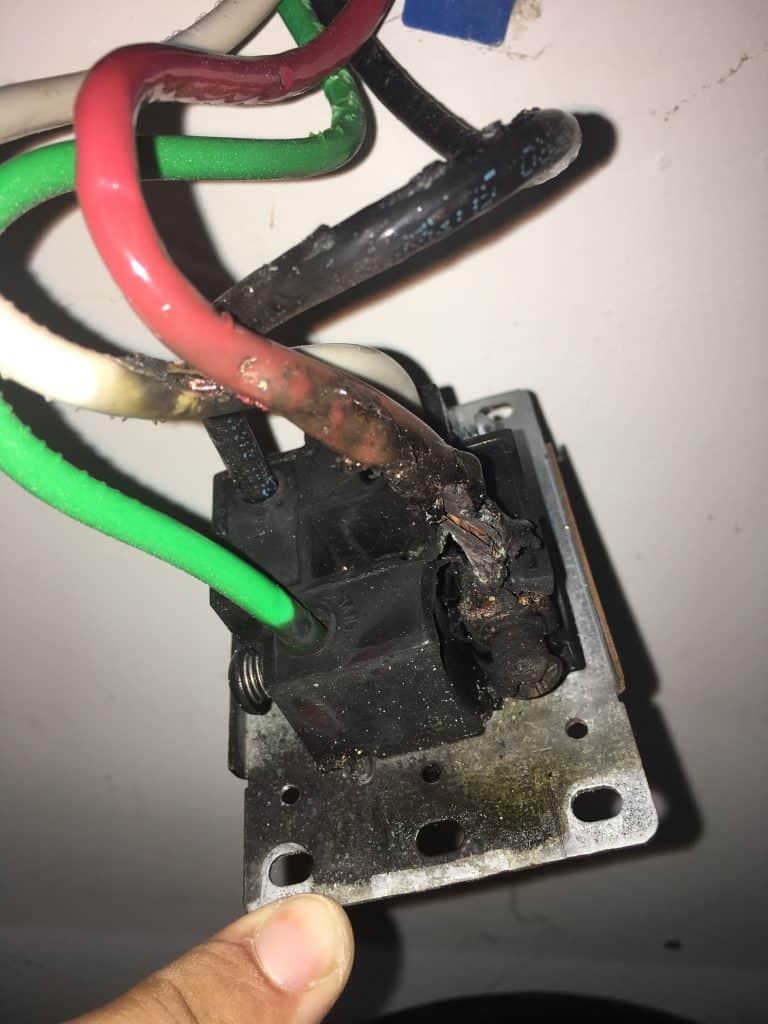
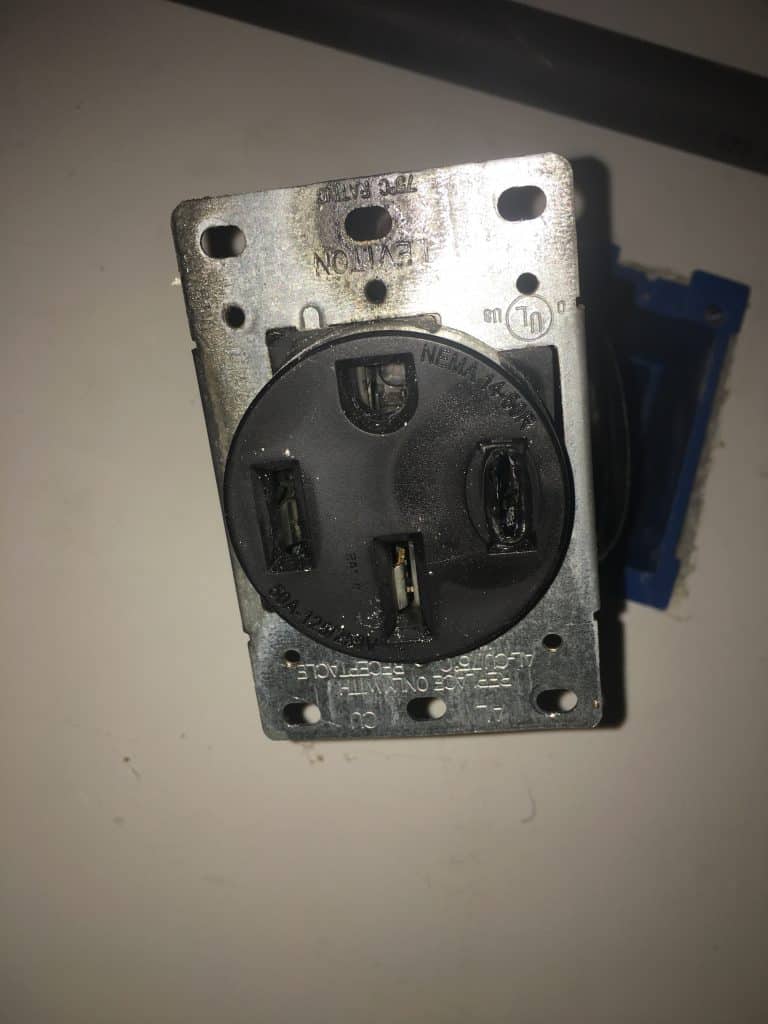
A word of caution, things can definitely go wrong if they aren’t done right. This is a photo of a NEMA 14-50 that was previously installed in a shop owned by a friend of mine. His house was built over 100 years ago and a shop was more recently added to the property before he bought it. This NEMA 14-50 outlet had been wired up before he bought the house. He plugged an extension cord in for his RV and soon started smelling that infamous burnt electrical smell.
After noticing (or smelling) a problem, he quickly disconnected the extension cord from the RV and then the NEMA 14-50. It didn’t take long for him to see what the smell was coming from. Luckily, this wasn’t any worse than some charred wires, but it could have been far more damaging if a fire had started. One of the hot wires appeared to be loose at the terminal connection and is presumed to be the cause of the mishap.
If You’re Unable to Get Charging Options at Home
While it may not be as convenient as in-home charging, EV ownership is still possible. Perhaps the most convenient place to charge would be at work if available.
Charging Where You Work
Some employers have charging onsite. Depending on where you work, you may have the option to charge at work. In downtown Seattle, there’s several parking garages with EV charging. When I’ve tried charging down there, I’ve noticed it’s not the most convenient though. While there are several charging spots, I’ve noticed if you don’t arrive super early in the morning, they tend to fill up.
I haven’t gone down there very often, but I remember going from one parking garage to another only to find no charging spots open. These particular chargers were operated by ChargePoint, so you’ll also need an account with them. They also operate for profit, so you’re going to pay a premium for the electricity.
Tesla Roadtrips – Charging Out on the Roads
In this section we’ll cover some of your options for charging out on the road, whether you’re planning for a long road trip or simply don’t have charging options at home.
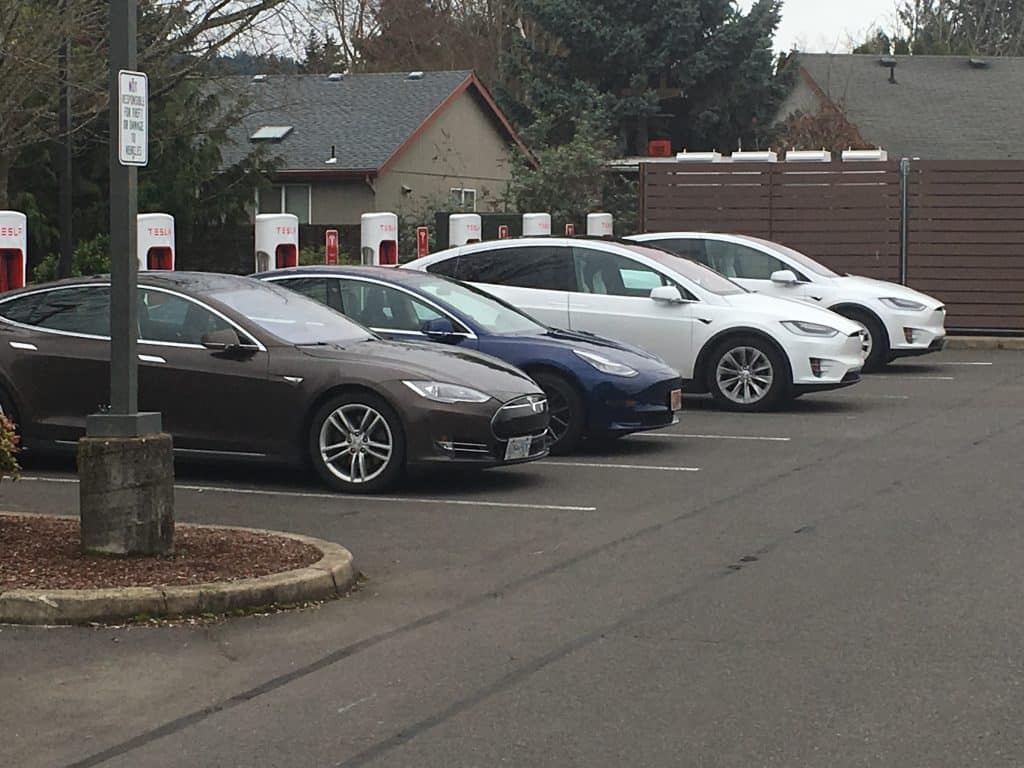
One thing that makes owning a Tesla more convenient than other brands of electric vehicles is their Supercharging network. It is also quick and convenient to plan out your trips thanks to the onboard navigation. Simply enter your destination and it will automatically plan out your trip for any necessary charging stops at their Supercharging network. You can also view Supercharger locations via the map on the touchscreen or on their website.
Versions of Tesla Superchargers
Currently, there are 3 versions of Tesla Superchargers, v1, v2, and v3. With version 1 Superchargers, I believe the max output is 72kW’s. If somone knows otherwise, feel free to leave a comment below. Version 2 are capable of up to 150 kW’s and v3 can supply up to 250 kW’s.
With a recent Tesla software update, you can now filter charger results. You must have at least one of the lightning bolt icons selected. It appears the filter works as such:
- Single Lightning Bolt – Destination Chargers (more on Destination Chargers further down)
- Two Lightning Bolts – v1 Superchargers
- Three Lightning Bolts – v2 and v3 Superchargers

Is Tesla Charging Free?
A common question that seems to come up is whether or not Tesla charging is free. Tesla has had a referral programs in the past where a new buyer using a referral code from another owner would receive free, unlimited lifetime supercharging. Elon Musk has stated several years ago that Tesla Supercharging would always be free, but that simply wasn’t sustainable and they’ve had to retract on that. Some employers may also offer various Level 2 charging options for no charge.
Vehicles that had free unlimited lifetime charging are supposed to carry with the vehicle. So if you buy one of these used Tesla’s from a private party or a used car dealership, it should carry the free supercharging over to you. I could be wrong on this, but I believe I’ve read where if Tesla takes back one of these vehicles into their own used inventory, the lifetime charging is canceled. If you’re looking to purchase a used Tesla, you should confirm with Tesla.
If You Don’t Have Unlimited Supercharing, How Much Does it Cost?
Where possible, owners are billed per kWh (kilowatt-hour), which is the most fair and simple method. In other areas, we bill for the service per minute.
When billing per minute, there are two tiers to account for changes in charging speeds, called “tier 1” and “tier 2”.
Tier 1 applies while cars are charging at or below 60 kW and tier 2 applies while cars are charging above 60 kW. Tier 1 is half the cost of tier 2.
Tier 1 also applies anytime your vehicle is sharing Supercharger power with another car.
Pricing to use a Supercharger may vary by location, and prices may change from time to time. All prices include taxes and fees.
Source: Tesla.com
At the time of this article, this is what Tesla has posted for the current average for Supercharging:


Tesla Destination Chargers
Many Destination Chargers are free for public access or for patrons of the businesses who have them installed, such as hotels. If you click on the charging icon on the map of the touchscreen, you’ll see results for the nearest Tesla Superchargers. Continue scrolling down, you’ll see a section for closest Destination Chargers.
Supercharging and Battery Degradation
While Tesla does have built-in thermal cooling that uses a coolant, and it slows down the charging speed after 60% or so, to much supercharging can lead to battery degradation. It certainly isn’t advisable to Supercharge on a regular basis if you can avoid it. On some vehicles, it has been reported that Tesla has slowed down the Supercharging speed on vehicles that have excessively used Supercharging. This is a preventative measure to prevent premature battery degradation.
Tesla Charging at Campgrounds
Whether you plan on bringing your Tesla with you camping to pitch a tent, towing a travel trailer, or camping in your Tesla you’ll want to know what your options typically are. I mention “typically”, because campgrounds and campsites often vary on what outlets are available. In my experience, the most common are your typical 5-15 outlet, usually a TT-30, and sometimes also a NEMA 14-50.
If you’re interested in learning more about charging your Tesla at campgrounds, check out our article Tesla Campground Charging article which covers the NEMA 14-50 and TT-30.
How to Open the ChargePort Door
On the Tesla Model S, 3, X, Y, the charging ports are all located on the driver-side taillight. There are three different ways to open the charging port:
- As mentioned earlier, if using a Tesla EVSE or Supercharger, simply push the button on the “wand” of the handle and the charge port door will automatically open
- If you’re using a 3rd party EVSE, press in on the cover and it will then open (Assuming you have your key fob (S and X) or key card/phone access for 3 and Y)
- You can also press “open charge port door” via the touchscreen inside the vehicle OR THROUGH THE APP?
Once the charge port door is open, simply insert the connector into the port. At first, you should see the indicator light turn blue, and then start to flash green to indicate charging has begun. You can also verify charging has begun along with the estimated time to complete charging by looking on your touchscreen or on the app.
Charging Status
This screen on the Tesla App and on the Touchscreen will give you information and charging status.
On this screen, you can set your charge limit. To help prevent premature battery degradation, many owners will set their limit to 80 or 90%. As the screen indicates, higher limits are recommended for longer road trips (if you actually need the additional range). Since we went from a 75 to 100 kWh Model X, I’ve yet to set this limit beyond 90%, even for longer road trips.
Tips for Faster Charging
Precondition Your Battery
Preconditioning your battery applies to Supercharging. This was done in an over-the-air software update by Tesla over year or so ago. If you simply select your destination for a Supercharger in the Navigation, your Tesla will automatically precondition the battery at the optimal temperature for fastest charging time possible. It calculates how long it will take you to get to the Supercharger to ensure the optimum temperature when you arrive.
Try not to go below 10-20% if possible. This is a tip I’ve heard from others. There’s seems to be some conflicting information whether taking the battery down to a lower state of charge increases battery degradation. Some argue it’s similar to not letting a gas-powered vehicle get all the way down to empty. This logic is certainly an apples and oranges comparison though in my opinion. Overall, I think it’s a good idea to leave yourself with additional buffer whenever possible.
Slower Charging Speeds After ~70%
Avoid Supercharging beyond 70% if you want to save time. You’ll notice the kW’s going into the vehicle substantially drop when you get over 500-60% or so. It’s becomes even slower after around 70%. The software is designed to slow down the charging speed to prevent the battery from getting too hot. This is done to avoid battery degradation. You can actually save time by using the recommendation from the Navigation for longer trips. Depending on your trip, you may see it recommends stopping off at one supercharger for 15 or 20 minutes. It could then say to stop at another one for 30 minutes. This is calculated to minimize overall charging time. In many cases, it would take longer at a single stop many times to charge up to 80 or 90% versus two shorter stops.
“Shared Stalls”
This will apply to version 1 and 2 superchargers. If you see numbers on the chargers such as 1A, 1B, 2A, 2B, etc. they have “shared stalls”. What this means is that power is shared between the 1A and 1B charger. Power is also shared between the 2A and 2B charger, etc. If a vehicle is charging at 1A and someone pulls in to 1B to charge, it will cut the kW’s coming into the vehicle by half. This essentially will double the charging time for both vehicles. If possible, always pull into a charger that is not already in a “shared stall”.
Avoid Idle Fees
Tesla wants to avoid owner frustration with finding full supercharger locations with vehicles fully charged blocking spaces. To combat this, they’ve implemented “idle fees”. You can check out their Support page on Idle Fees for more information. Essentially what it means though, you can be charged for every minute of idle time your vehicle is plugged in for after it has fully charged if the station has 50% use or higher. For example, if there are 8 vehicles plugged in a 16 stall station, it would have 50% use.
Once Charging is Complete (or You’re Just Ready to Go)
Simply press the button on the wand and charge port will unlock the wand. You will then return it to a holster (if applicable) to help keep it free of debris and other elements such as the weather.
What To Do If the Tesla Charge Port Lock Doesn’t Release?
The Tesla charge port has a built-in locking function to prevent someone from unplugging your car.
If for some reason this lock doesn’t release, first, make sure you have your key card, phone (with enabled key), or fob with you. If you do, and it won’t release, try going into the touchscreen and make sure to XXXXXX
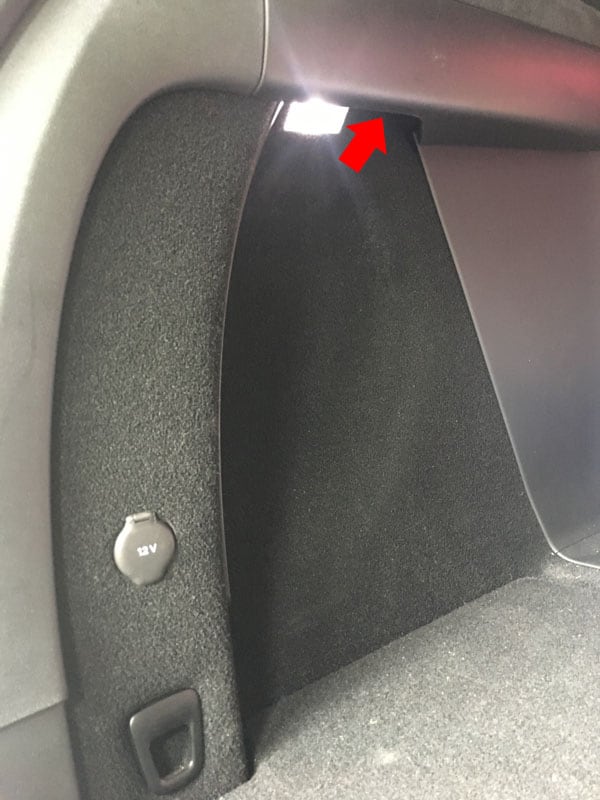
Lastly, there is also an emergency pull string. This is located inside the vehicle and should only be used if no other method is working. I had to do this once when we had a charge port go bad. This method was recommended to me by Tesla support after the vehicle would not release the wand from our home Wall Connector. It should be an extreme rarity to have to do this.
The manual release cable is located here in the driver side trunk area. This is on our Model X. Reach inside here and you’ll feel a rubber handled pull cord. Remember, this should only be used if absolutely necessary. My local Service Center said it could potentially damage the chargeport assembly.
3rd Party Charging Networks
I previously had a monthly subscription with Aerovironment which we used fairly often for our 2012 Nissan LEAF. With Tesla’s network constantly adding more and more chargers and the vastly improved range of the Tesla models, we haven’t found our self needing to use these 3rd party networks. I honestly find it a hassle.
It’s so much easier to simply show up to a Tesla Supercharger, no cards to swipe, no additional accounts to create. So far, we also haven’t seen anywhere near as many charging stalls at any of these others either. Several will only have 1-4 stalls in some areas. I think the fewest Tesla stalls I’ve seen were 8. Depending on your location and typical travel, you can likely avoid these 3rd party networks altogether. It just depends on your own personal travel and what is or isn’t available.
If you’re going on a large roadtrip, I would recommend putting the destination into your Navigation and see what it shows you for recommended charging stops. You’ll also want to make sure you can charge near your destination (or arrive with enough charge) to get back to the nearest charging location for your trip back. The navigation currently does not calculate for a return trip, merely getting to your destination.
Tesla Charging Easter Egg
We’ll wrap this article up with an “Easter Egg” that Tesla has in charging. When you plug in the charging wand, press the button quickly and repeatedly 10 times. The charging port will now glow with a rainbow color changing effect. Some have guessed it’s influenced by the Rainbow Road track in Nintendo’s Mario Kart games, which also seems to be the inspiration behind another Tesla Easter Egg.
Summary
There’s certainly a lot of variables and some times no straight answer to charging a Tesla, but the more you read about it, the more knowledgeable you will become. The main takeaway is get an understanding of where you’ll likely charge and what the best option is for those locations.
I hope this article provides some info on what I considered to be more of an introduction to Tesla charging for a newbie. If you feel there’s anything I’ve left out, leave your comments and I’ll do my best to answer them.

