
Variable and Total Cost, Things to Look For, and Tips on Hiring a Contractor
In this article, I cover the build process of our 24×30 foot “daylight” pole building. I’ll provide detailed first hand experience. How much we paid to have this shop built, only doing the pad site prep ourselves and having everything else contracted out. I’ve never taken on a project this large (or expensive). Some times it’s better to have things done right the first time, and with a warranty.
With this large of project, not having the experience was a huge factor for me deciding to hire it out. Also, I would have been hard pressed to find the time for the actual build, but also needing to learn and research how to construct various elements to code.
Of the companies we contacted, none provided site prep, so we either had to contract it out, or do it ourselves. We opted to do it ourselves to try and save on labor costs. There must be some companies that will do everything start to finish, but the ones I talked to did not.
We were looking for the most cost effective building structure. Aside from a Quonset hut style shop which my wife would not agree to, pole buildings seem to come in at the lowest cost. A few years back we had a quote for a “stick-build” shell, and it was substantially more expensive for just a shell structure. It would have been unfinished on the inside just like the pole building.
Snow Load and Wind Rating
The builder we chose has most of their shops rated for a 25 pound snow load and for 85 mph winds. They state if your jurisdiction requires higher wind exposure or snow loads, that building prices will be affected. If your considering a DIY kit, make sure these requirements (and others) meet your local code requirements.
Septic Line
With our septic line running through our backyard, we weren’t sure if we were going to even be able to build in this location. The sales person advised we would have to reach out to the county inspector office. After calling our county inspection office, I was quickly referred over to the county health department. Our county health department is responsible for overseeing septic systems. I started to get some conflicting information. The original person I spoke to said we could be build a shop over the septic line, and that we would just have to sleeve it. To add a sleeve involves putting the primary line inside of a larger pipe. I ended up putting 22 feet of pipe for sleeve in.
Later, we would have someone else come onsite to sign off on the build plans. This was a different representative than whom I had spoken with on the phone. They stated a different requirement. This person said the septic line needs to be at least 5 feet from the building. I would also have to sleeve over the septic line where the driveway would go. So after initially planning to sleeve the line, I would also have to do some relocation.
Septic Line Relocation
To relocate the septic line, there would be a lot of digging ahead. Your application will certainly vary. Better yet, you may not even have a septic line to worry about. Or at least not in the location you’re building (including where a driveway will be installed).
I first had to locate the septic line, which according to the “as-built”, should run right through the middle of our property. This is when I first started using a rented excavating and was soon later able to locate the line. Once I located the septic line, I was able to start trenching out for the relocation. For the relocation, I used two 45 degree elbows to ensure a path at least 5 feet from where the shop would go. I had to find the line further in backyard, and again, had to start digging for where I would have the PVC meet back up.
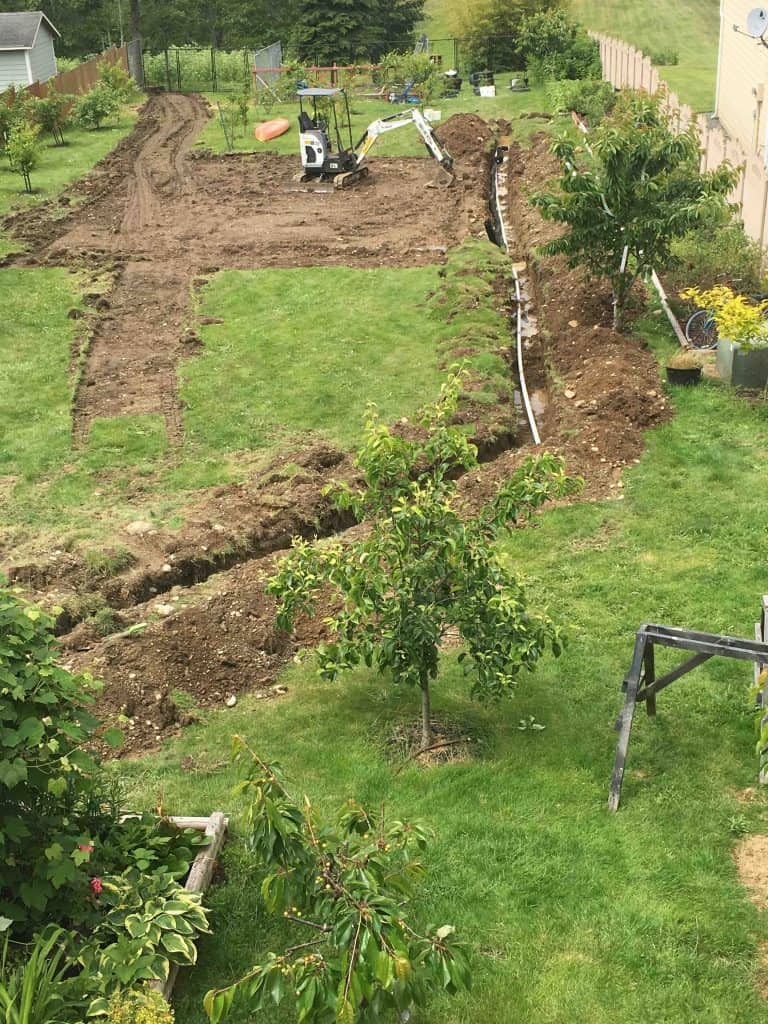
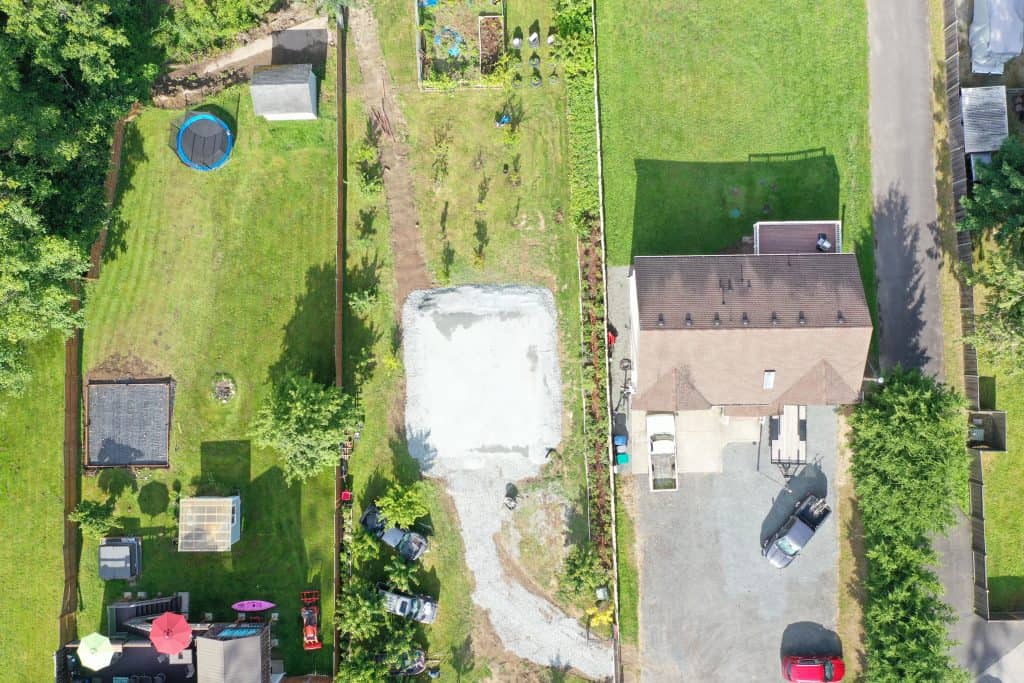
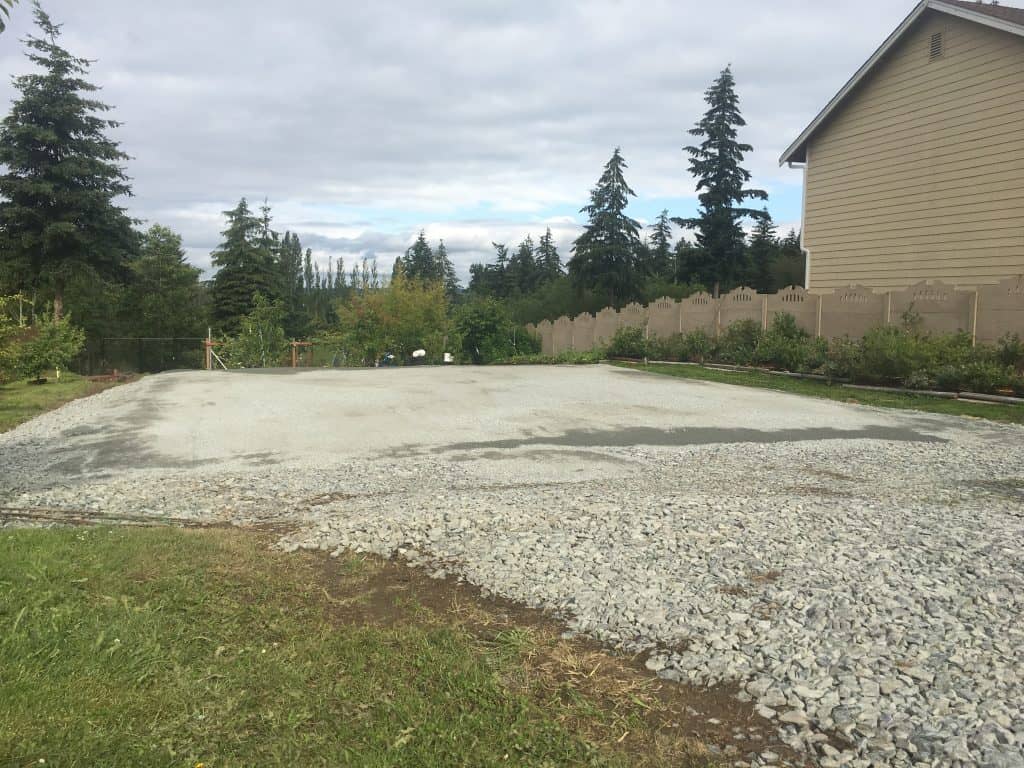
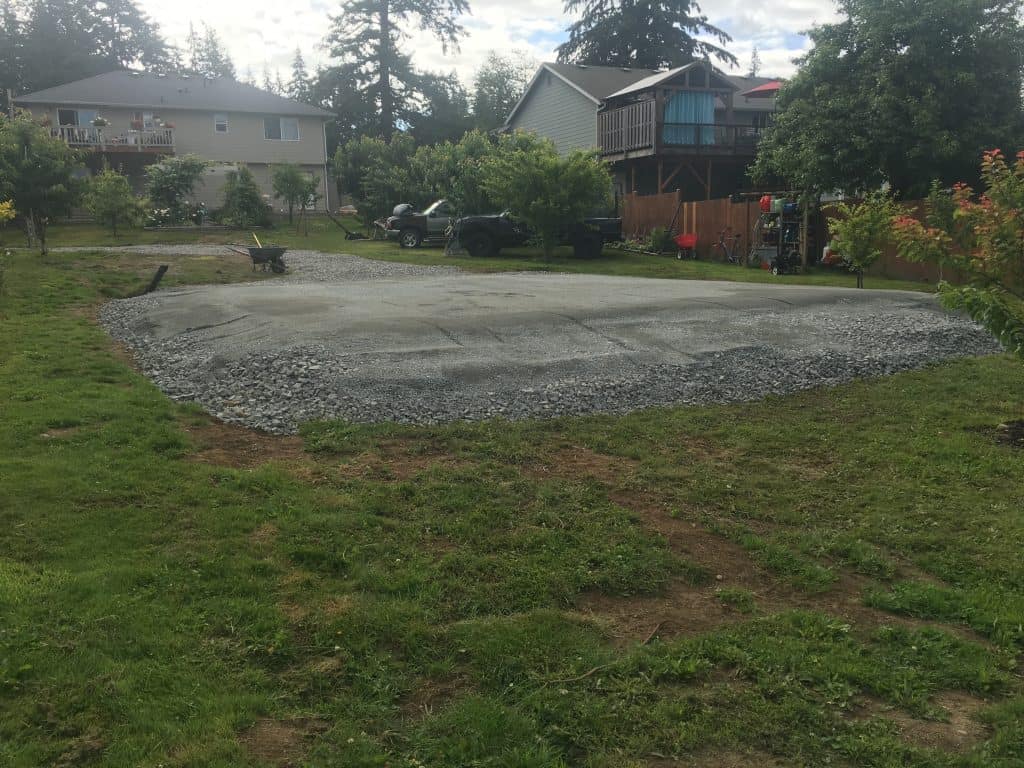
Pole Building Site Prep
Our property has a gradual slope, after running a line level, we had about a 9″ difference from the front to the back. We chose to start with a base of 2″ chip rock. After multiple rounds of compacting, it was time to go over the base with a 5/8″ minus mix. More compacting and running line levels to ensure everything was within 1/2″ of being level. This was about a 3 day process. Lots of material moving and manual racking. After some final compacting, it was now time to call it done.
Temporary Driveway
We also needed a temporary driveway to the building site. With construction crews going in and out, grass would quickly get tore up, especially after heavy rain. I just went with a 2″ chip for the driveway. Having a driveway (and not dirt) was a requirement from the contractor. We also had to make sure we didn’t “disturb” more than 2,000 square feet of native ground. This included the shop area and driveway combined square footage. Otherwise, we were told we would have to hire an engineer to ensure adequate drainage was achieved. This is per our county’s code. Local codes on this and other requirements will vary.
Waiting for the Build
One of the requirements was for us to send in a confirmation card once the pad side was ready. I did this on July 10th, 2020. When we first signed our contract, we were scheduled to begin January 2021. However, we were told if they had a slot open up we might be able to begin sooner.
Sure enough, I got a call they could start late August/early September. When I called in mid August to see if things were still on schedule, I was informed they had a foreman who had been out sick for a while, and there might be delays. We didn’t hear anything for the next few weeks
Without warning, we had a foreman show up onsite on Labor Day of all days. We got a call from the foreman that he was there, yet we were out camping. This was the start of a lack of communication. With a locked gate, he was not able to access our property. After talking to him on the phone, he said he would be back out either tomorrow or the following day.
Holes Drilled for the Poles – First Inspection
The first step for the contractors was to dig the post holes. These holes are for the structural poles around the edge of the building. For our build, it required 10 holes/posts. The contractor used a skid steer with an auger attachment to drill out the holes which were about 5 feet deep.
First Inspection
The holes were verified to be drilled at the appropriate depth and that 2 bags of concrete were used in each hole. For the first inspection, the poles also had to be placed, and braced in order to pass. Some counties vary on this requirement.
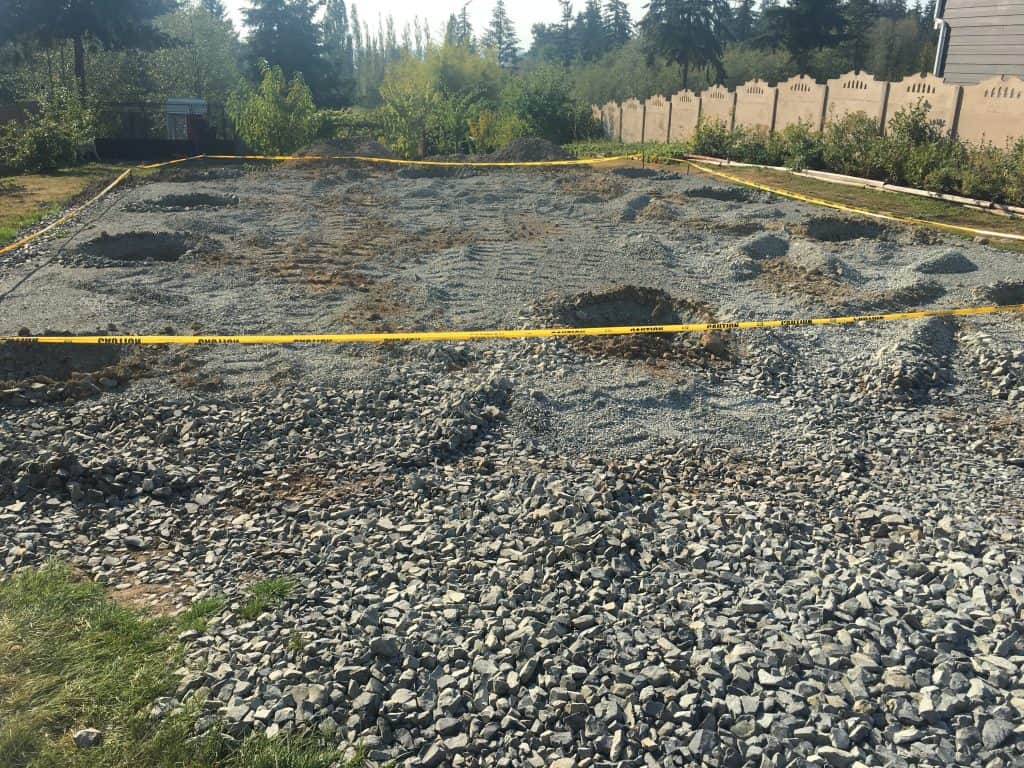
We had spent multiple days working on the pad site prep for the shop. It only took a few hours of skid steer work to make it look like mine field. Six hours of skid steer work to be exact. The foreman mentioned our ground was extremely hard. The 2″ chip rock base was also deep into the ground. The 3.5 ton rolling compactor I used more than likely contributed to that.
I felt better care could have been taken not to tear up the pad site as badly as it was. Granted, we did have two feet of fillup in one of the back corners, so we had a fairly steep grade near the back. Our property is also only 65 feet wide and with landscaping/gardening back there, we didn’t have a lot of room for the skid steer to come up on the sides.
Lack of Communication, Unannounced Deliveries Continue
We had a string of non-communication for deliveries over the next few days. First, it was a truck of materials that came a day earlier than what we were told. Then, it was a sand delivery we knew nothing about.
Easily the most frustrating delivery was for a port-a-potty. Similar to the sand delivery, we were never told one would be dropped off. I heard a truck nearby around 5:30pm, went to our back door. I saw a flatbed truck and immediately called our dog. He didn’t come, so I went over to the gate. A delivery driver was there opening the gate and asked, “is that a husky”. To which I responded “yes, where is he”. The driver saw him before opening the gate, and allowed him to get out, but didn’t see any issue in that. After over an hour, my neighbor who was helping me find him was able to locate him. Thankfully we were able to get him back, it could have been much worse.
Delays and Poles/Posts Finally Set
After no crew for a couple of weeks, we had a new foreman show up, again, unannounced. It was great to see the project was back underway though, just would have been nice to have some communication. Mostly because of our dog being in the backyard.
With two bags of concrete at the bottom per hole, the posts were set in with sand.
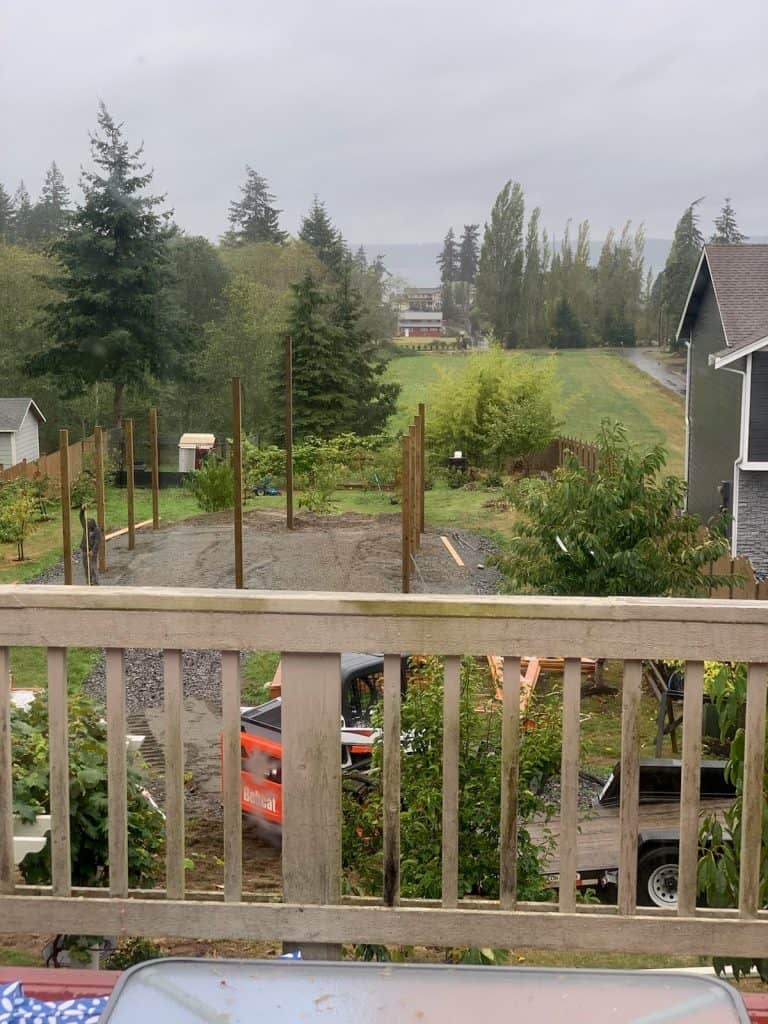
After taking the photo above I realized our balcony railing is overdue for a pressure washing. I’ll likely have that on my spring project list for next year.
A couple days later a county inspector was back out and we finally had our initial inspection signed off (after about 3 previous visits by an inspector and unfortunately without the necessary work being completed). The post holes were than filled with sand.
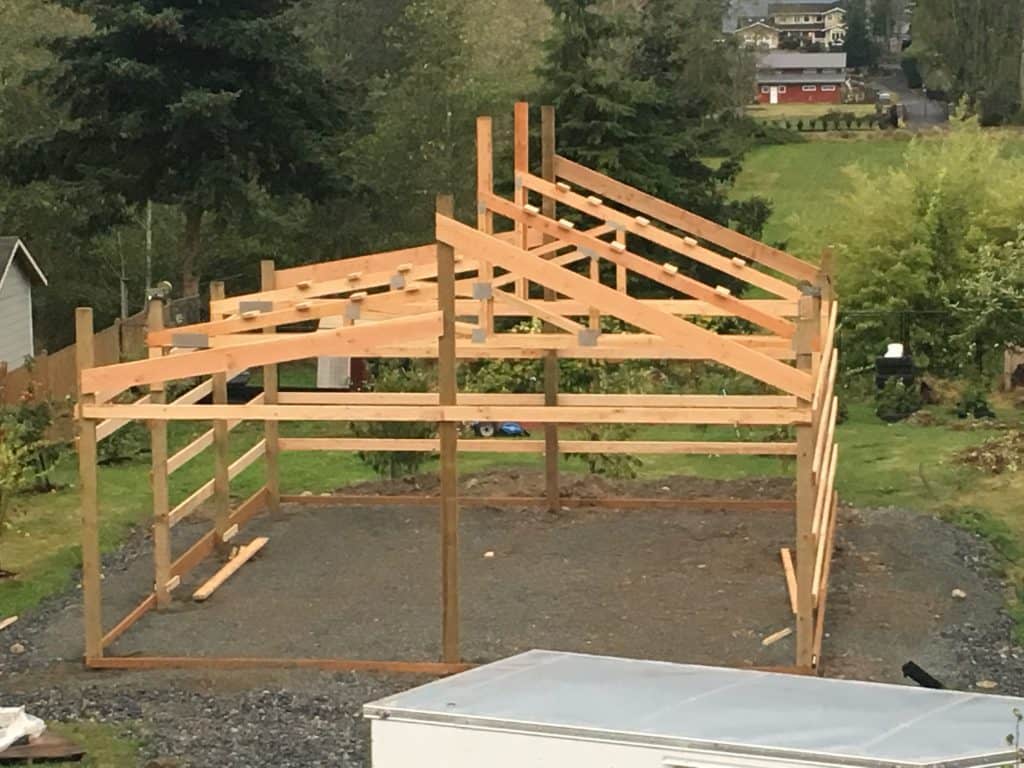
Pole Building Framing – Second Inspection
The crew of three were able to complete most of the initial framing in one day. They still needed to place 2×6’s for the roof which they would do the next day. Door framing would also need to be completed.
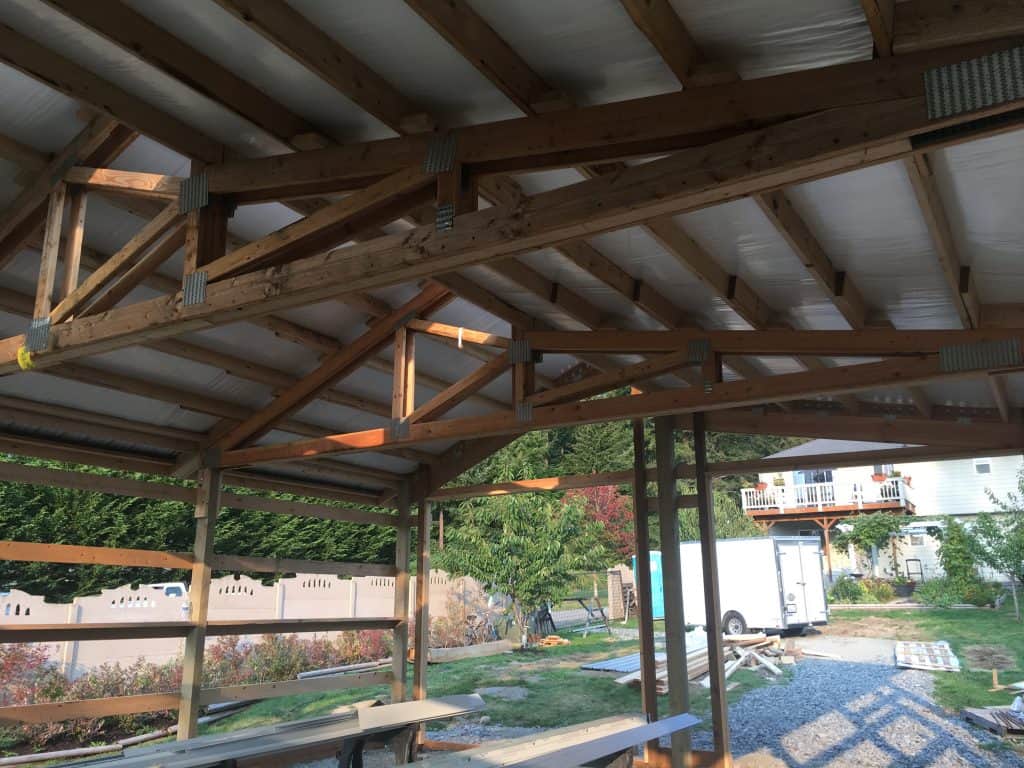
Pole Building Roofing
By day 3, our roof was on. Two-inch vapor barrier is included in the price of the building. It was installed on top and the metal roofing sandwiched it into place. After they spread out the vapor barrier, the started placing the metal roofing and screwing it down.
If you hire a contractor to build a steel building, you should make sure they at least include a vapor barrier for the ceiling. It could literally appear as though it was raining inside the shop if this isn’t done. The vapor barrier catches condensation. The foreman mentioned he’s seen vapor barriers cut open and significant water immediately drop down.
Siding and Trim Done (Almost)
The siding and trim went up fairly fast in just three days with only 2 crew members during two of the three days. It was now getting close to completion.
In the picture above you can see the siding near the middle cut short (and at the wrong angle). This left a partially exposed 2×6. Our foreman quickly informed me of the issue. He mentioned he wasn’t sure if they just cut it wrong or if they received a shorter piece by mistake. He assured me that it would be fixed, and it was.
Re-working the Pad
The new foreman had scraped the pad site before they started, but mentioned it was well out of level. He said I would have to work on it before concrete could be poured. This certainly wasn’t something I was expecting to have to do, but it also wasn’t his fault the original foreman tore up the pad as bad as he did. What was once probably within half an inch of level was now a couple inches off, especially toward the back.
We spent the better part of three days re-working it, but at least we knew everything was properly leveled. This allowed us ensure we were getting the proper concrete thickness throughout the shop without any thin areas.
Concrete Pour for the Pole Building
Pole buildings use a “floating foundation”. The concrete slab is poured after the structure is built. The company we went with used a fibermesh reinforcement and zip strip crack control. I wasn’t familiar with zip strip crack control, but it was essentially just plastic strips. The concrete sub-contractors merely pressed it down into the concrete before smoothing everything out.

Both the builder and concrete sub-contractor told us we would have to give the concrete 28 days to fully cure. This meant leaving the garage doors open during this time. The garage doors were installed 24 days after the concrete. That left only 4 days of having garage doors to even keep open.
Gutters
For final inspection, our county requires gutters to be installed on shops. I was told this by the salesperson we originally spoke with and it was later confirmed with an inspector. Our salesman mentioned that they did not install gutters and we would have to hire someone else to install them (or do it ourselves).
Since I wanted to go with seamless gutters, and have never installed them before, I opted to hire a contractor. I also don’t have the equipment for it. Going with seamless gutters would reduce the chance of areas that would leak and later need to be re-sealed.
A quick Google search got me names of local companies. The one I decided to go with could not install until November 17th, but called me a few weeks later to inform me they had an opening on November 5th. I had a doctor appointment on this day, and sure enough, they arrived a few minutes after I left and they were already done and gone before I got back.
Garage Doors
Just when things seemed to be coming together, we had a garage door installer come out to install the overhead doors. The garage door installation was subcontracted out. As soon as he walked in, he immediately said “We’ve got a big problem”. He mentioned a lack of clearance from the opening to the trusses. After pulling out his tape measure, he said the opening should be 6-7 inches shorter.
I wasn’t sure how the builder would deal with this. Would they make the opening shorter or go a different route? Turned out they added 2×4’s to gain an extra 1.5″ of thickness. About two weeks later a different installer came out. He noticed problems still existed. He mentioned the framing needed to flush with the truss above. So he left, and it seemed we would be delayed again. About 20 minutes later he returned and said he had good news. His boss was coming over with lumber and they would get it right. They added yet another layer of 2×4’s and the garage doors were ready to be installed.
After a few hours, he had both doors installed.

Rodent Control for Pole Buildings
Not all pole building builders will include a trim piece at the bottom. Z-metal or similar trim pieces block off the raised portion of the siding from becoming mice highways. We had a problem with rodents getting into the garage of our house and it took quite a while to get rid of them. I’ve read where mice can fit through gaps that are only 6-7mm in size. While the trim at the bottom is a good start, I’m not convinced of other areas. This includes the corner trim and other places. Mice cannot chew through steel wool, and there’s products made specifically for rodent control. I may look to add a product such as this:
Final Inspection
Our final inspection was signed off on November 10th, 2020. I wasn’t home when the inspector was there, but things apparently were all up to par and he seemed to get in and out of there fairly quickly.
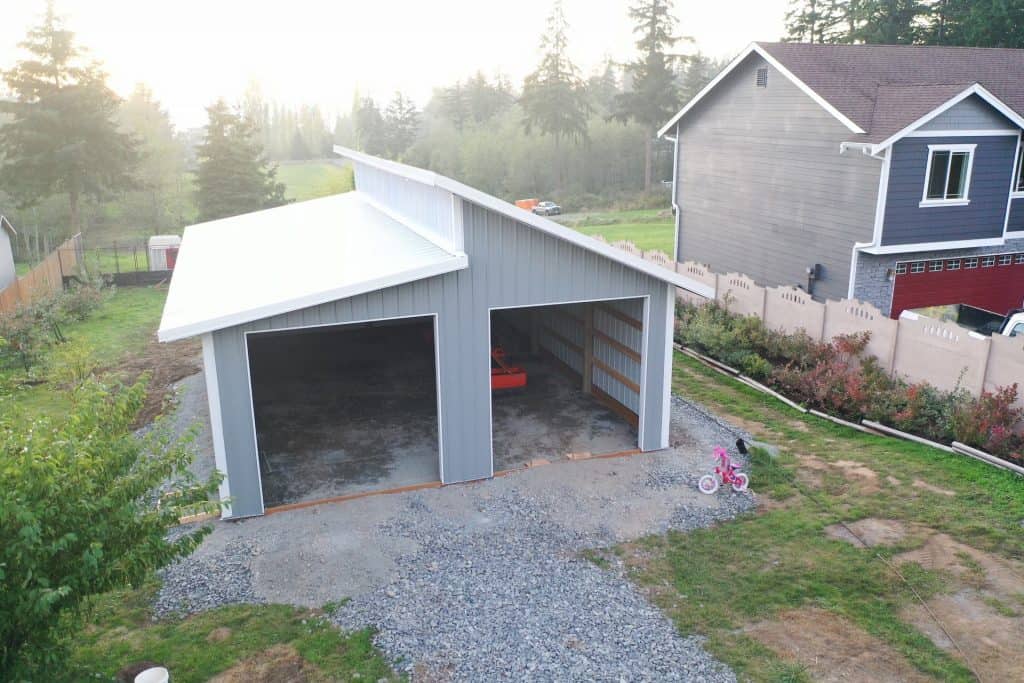
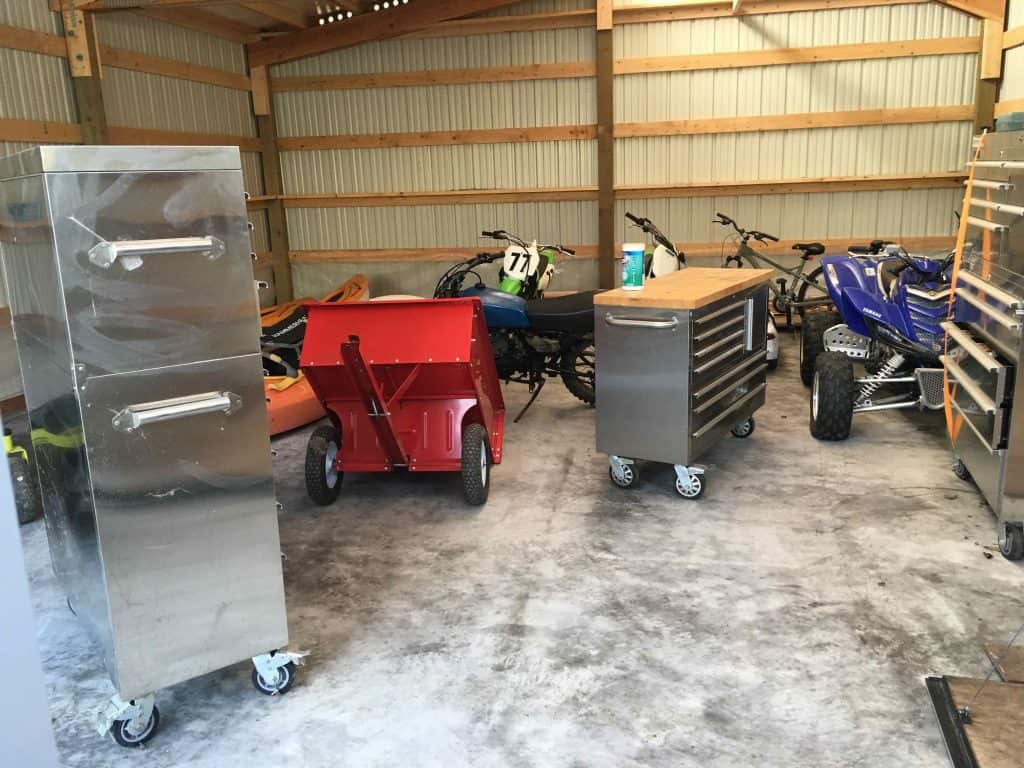
Moving Into the Pole Building!
It at least felt like I was moving to some extent. I used my cargo trailer to load up items from the garage that were going into the pole building. The plan is to get a feel for everything that will be kept in the shop and then determine where everything should go. There will be space optimization, future needs addressed/accounted for.
Punch List
In construction, there’s often a “punch list”. This is usually a list of items the new owner will write onto a form for the builder to address. We had 8 total items, some may be non-issues, but we wanted to get their input. Most of these items are related to preventing rodents or weather from getting in. There’s also a few fitment issues with trim.
I’ll update this section if there’s anything that was not changed and considered to be within spec.
1. Roof Panel Lifting
After some fairly high winds, my wife noticed that the top overlap of roofing managed to raise up. Our concern here is if rain and other elements can get in between.
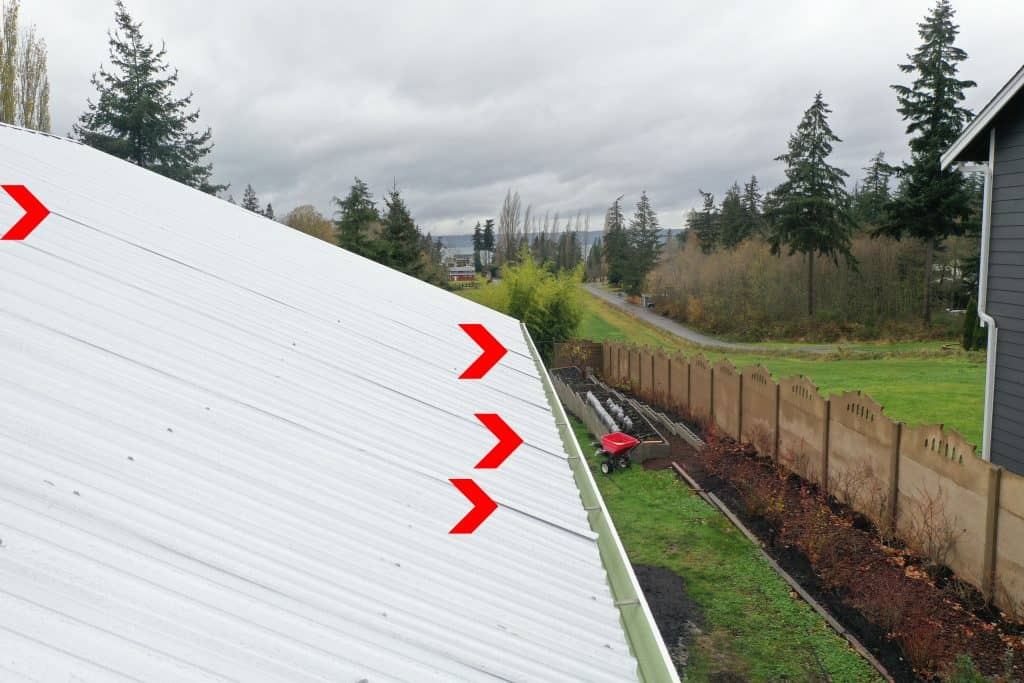
2. Lower Metal Trim
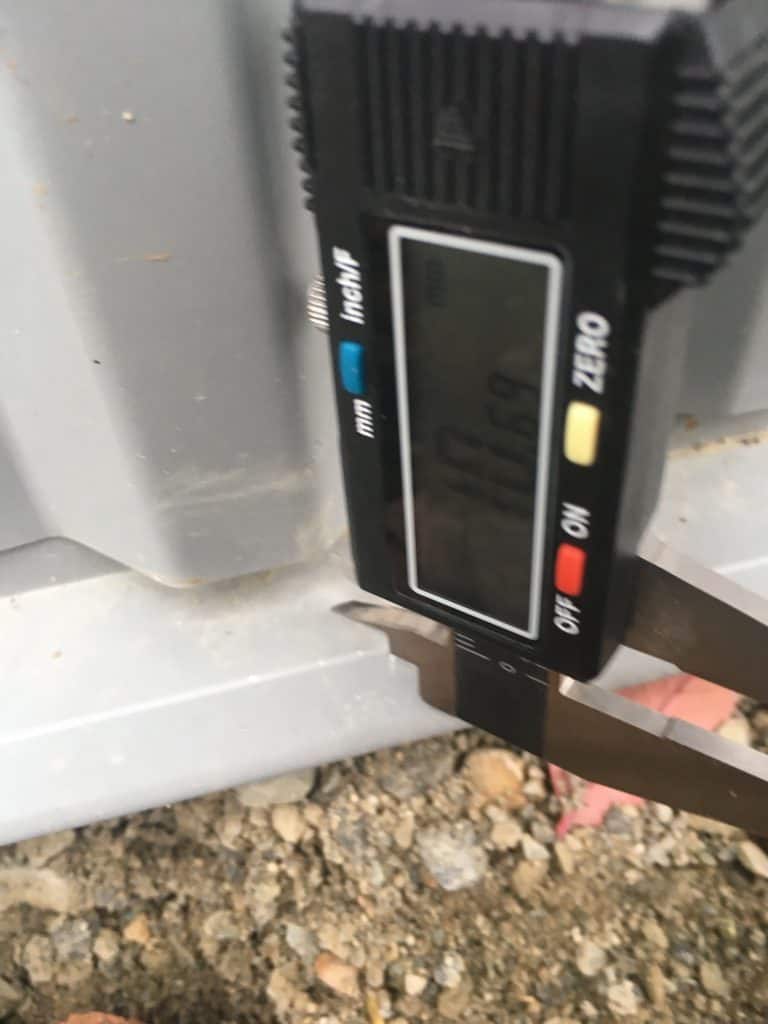
We did notice a few large gaps between the lower trim and siding. It some areas it was nearly 11mm. This is definitely a concern for me since mice are supposed to be able to squeeze through openings that are as small as 6mm.
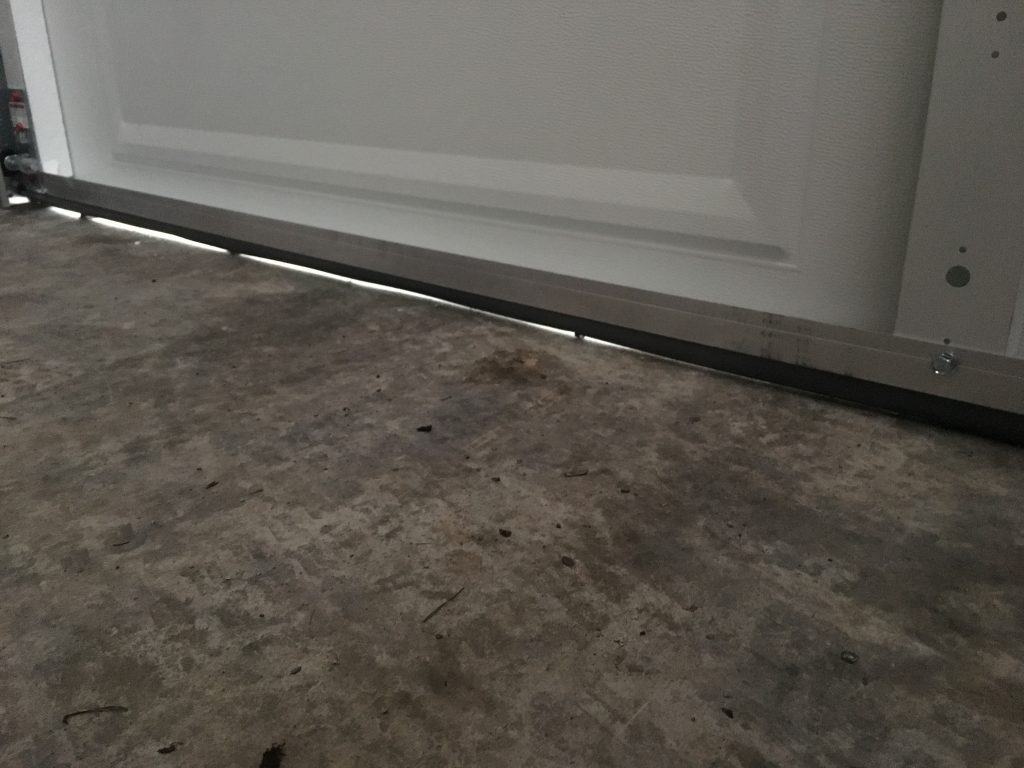
3. Garage Door Gap
Daylight coming through certainly indicates less than a tight fit. Unfortunately I’ve been told with house construction too, many times the concrete crew won’t go back with a level to ensure everything is perfect. This tends to leave gaps such as we have here. This could be an entry point for rodents as well as weather.
4. Pre-Drilled Holes in Roof
Our foreman mentioned they could place rivets in two holes we had in the front eave or use a sealant. He forgot to do either.
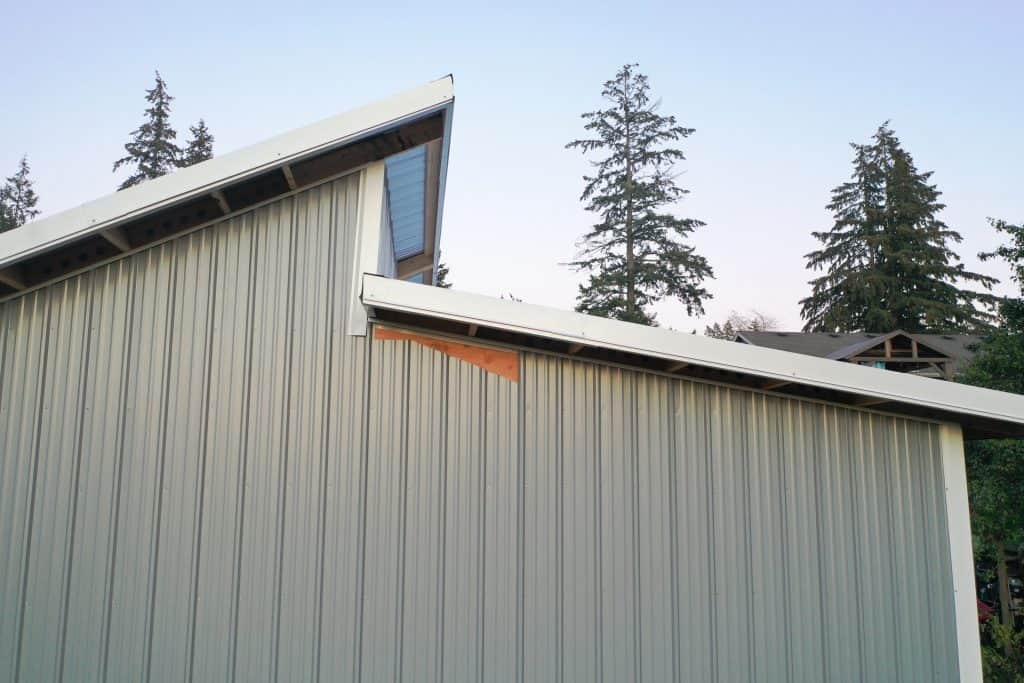
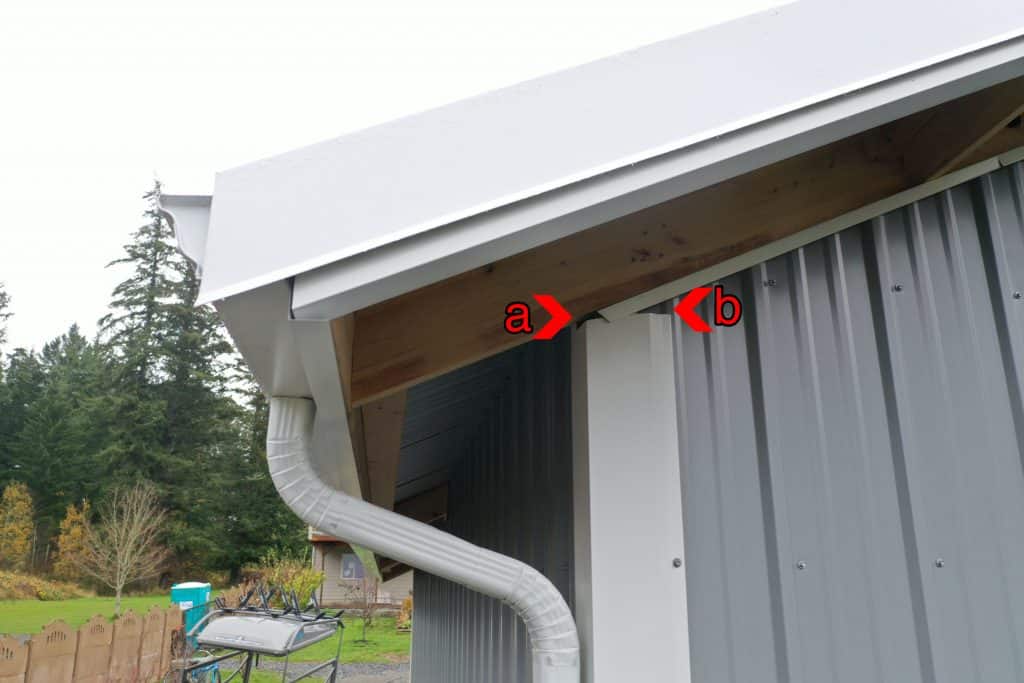
5. Corner Trim Gaps
The corner trim as well as upper trim could have been cleaner here. Rather than the 90 degree cut (b), the corner trim should have matched the roof angle. The trim immediately above it was not flush down to the corner of the building either (a).
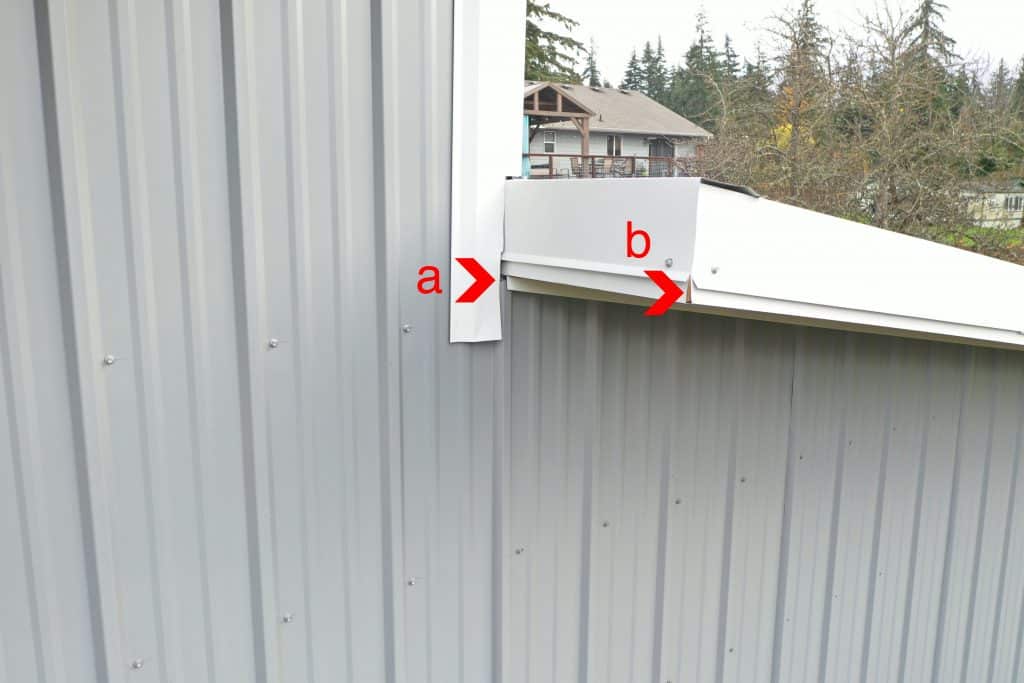
6. Upper Trim (Different Corner)
Similar to item 5, the trim above the siding was not cut flush to the edge of the corner, it came up a bit short.
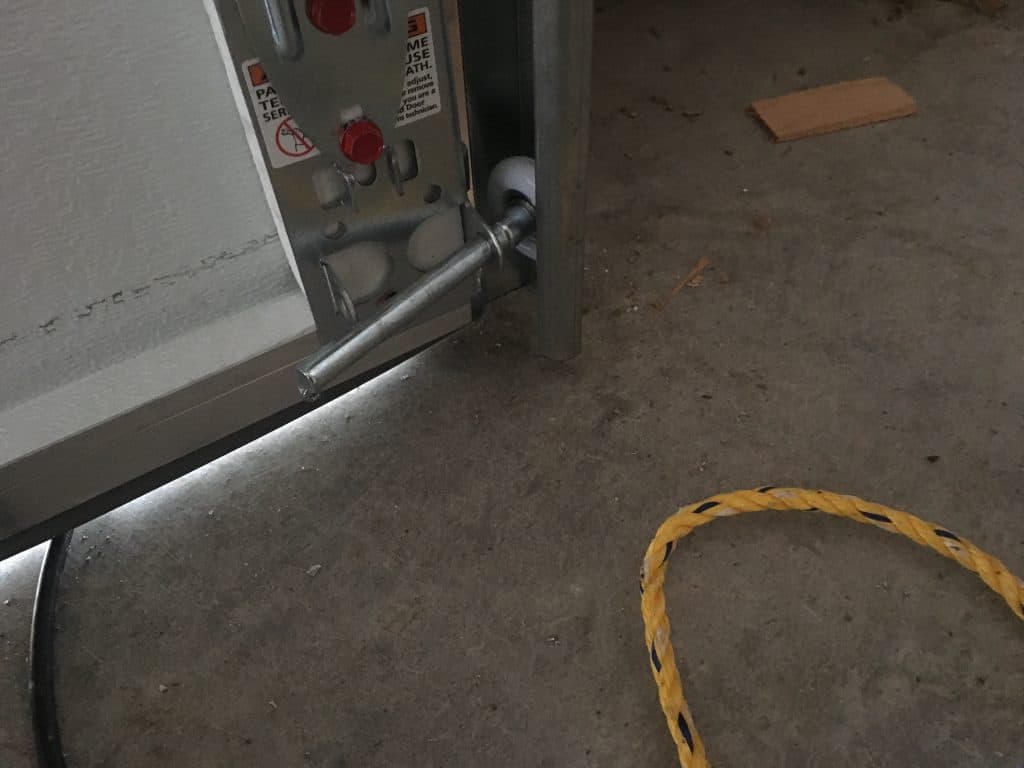
7. Lower Garage Door Roller
After only a few times of closing one of the doors, a roller pulled out of the bracket. The garage door installer had placed the rope to close the door on this lower roller. Apparently I pulled at too much of an angle and it must have managed to spread the bracket enough for the roller to pop out. Since this bracket is under tension, I’ll let them fix it.
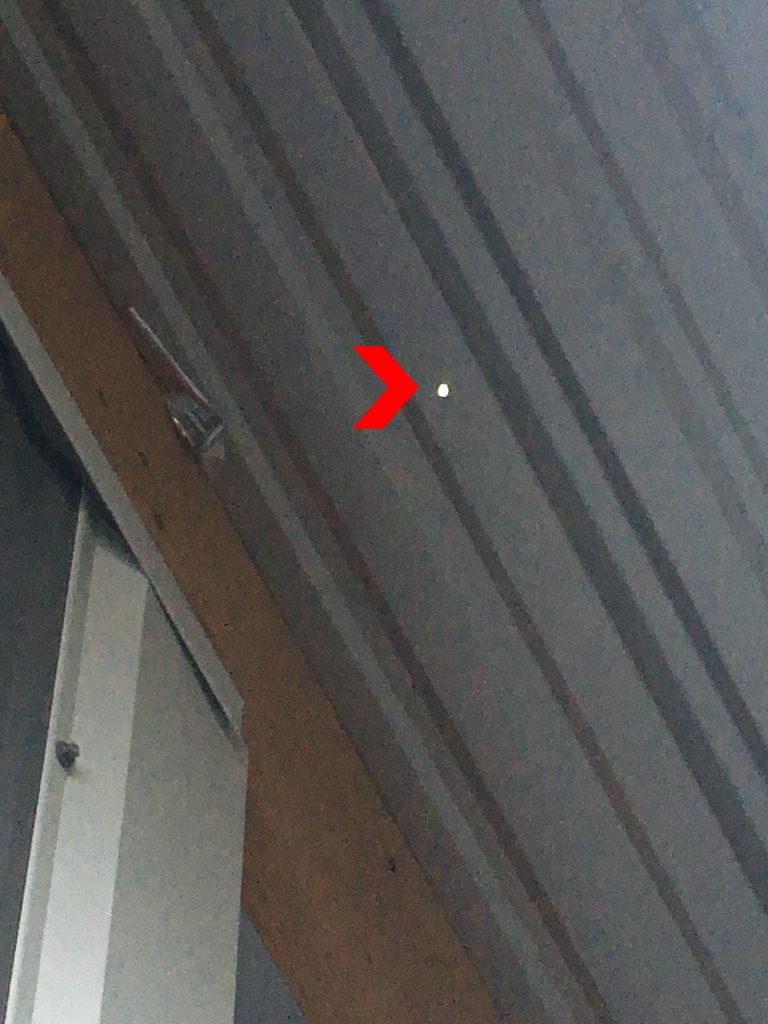
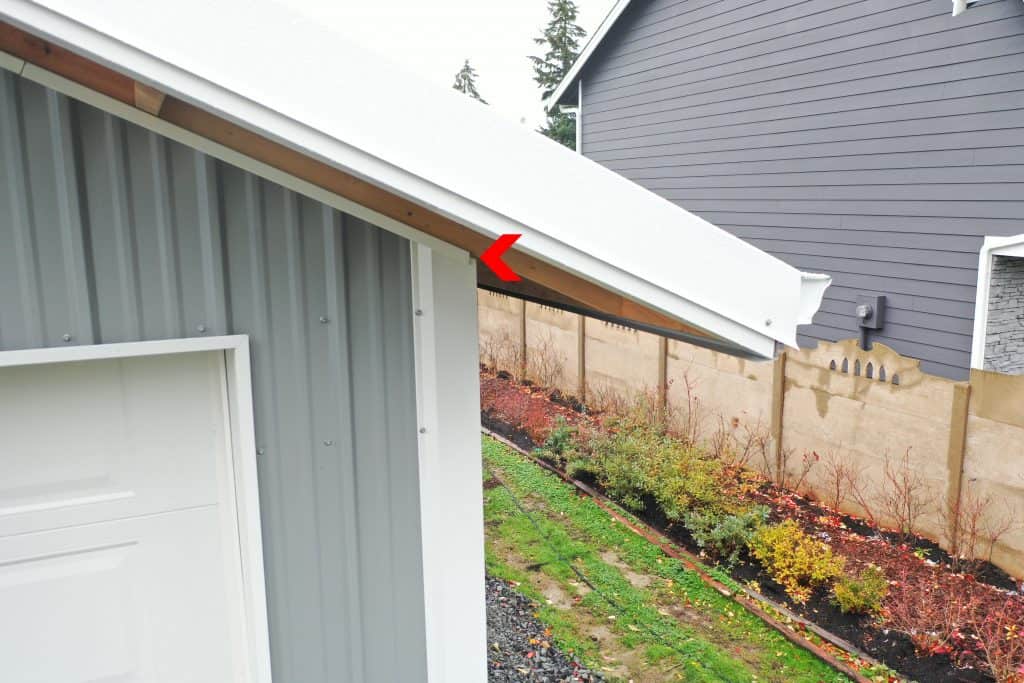
8. Exposed Hole and Corners
Arrow A is pointing to what could be a potential area where rain and other elements could get in. My opinion, the trim should have extended further to cover it. Arrow B shows non-pressure treated wood exposed behind the metal fascia. I’ll see what they say on these.
Total Cost (So Far) of the Pole Building
I’m sure I’ll have additional costs to the shop over time, but these are the initial costs I’ve incurred:
Building Cost (with tax): $32,287.98
Building Permit: $1,866.84
Excavator Rental: ~$300
Compactor Rental: $526.82
2″ Chip and 5/8″ minus fill: ~$3,000
2″ PVC to relocate septic line: $171.72
Gutter Cost: $866.55
TOTAL COST: $39,019.91
Electricity TBD, but I have a quote for $6,800 and currently waiting on a second quote.
Pole Building Timeline
February 2020: We chose our building and signed our contract
July 2020: Completed our pad site prep (fill rock and compacting)
September 9th: Holes Dug, then delays waiting for a new crew
September 23rd: Poles placed and construction picks up
October 14th: Concrete was poured. We had to make sure the doors were left open 28 days after the pour. The garage doors weren’t installed until 24 days later, so that made for a shorter wait.
November 7th: Garage doors installed.
November 10th: Final inspection by the county signed off.
What’s Next for our Pole Building Shop?
Epoxy Flooring
Initially I was looking to apply some epoxy paint to the floor. With a stretched budget already, I decided not to paint the floor. At least for now. Not only for budget restraints, but also temperature. From what I’ve read, most of these paints need a consistent temperature in the 50.
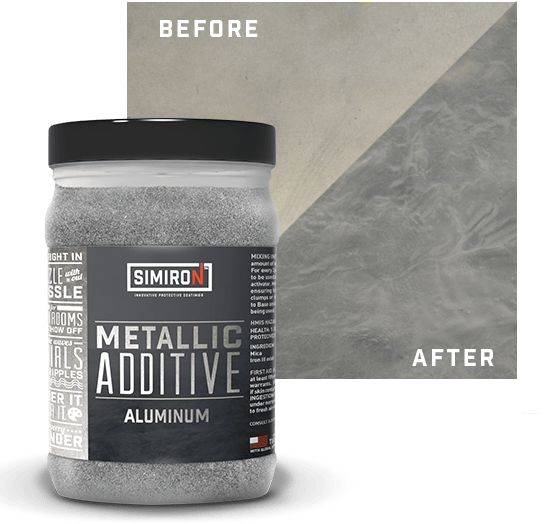
Metallic Additive
I came across this metallic additiive by Simiron. If I do add an epoxy floor later, I may look at going with an additive similar to this. This additive needs to be mixed with a clear epoxy. With a smaller footprint in the garage, I may consider doing an epoxy floor in there before our shop. It would have made it a lot easier to do it before I had anything stored in there though. Late Fall and a tight budget just didn’t allow for it.
Pole Building Insulation
I was also debating whether or not to insulate the shop. It would be easier to insulate it before moving things into it, but I’m prioritizing getting electricity to the shop. At this point, I plan to see how a couple of years without insulation turn out.
We’ve recently seen a drop in temperature into the low 30’s, so this will be a good test for colder weather. I’ve read that insulating a pole building the wrong way can cause rotting issues with the framing and rusting of the siding over time. It’s definitely something you want to make sure is done right, or it can lead to headaches later on. I’ve got some more research to do on this front. In time, I may decide to go with a spray foam insulation, traditional insulation, or none at all.
Custom Shelving
I want to make sure I keep things well organized in the shop. One of the first projects will be to build some custom shelving.
Work Bench
While I have a rolling tool box with a bench top, I may build a custom work bench (or benches). I’ll see how the rolling tool box works out first, but depending on projects, I may add more. It would be nice to have dedicated areas for metal work, electrical work, etc. I’m sure this will be something I expand over time.
Overall Organization
One of my main goals is keeping the shop fairly clean and organized. I’ll implement some 5S standards throughout. If you’re not familiar with the 5S methodology, this is a great book to check out. At at a previous employer, some of us were given this book to learn about 5S:
Projects!
The overall decision to have a shop built was to free up space in our garage, but also allow room for projects. Organizing the shop will be some of the first projects on the radar. Although I definitely plan to start up some others soon as well. One of the first projects might be a V8 engine swap into an off-road truck. Stay tuned!
Electricity
I currently have one quote to have electricity ran to the shop. I may or may not do some of the initial wiring myself. Since I’ve never ran power from a transformer to a circuit breaker, I’ll leave that one to the professionals. I do feel comfortable installing circuit breakers in a panel and running the necessary wire inside the shop. Keeping things cheap(er) on electricity will be a priority
Pole Building Summary
All in all we’re quite happy with our pole building and excited to start using it. Lack of communication regarding start dates and deliveries was certainly a huge negative in the experience. We also had an inspector show up a couple times without notice and unfortunately things weren’t ready for inspection. Maybe it’s common, but you’d think the construction company could give a courtesy call if they weren’t ready for a previously scheduled inspection.
This was definitely a long, drawn out process. You may find builders with calendars more open, but at first, we were looking at nearly a year before our project would start. I wasn’t looking forward to a winter build, so I’m glad we were able to have things start late summer/early fall. Cold weather isn’t good for new concrete, I would have been concerned about a fresh pour in the middle of winter.
If you’re considering hiring a builder for any kind of shop, definitely do as much research as possible. Look for reviews online and see if you can visit some of their previous customers. One company we spoke to offered a handful of nearby locations to visit. They had proactively received permission from some of their customers to allow potential customers check out their buildings. If available, it’s a great experience to be able to get first hand impressions of the overall process and see the quality in person from their previous builds.
Warranty
Be sure to fully understand warranties. Certain portions of the building may have different periods of time covered. I need to read in detail the warranty from the builder and make sure to file it away safely. We also received a separate warranty for the siding and roofing material which is covered by the manufacturer. If we have any future material issues, we’ll need to go through them.
More Projects on Fabville!
Be sure to check out more of our projects on Fabville. Until next time…