The Cabin

Custom Wood Wall Plates for Nest Thermostats

After we bought our cabin, I wanted to make sure to install a smart thermostat. This would allow me to control the temperature setting from anywhere with the app on my phone. If we’re heading over to the cabin in the winter, I can pre-heat the cabin so it’s warmed up before we get there. I don’t know mind the cleaner installation of no wall plate at all (this is what I did at our house), but what you do if there’s a large hole? You could use the plastic wall plate that comes with it, but it didn’t quite feel right with the wood panel walls of the cabin. That’s when I started searching for other options, and found a few on Etsy. On our house there was about a 1/2″ hole in the drywall for the wires going to the thermostat. At our cabin however, we had a slightly large cutout (enough for a 1-gang outlet if I remember right). This is a photo of the Nest backplate mounted over the electrical box. I proceeded installing the thermostat with the included wall plate, but it certainly felt off to me. Certainly felt as though it stuck out like a sore them against the wood paneling, but also with the beige switch and outlet covers below. I’ll likely look at swapping those switch and outlets for something else later, possibly going with a wood wall plate for those as well. So, after a quick search I came across this wooden Nest wall plate on Etsy. This particular seller has different options including the painted design, but I opted for the mountains. It seemed quite fitting for our cabin. Unfortunately the screws that came with it were a bit too short, and I had to pick up some longer ones at the local hardware store. A fairly quick install though, and I think this looks quite a bit better than the plastic wall plate.

How to Build a Hidden Door Pool Cue Rack

This is another in-progress project I’m working on for the cabin. With the scrap wood left over from the Murphy bed cabinet I had enough to build a door. There’s a few kits available on the market for hidden doors, and specifically hidden doors with pool cue racks, but one’s I came across started out at $1200 USD and were made of particle board. With no particle board currently in the cabin, I didn’t want to start adding any. I’m still a novice with furniture woodworking, so I called upon my brother-in-law to give me a hand over at his shop. Some of our rough sketch work to figure out what we were trying to build. Definitely don’t try to follow our chicken-scratch. Planning out for your own build certainly advised though, measure twice, cut once. Building the Main Box of the Hidden Door Some photos as we built the initial box structure of the door, I’ll add more descriptions later. Several clamps keep everything in place for the glue to dry. In this photo, you see multiple sections for the back panel. I may have been able to get one single piece from the Murphy bed scrap wood cut differently, oh well. This ended up with 3 pieces. The upper shelf was positioned to hide the gap at the top. We also placed a trim piece to hide the lower section. Shelves for the Hidden Door Pool Cue Rack Originally we intended to have the barrel staves go flush to the edge of the door, however, re-thought our decision on this. The overall intent is to make the door as inconspicuous as possible and will have some fixed out trim. Based on this, the edge of the door will be hidden when closed. After spending a good amount of time figuring out how to notch the staves to fit flush, the idea was scratched. This image also shows a couple pool cues we used to determine rough placement of the shelves. I didn’t snap a photo, but we had shelves cut to width and traced the contour once the staves were cut to size. A fairly quick cut on the bandsaw, one last dry fit, and the shelves were ready to be drilled. Drilling the Shelves Forstner bits were used to drill the holes for the shelves. The lower shelf was drilled to a depth of 3/8″ an inch using the depth gauge on the drill press. The upper shelf was drilled all the way through. Routing the Edges A router was used to give a softer edge to the holes, a bit of a chamfered edge. Barrel Stave Biscuit Joints Here’s an image of a biscuit joint. Glue should be strong enough to hold the barrel staves in place, but I will also have screws from the door sides also holding them into place. The screws will be countersunk and plugged. Here’s the “lower shelf” where the pool cues will rest. Using a Forstner bit always lives a detent in the middle, but I plan to glue in some felt pieces later. Dry Fit Before Final Assembly of the Shelves A quick dry fit before the shelves were screwed into place (from the side and back). The barrel staves will be stained and final assembly later. Primary Structure Complete Here’s the end of our second day of work. The door was now ready to haul over to the cabin. I brought it back over to my house in our enclosed trailer. The door, along with the Murphy bed cabinet plywood will be hauled over to the cabin soon. I’m planning to use five standard door hinges. If they don’t work, I’ll look at other hinge options. At the Cabin and Hinged I was surprised, but I was actually able to fit the hidden door, all but two pieces of the Murphy bed cabinet, laminate flooring, and a handful of other items into our Tesla Model X. Didn’t have to wait on my dad or neighbor to help haul it over in their truck after all. Here’s the initial install: Hinges for the Pool Cue Hidden Door Rack There are some “specialty” hinges for hidden doors. Some of the ones I saw didn’t seem they would give the right pivot point I was looking for. I ended up installing a total of 5 standard door hinges. The package stated 2 hinges were rated for up to 100 pounds, 3 hinges could handle 150 pounds. I’m sure this door is quite a bit lighter than 150 pounds, but figured I’d go with 5 hinges just to help prevent any sagging. Re-Trimming the Doorway I pulled the cedar trim and had to cut and/or re-position several pieces. I also cut down a wider piece for the top trim that would keep the original trim location at the top, but also was now tall enough to cover the top of the door. Notice the light color of the knotty pine where the trim used to be. The previous owner had several pictures and other items on the wall. Where these were located showed varying color depending on how long they were there for. He had mentioned give it a couple years and it will darken. Wood Plugs My brother-in-law made some wood plugs from some scrap wood from the same plywood. They have a slight taper and with a bit of wood glue, will permanently hide counter-sunk screws. I used a Japanese flush cut trim handsaw for this. As the name implies, it gives a nice, flush cut. More on this tool later. What’s Next? I still have some sanding and staining on the door itself to finish up. Most of this work likely won’t happen until the spring when the weather starts to warm up. I’ll also work on a compartment for the bottom to store additional pool table items like the brush and extra chalk. The door is also going to require some shimming, I have some gaps on

How to Build a Barrel Stave Pool Cue Rack

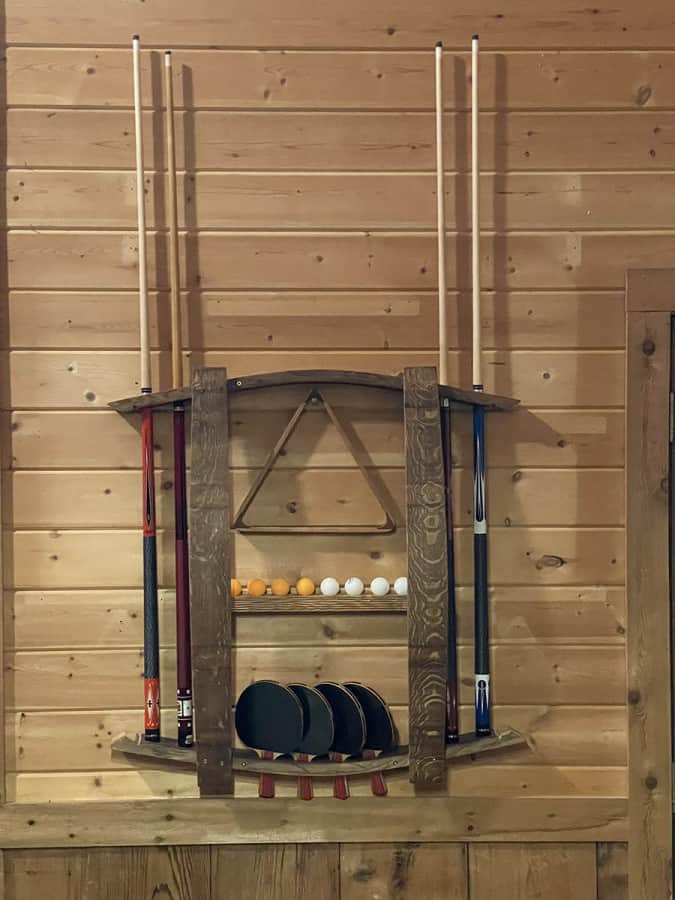
This is another in-progress project that I have underway. This post will be updated as I continue the project. Here’s a dry fit of what I’m building: A temporary screw to hold the triangle that will most likely be replaced with a wood dowel setup. Also using the bottom mount of a pool cue rack for the ping pong balls. Drilling the Ping Pong Paddle Holes After measuring the placement for the ping pong paddles, it was time to use a Forstner bit in the drill press. The largest Forstner bit I had was 1-3/8″, this hole was just large enough for the paddles we have, but probably would have otherwise gone up to at 1-1/2″ for some extra clearance. Initial Assembly Applying a Stain Here’s an initial coat of stain. I used a “dark walnut” varathane. More to Come I still need to add a “shelf” for pool cue chalk and conceal the screws. That’s all for now though!

How to Build and Install a Murphy Bed Kit

I recently purchased a Rockler I-Semble Murphy bed kit. This kit comes with all of the hardware needed to build a Murphy wall bed, minus the wood to build the cabinet. It also comes with dimensions for the plywood cuts to build the cabinet. I took advantage of using the cutting service at our local home improvement store rather than leaving with full sheets of plywood to have to cut myself. The associate let me know the upper headboard is below the minimum cut size. More than likely, I could have had it cut off first. Instead, I left with just one piece that still needed to be cut. With the left over “scrap” plywood, I had enough to build a hidden door. More to come on this build as well. Rockler I-Semble Murphy Bed Kits The I-Semble Murphy Bed Hardware Kits are available for vertical and horizontal configuration. They offer kits for twin, full, and queen size beds. Based on the room I’ll be installing our Murphy bed in, vertical was the only option for us. We also opted for the queen size. The Hardware Here’s everything that comes with the kit (minus the packs of bolts, nuts, and screws). Again, you have to purchase your own plywood for the cabinet. It also does not include #8 x 2″ screws, dowels, or wood glue. Also not listed in the instructions was an 8mm Allen wrench, more on that later. Tools Required (Not Included) Per the instructions (the copy I received was last revised December 2018), these are the required tools that are not included: Drill Saw Circular Saw or Table Saw Stud Finder Tape Measure Pencil 3/8″ Nut Driver or Socket Wrench I lightly used an impact driver for the bed frame Phillips Screwdriver Doweling Jig Drill Bits 13/64″, 5/16″, 3/16″, 5/32″, 3/8″, and 27/64″ #8 Countersink Bit 8mm Allen Wrench This was not listed in the instructions Quality Control Issue When I picked up the Long Center Frame Support, I could hear something rattling inside. I certainly didn’t want to have this sound occur every time the bed was raised or lowered, so I tried getting whatever it was out. I assumed it was either a piece of welding wiring or a piece of metal that was punched out. With a flashlight looking inside of one of the holes, it appeared to be a round piece of metal. It also sounded as though there were multiple. I tried getting it out through the center hole, but it wasn’t going to be easy. Next, I double-checked the instructions to confirm the center hole on the end bracket wasn’t used for anything, which it wasn’t. I then drilled a larger hole into the bracket to make getting these pieces out much easier. After widening the hole, these pieces came out fairly easily. I assume a stamping machine was used to punch the holes out on this piece and it wasn’t fully cleared when the end brackets were welded on. With that out of the way, it was time to start assembling the bed frame. Murphy Bed Frame Assembly Following the I-Semble instructions, everything is fairly straight forward. There are several bolts, nuts, and washers however, so it can be a bit time consuming. I laid out all the parts and began assembly. To speed things up, I did use an impact driver, but made sure not to apply any torque and used a socket and ratchet to get everything “hand tight”. Here’s the frame fully assembled: Slat Assembly I missed this at first, but there are actually two different slat caps. The double slat caps are intended to be used on the middle. I used them on the outside as well and ended up having to use a flat screwdriver to pry them back up and re-do the slats I had already completed. Per the instructions, you want to leave Row 8 and Row 20 open. This is to allow room to later install other pieces. Also, on queen size beds you’ll leave Row 11 open as well. I missed the queen size call out and had to remove Row 11. My inspectors calling out that I should not have installed Row 11 yet: Tip: I found it easiest to install the left and right slat caps, then push the middle cap into place. The instructions do you mention you may need to use a mallet, but I didn’t find this necessary. Your results may very. Cabinet Build The instructions call for the cabinet build to be done first, but I knew it was going to be a while before I was going to pick up the plywood. So, I assembled the bed frame first. For the queen size Murphy bed, you’ll need 5 sheets of 4’x8′ plywood. Wood prices have skyrocketed in the last year or two, but have started coming down a bit. I spent $71.58 USD for each sheet in November 2021. I went with a finished maple plywood, it has a veneer on one side. The veneer side will be used for the inner portion of my cabinet and I will either stain or add slats to the exterior. My goal is to get it assembled, then I’ll focus on some aesthetics later. Plywood Cuts This is as far as my build has gone. I have the sheets cut, but need to haul them over to our cabin and then begin assembly. The instructions do not include a cut diagram, so I mapped out what I thought would be the best cut layout for our queen size bed. Feel free to use these for your own reference, but I’m not liable. Be sure to verify your required measurements. Again, this is for the queen size Murphy bed. And here’s the cut layout I went with, once again, for a queen size bed: Assembling the Cabinet Here we go, cabinet time! At first I thought I’d have to bring most of the plywood for the cabinet