
Tesla’s electric cars are well-known for their reliance on technology. From their minimalistic touchscreen center consoles to their advanced safety and security features, Tesla vehicles are game-changers in the EV industry. For a first time electric vehicle owner, a Tesla charger may be foreign for new drivers and prospective buyers.
To remove a Tesla charger, first ensure the charge port is unlocked. Simply having your key card or fob with you also work. You can unlock the charge port via the Quick Controls on the touchscreen. Press and hold the charge connector button, and wait for the LED to turn white before removing the charger. You can also unplug the charger manually through the release cable located in the trunk, though this should be a last resort.
If you’re concerned about charging your Tesla or how to remove a charger from the car, then you couldn’t be in a better place. Read on as we break down several ways to remove your charger, even when it gets stuck.
Unlock the Charge Port
You can only remove the connector if your chargerport is unlocked because the connector is designed to lock when the car is plugged in and charging. This prevents a random person from walking up to your Tesla and unplugging it.
Press the Charge Connector Button
Once your car is unlocked (or with your key fob or key card nearby), the next step is to press and hold the button on the connector for two to three seconds. The LED on the charge port should turn white to indicate that the connector is safe for unplugging.
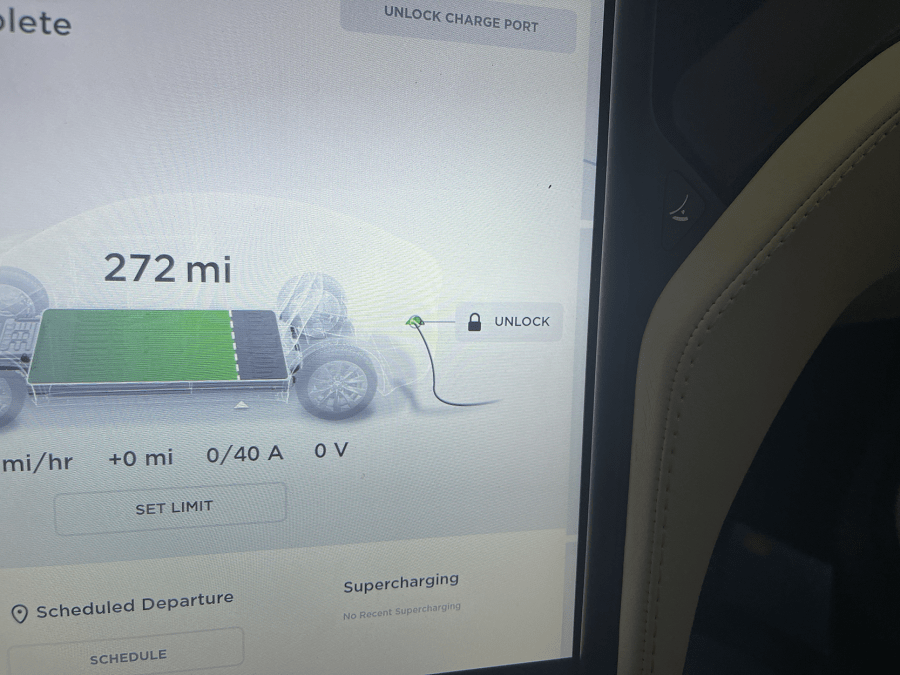
The charge port can also be unlocked through the touchscreen in the quick controls menu:
Manually Release a Tesla Charge Cable
Tesla’s have a manual release cable. Be sure to follow the instructions in the owner manual for your specific model as these steps and precautions may be updated. The release cable is located in the rear trunk area on the driver side. These are the current steps listed in the Model X Owner’s Manual.
If the usual methods for releasing a charge cable from
the charge port (using the charge handle release button,
touchscreen, or mobile app) do not work, carefully
follow these steps:
- Ensure that Model X is not actively charging by
displaying the charging screen on the touchscreen. If
necessary, touch Stop Charging. - Open the rear trunk.
- Pull the charge port’s release cable downwards to
unlatch the charge cable. - Pull the charge cable from the charge port.
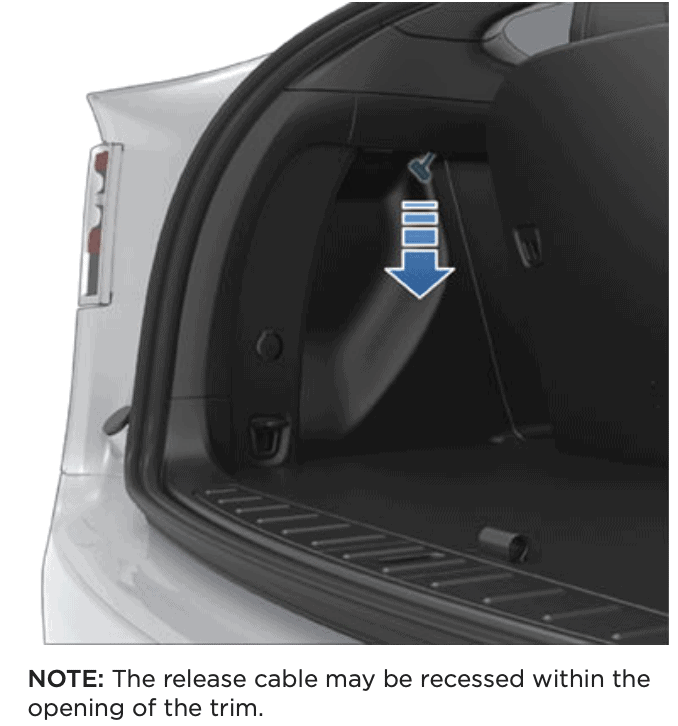
CAUTION: Use the release cable only in situations where you can not release the charge cable using the usual methods. Continuous use can damage the release cable or charging equipment.
When To Be Cautious
Please note that Tesla strongly advises against using manual cable release techniques frequently. The EV manufacturer insists that the release cable or levers are for situations where the normal charger release methods don’t work.
Another precaution given by Tesla is to refrain from manually releasing the charger cable when the car is charging. Removing the cable when the vehicle is charging can lead to electric shock and serious car damage.
Tesla further adds that you should never pull the release cable and the charger cable simultaneously. The right way to do things is to pull the release cable before you attempt to remove the charger cable from your car. Doing both activities at the same time increases the chances of electric shock and car damage.
If the vehicle is still charging, stop charging via the touchscreen.
What if My Charge Connector Is Stuck and the Charge Port Color Is Yellow?
Your charger connector is likely to get stuck when incorrectly positioned in the charge port. In such situations, the charge port color will be yellow, an indication of incorrect connector positioning. Pressing the button on the connector will only make the situation harder and more confusing for you.
Instead, push the connector carefully such that it fits firmly in the charge port. Observe if the charge port LED switches to flashing or solid green. If the LED is green, the car is fully plugged in. You can then press the connector button and safely remove it from the charge port.
Understanding Tesla’s LED Lights
Going through your owner’s manual is integral to safe and efficient Tesla charging. You should understand what the LED lights mean and how to navigate past the various colors. Below is a brief explanation of what some LED lights mean when charging a Tesla Model 3.
- White: A white color means the charge port door is open and your car is ready to charge, but the connector is yet to be inserted. White also signifies that the port latch is unlocked, and it is safe to remove the connector.

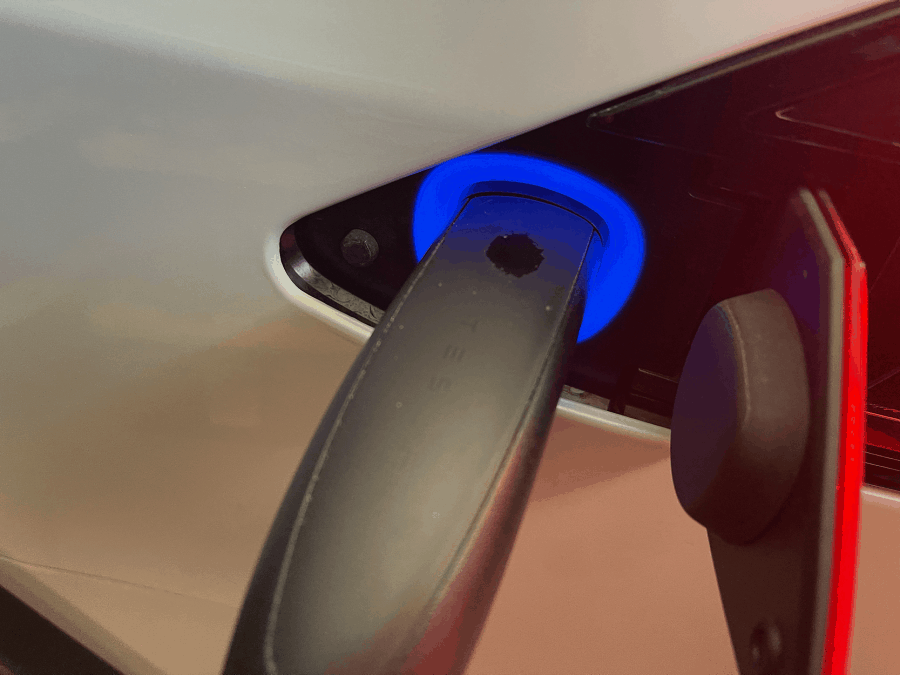
- Blue: A blue light indicates that the connector has been plugged incorrectly. A blue blink is a sign that the car is in communication with the connector and is preparing to charge. It could also indicate that the car is scheduled to start charging at a specified time.
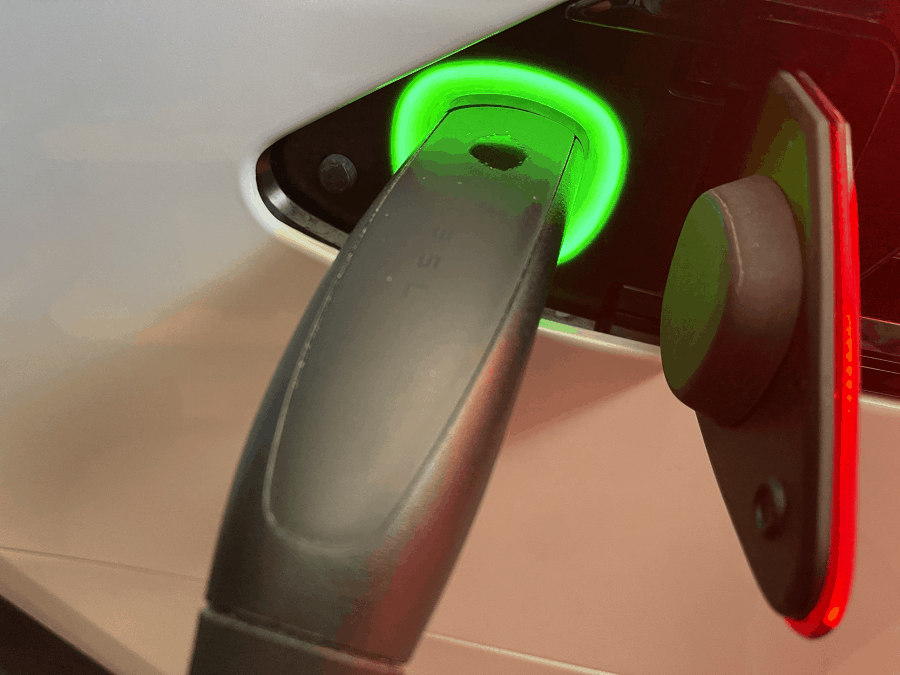
- Green: Blinking green signifies that your Tesla is charging as expected. The frequency of the blinks tends to reduce as the car approaches full charge. A solid green should then follow after a while, indicating that the car is fully charged.
- Amber: Be wary of solid amber as it is an indication that you’ve not properly or fully plugged in the connector. In such situations, try realigning it and inserting it fully inside the connector. Blinking amber is usually a sign that your Model 3 is charging at a slow pace (AC charging only).
- Red: Red is a danger sign indicating that charging has come to a halt due to a fault. Proceed to check for a fault message on your touchscreen whenever red appears on the charge port LED.
Charge port LED colors can change depending on the model you’re using. However, these are standard LED colors associated with most Tesla releases. But to be on the safe side, always consult with your owner’s manual to ensure you understand exactly what each color or blink means.
Final Takeaway
Removing a Tesla charger from the car isn’t rocket science. But without following the right procedures, the process can prove daunting, especially for new owners.
Use your key fob, key card, or mobile app to unlock the car before pressing the button on the connector. Luckily, you can also opt to remove the connector manually by pulling the release cable located in the trunk. Always check on the charge port color to know whether the connector is firmly in place.